


If you have read my introduction to single sign-on, you already understand the concept. In this one we get practical.
We are going to configure SAML SSO in Pega using Okta as the identity provider – end to end. From provisioning users in Okta, to creating the authentication service in Pega, to restricting access based on department attributes from the SAML response.
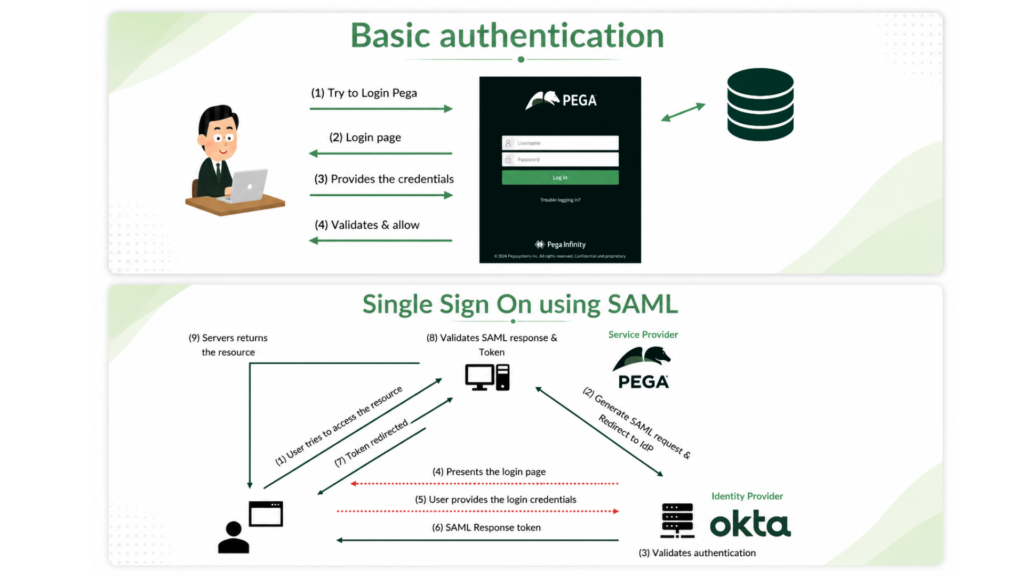
This is the kind of setup you will encounter on almost every enterprise Pega implementation.
The Three Parts of This Setup
There are three distinct roles involved – the Okta administrator, the Pega developer, and the connection between them. Understanding this separation matters because in a real project, these may be different people, and both sides need to exchange specific details to make the integration work.
Part 1 – Okta Administrator Setup
The Okta administrator is responsible for provisioning users in the Okta directory and creating the SAML app integration that represents your Pega application.
When creating the app integration, the Okta administrator needs two pieces of information from the Pega team – the assertion consumer service URL and the SP entity ID. These come from the authentication service rule in Pega under the service provider settings. The Pega developer creates the authentication service first, copies those values, and hands them to the Okta admin.
Once the SAML app is created in Okta, the Okta administrator can export the IdP metadata – issuer, single sign-on URL and signing certificate – which then gets imported into the Pega authentication service.
The Okta administrator also assigns users or groups to the application and can configure attribute statements in the SAML response – first name, last name, email, department – that Pega can read and map to operator properties.
Part 2 – Pega Authentication Service Configuration
In Pega, you create a new authentication service of type SAML 2.0. After importing the IdP metadata from Okta, the key configurations are the authentication service alias – which forms part of the login URL – operator identification settings, operator provisioning and attribute mapping.
For operator identification, you map the unique identifier from the SAML response – typically the name ID or email – to the Pega operator ID. This is how Pega knows which operator to load or create when a user logs in via SSO.
For new operators, you can enable automatic provisioning using a model operator or a data transform. The model operator approach copies an existing operator’s settings as a template. The data transform approach gives you more control to initialise specific properties – access group, organisation, division, unit – programmatically.
The mapping tab is where you connect SAML response attributes to Pega operator properties. First name maps to py first name, email maps to py email address, and so on.
Part 3 – Controlling Access With Post-Authentication Activity
This is where things get interesting for real enterprise scenarios.
After a user successfully authenticates via SSO, Pega runs a post-authentication activity before granting access. This is where you can apply business logic – like restricting access based on a department attribute from the SAML response.
Pega loads all SAML response attributes into a data page – D_SAMLAssertion – which you can access in any activity or decision rule. You loop over the attribute statement, check for the department attribute, and if the value matches your target – say the claims department – you assign the right access group to the operator. If it does not match, you assign the unauthenticated access group and fail the authentication policy.
One important thing – always reinitialise the access group at the start of the post-authentication activity, not just for new operators. An employee’s department can change. Every login should re-evaluate and re-assign the right access group. If you only set it during operator creation, a user who moves teams will carry their old access indefinitely.
Also remember to call obj.saveAndCommit in the post-authentication activity if you want operator property updates to persist.
Testing With SAML Tracer
The SAML Tracer browser extension is genuinely useful here. It lets you inspect the SAML request and response in real time – including the relay state, the assertion consumer service URL, and all the attribute values coming back from Okta. When something is not working, this is your first place to look.
Watch the Full Walkthrough
In the video below I walk through every step live – Okta admin setup, creating the authentication service in Pega, testing the first SSO login, adding attribute mapping and implementing the department-based access restriction using a post-authentication activity.
SAML SSO is one of the most requested topics I get asked about. This video covers the full implementation from both sides of the integration.

