


In this blog article, we will see how we can classify the nodes.
I suggest you to go through the previous articles on System name and Nodes Introduction.
Why to classify nodes?
Effective resource allocation
Imagine an Insurance organization using Pega application for Sales activity. End users login to the Pega applications creates sales case and executes the processes. There is a different JavaScript application that generates Leads for Insurance products based on real-time data processing. The real-time lead generation is via Kafka events. There can be millions of real-time Kafka events coming into Pega application for processing.
Now do you want to do the event processing in the same server where the end users login and do Sales processing?
It is pretty clear that Kafka event processing can eat up a lot of system resources!!
Also if the Pega application uses multiple file processing and email processing (background processes) again this can impact the system performance.
Pega introduced the Node classification to make use of the system resources effectively. Servers can be classified based on it purpose.
So what is node classification?
Process of separating nodes (servers) by purpose.
Out of the box, Pega provides different options to classify the nodes.
Currently, there are around 16 node types come out of the box.
Just open any listener form and check the available node type classifications.

These are all the available Pega node types.
All these node types fall into two categories
1. Pega-provided node types
Background processing – The assigned node type can be used for all background processing (Listener, agents etc)
BIX – The assigned node is used for Business Intelligence Exchange (BIX) jobs.
Custom1,2,3,4,5 – Additional node types, that can be used for any custom use cases.
Search – This node type is used for search indexing for elastic search.
Stream – This node type is responsible for Kafka based stream processing. Queue processors uses the Kafka stream processing.
WebUser – Used for web application processing. Usually the end users can login to this assigned node type
2. Decision strategy manager node types
Pega introduced the below node types to support the decision framework. Since decisioning usually involves huge data (live data), Pega wants to classify them in separate nodes.
ADM – This assigned node type uses the Adaptive Decision Manager service
Batch – This node type runs the DSM batch processes.
DDS – Decision data store
RTDG – Real Time data grid service
Real time – Other real time processes
Other node types
Universal – It is like all in one. All background processes also can run on this node type.
Important note: As a best practice, Pega recommends not to use the Universal node type.
Note: If you do not configure node classification, node may start with Untyped node classification. In later Pega releases, Pega adds the default node types – WebUser, BackgroundProcessing, Search and Stream, when you don’t specify any node type.
Let’s see the default node classification for our personal edition server.
Launch the admin studio.
Click on System & Nodes link. You see the personal edition server is classified as ‘Stream, BackgroundProcessing, WebUser, Search’ node types.

Where do you do the node type configuration?
All we need to do is set the JVM argument –DNodeType
JVM argument – refers to the parameters that are passed to the Java Virtual Machine (JVM) at the time the application is launched.
The location varies based on the application server. For the tomcat server the configuration stays in your setenv.bat file
C:PRPCPersonalEditiontomcatbin
Open the setenv.bat file

You see, there are 4 node types defined.
You can remove Search or stream, then restart the server. You can see the changes in admin studio.
Let’s see how the 4 node types are used.
a) WebUser – this is where the end users will be asked to login. Make sure to provide the WebUser classified node to the end users login. If you use the load balancer URL, configure the WebUser nodes to be used.
b) BackgroundProcessing – As we saw before, this node type is responsible for performing the background processes.
Currently – Listeners, Agents, Queue processors and Job Schedulers can run on this node type.
Note: Queue processors also make use of stream node type for Kafka processing.
By default all the Out of the Box (OOTB) agents, listeners, job schedulers and queue processors were all configured to run on background processing node type.

Make sure when you use new agents and listeners, tag it to the BackgroundProcessing node type.
Note: There may be some scenarios, where you need to run the agents on one specific node. You can either tag the agents to custom1, or any new node type ( we will see at the end how to create new node type) and specify the same name in the agent rule form.
c) Search – This node type is used for search Indexing in elastic search.
Navigate to Configure -> System -> Settings -> Search

On the search landing page, you can see the Indexing on rule, data and work instances.
I am not going to explain all the configuration on the landing page.
You will see the search node type is added by default in the search node block. Server restart does this job automatically.

You can see the elastic search file directory, node ID and node status.
d) Stream – This node type is responsible for Kafka based stream processing.
Navigate to Configure -> Decisioning -> Infrastructure -> Services -> Stream

The landing page will give you the list of available stream nodes.

This node now serves as a Kafka broker. You can stop, start, and decommission the stream nodes.
The Kafka series is up next.
We saw there are 16 Pega provided node types. You may get a question, can we add additional node type?
The answer is Yes!
Mostly it is not needed to create a custom node type!
What is the standard ratio for node classification?
First, each node corresponds to a server or a machine. Running a machine means you need to set up the right infra, you need to buy the license for the infrastructure. It is all money baby ???? Unless you use a lot of open source tools, you may need to spend a lot on running servers.
So basically in many projects, we may have one or two development, and test servers and in Production there can 4,8,16 whatever servers are based on the need.
You need to make the right decision and use the available resources effectively!
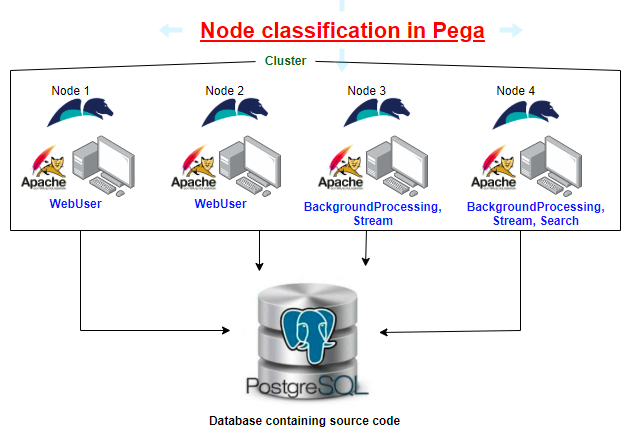
Let’s say there is an application with around 100 users and quite a lot of listeners and agents for background processing. In production, It was decided to have 4 servers(Server A, Server B, Server c, Server D). So, how do you classify the nodes?
This is my recommendation.
Note: One server can always classified or tagged to multiple node types.

WebUser – 2 nodes will be dedicated for WebUser, so that only end users use those servers.
BackgroundProcessing – Since we have a lot of listeners and agent processing, 2 nodes are dedicated to background processing
Search – One node is dedicated to search Indexing
Stream – This is similar to background processing and so two nodes are dedicated.
Important note: There is no standard rule for node classification. You can always decide the numbers based on your application needs.
How to create a new/custom node type?
Let’s say there is a background process (LMSProcess) that needs to run all day. The decision was made to use a dedicated server to handle this process. In Pega, we can create a specific node type – LMSProcess, so that it is totally dedicated and so no other process runs on this node J
Step 1: Add the applicable node types in the setenv.bat file
Important note: you cannot directly set the new node type in –DnodeType JVM argument. You need to make the node type as applicable, else server startup will fail Add a new JVM argument –DavailableNodeTypes and specify all the applicable node types.

As we saw, by default all 16 node types are applicable. Now by defining this JVM argument, you restrict the applicable node types to 5 node types.
By restricting the applicable node types, you can choose only these 5 node types in file listener, agents etc.
Step 2: Save the file and restart the server.
Step 3: Verify the node type argument.
Check in the admin studio.

Step 4: Verify the applicable node type argument.
Open any listener form.

You see the node type lists only the 5 applicable node types specified in the setenv.bat file. Newly added Node type is also there.
You can tag the node type similarly in agents, job schedulers and queue processors as well.

Okay, we are done with Node classification.
As a summary,
– Pega personal edition server is configured with four node types – WebUser, BackgroundProcessing, Search and Stream.
– You can always edit the node types using JVM argument –DnodeType in setenv.bat file
– Agents, listeners, job schedulers and queue processors can make use of node classification.
– You can also add custom node types using –DapplicableNodeTypes JVM argument
Hope you liked the node classification series. I enjoyed myself writing this series.

