OAuth 2.0 – Part 2 – Pega as OAuth Client – Client Credentials Grant Type

This is the continuation of the previous blog article. In this article, we will see how Pega can act as an OAuth client using the Client credentials grant type.
The article was created using earlier Pega 8 version! but the core concept remains the same! Use this blog article to learn the concepts and you can try the entire tutorial in the latest versions as well.
For a better understanding please go through the below article first to cover the basics about OAuth 2.0.
What is client credentials grant type?
This is often used when the protected resources are under the control of the client.
Say for example – ABC is a banking organization and they have their own X (formerly Twitter) account for customer servicing. Here twitter is the OAuth provider and the protected resource (tweets directed to the ABC Twitter handle) are indirectly under the control of ABC. Here trust is already maintained.
You don’t need to manually authorize your access. This is mainly used when the client is the application and not a user.
This is again a widely used OAuth grant type in Pega.
One additional piece of information is whenever you register any client with the resource, you will be provided with a client-ID and client-secret (this is not the same as login credentials). So, with these credentials, you can directly request the access token.
Enjoying this content?
Access the author’s full video courses here at MyKnowAcademy.
Explore Courses →
The flow for the client credentials varies a little from the standard OAuth flow.
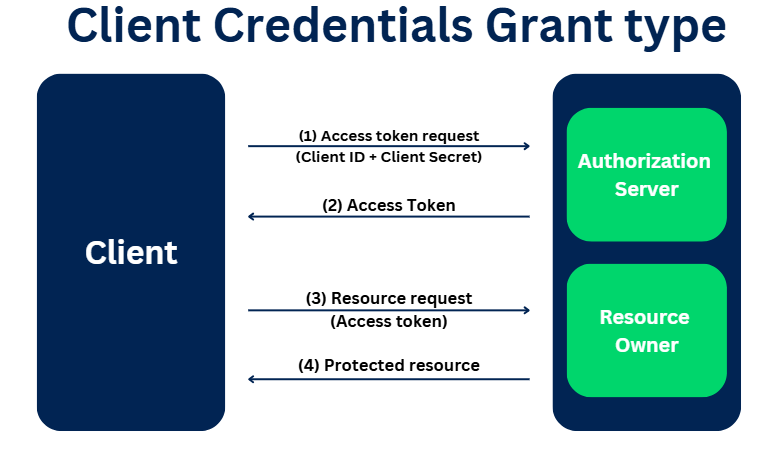
(1) It starts with an access token request. It skips the authorization code step. The client credentials (ID and secret) are passed in the request)
(2) The authorization server validates the client ID and secret and sends the access token post successful validation
(3) & (4) With the access token, the client can access the resource.
In the last article, we have successfully configured an application in twitter. We will start using it in Pega!!
The below demo was created years before using X (Formerly Twitter). You can just go through the tutorial to understand the OAuth 2.0 Concept.
How to implement OAuth authentication in Pega connectors?
Mainly there are two rules involved to configure Pega as an OAuth client in connectors.
a) OAuth 2.0 providers
b) Authentication profile
What is an OAuth 2.0 provider instance?
– It is a data instance that represents an external application pega connects to. (the authorization server or the resource server) They provide the OAuth service to pega applications.
In our examples LinkedIn, Twitter are the OAuth 2.0 providers.
As usual pega ships with a lot of samples or templates for OAuth providers 😊
Records -> Security -> OAuth 2.0 providers
You will the connection details for a lot of social networking sites!

Click and open Twitter.

Let’s see some important fields in the OAuth 2.0 provider instance.
Grant types – Client credentials, Authorization code, Password credentials. You see 3 out of 4 grant types we saw in the introduction post is supported by Pega.
Note: It is a checkbox and so you can have more than one grant types configured in a single provider instance.
Access token endpoint – You know without an access token, OAuth is nothing, so it is obviously mandatory!
The providers (Twitter, LinkedIn) should be responsible for providing these endpoints.
Authorization code endpoint – This is necessary when you use the authorization code grant type.
On hitting this endpoint, you will get an authorization code after successful authentication.
Revoke token endpoint – There is an option to revoke the issued access tokens.
Note: All the above three endpoints are usually provided by the OAuth providers in their API guide.
Client authentication scheme – This is applicable for client credentials grant type.
You can send the client ID and client secret (client credentials) in 2 ways

a) Basic – send as the authorization header
b) POST – Send in the body of the POST request.
This will vary based on the provider configurations.
Send access token as – We know that to access the OAuth protected resource, we need to send the access token along with the request.
You can send the access token in two ways.
a) Authentication header
b) Query string parameter.
Again, the decision will be based on the OAuth provider configurations.
Security settings
Some secure configuration that corresponds to SSL https settings.

I have a dedicated post on SSL topic. Please refer it for more details.
https://myknowtech.com/tag/ssl
You can click and open the OAuth provider instances for other providers and see how it vary.
It is not restricted to use only the shipped OAuth provider instances. We can create a new one OAuth provider and connect to them as well.
Records -> Security -> OAuth 2.0 provider -> create new.
You need all these configuration details from the provider system. For now, we will use the existing Twitter instance.
Authentication profile –
What is an authentication profile instance?
It is a data instance that identifies the authentication details that is necessary to connect to a secured application.
Tip: Always it is better to create an authentication profile instance for the connecting system, so that the same instance can be used across connectors accessing the connecting system. This make the maintenance easier. Also with OAuth, Authentication profile is mandatory!!!
In the coming tutorial we will just concentrate on the configuration points for OAuth authentication profile instance.
Now we are ready to consume the OAuth protected Twitter API.
I am going to check some users Twitter timeline. Below is the endpoint URL
https://api.twitter.com/1.1/statuses/user_timeline.json
Below is the API documentation for our requirement – https://developer.twitter.com/en/docs/tweets/timelines/api-reference/get-statuses-user_timeline
You can find the request and sample response in the above link.
How to include OAuth authentication in connect-REST?
Let’s start with the wizard
Step 1: Designer studio -> Integration -> Connectors -> Create REST Integration – start the wizard
Step 2: provide the endpoint URL. You will see the resource path formed

Step 3: Specify the query string parameter. Based on the API documentation, I am using the screen_name query string to get the timeline for the usernames.

Step 4: Specify the authentication details
Click on Add authentication and select create new.
Follow the below configurations –
authentication scheme – select OAuth 2.0
Now you know the choices of authentication profiles. We will concentrate only on OAuth.

OAuth provider – select the already created/defined provider. We will use Twitter.
Grant type – client credentials are predefined.

Client information –
Remember, in the last article, we registered a client application with Twitter developer account. Use the same client credentials.

Copy and paste in the client ID and secret fields.

Scope – this defines the permission level. For this API, scope is not a mandatory field, so leave it blank.
Redirect URI endpoint – This is used for the authorization code grant type to redirect back to pega with the authorization code. For client credentials grant type leave it blank.
Use refresh token, if available – First thing is every access token will have some expiry time. So, some providers provide an option to automatically refresh the tokens. For Twitter it is not supported so leave it empty.
Additional endpoint parameters – leave it empty.
Click next.
Step 5: Choose the GET method in the resource tab

Step 6: Provide the data model for response.
We have two options. First, we will try out ‘Add a REST response’ option.

Again, I am checking Virat Kohli timeline. Success response.

But you cannot use this option directly to generate the data model because of some delimited characters in the raw response.
I suggest using the sample response provided in the API documentation.
https://developer.twitter.com/en/docs/tweets/timelines/api-reference/get-statuses-user_timeline#

Copy the entire content and paste it into the online JSON editor – to verify the syntax.
Once done save it to your local disk.
In the following sample response, you may get parse error for link reference tag.

Just make the source field value empty.

Use the Add a File option and add the saved JSON file.

Step 7: Complete the wizard to generate the rule
Note: I just created all the layers and I didn’t follow standard naming conventions 😉

Let’s test the OAuth authentication.
Step 1: Open the newly created data page.

Step 2: Run the data page to test the connection
This time checking out on Iron man!!


We saw in the Understanding blog article, that there will be two calls to the service provider for client credentials grant type. The first call to get the access token and then the second call is to get the protected resource (tweet timeline)
So, who performed the first call to get the access token?
Go to App explorer and click on the class instance – Data-Admin-Security-OAuth2-AccessToken.
You see there is an instance saved in Pega.

Click and open the instance and then check view XML.

You will not see any expiry date for this, because Twitter do not expire the access token explicitly.
Now we know access tokens are saved as a pega instance.
Do Pega have any OOTB connect REST rule to get the access token? Yes, but all are hidden inside engine API library.
Open the engine API window. You will see valuable Java classes corresponding to OAuth2.

So based on the grant type in the authentication profile rule, engine API will execute the necessary functions and retrieve the access token.
We will dive deep into the next blog article, we will use the authorization code grant type.