Job Scheduler – Usage & Configurations
In this blog article, we will see all the configurations for the Job scheduler rule and how to replace an advanced agent with Job scheduler.
What is Job Scheduler?
As the name implies it is used to schedule jobs.
Job scheduler got introduced on Pega infinity (Pega 8) release and set to replace the advanced agent rules.
It belongs to SysAdmin category.
What is a job in Pega terms?
All the Pega applications use some type of job – normally those are kind of background jobs. For example – sending out notification emails, cleaning up your Pega nodes, etc.
One of the main rules that is responsible for executing the job is Activity. Activity can in turn use other rules to perform the job.
Till Pega 7, the Agent rule controls and schedules the activities to perform different background jobs. With Pega 8, the Job scheduler rule will be used to control and schedule the Job or the activity.
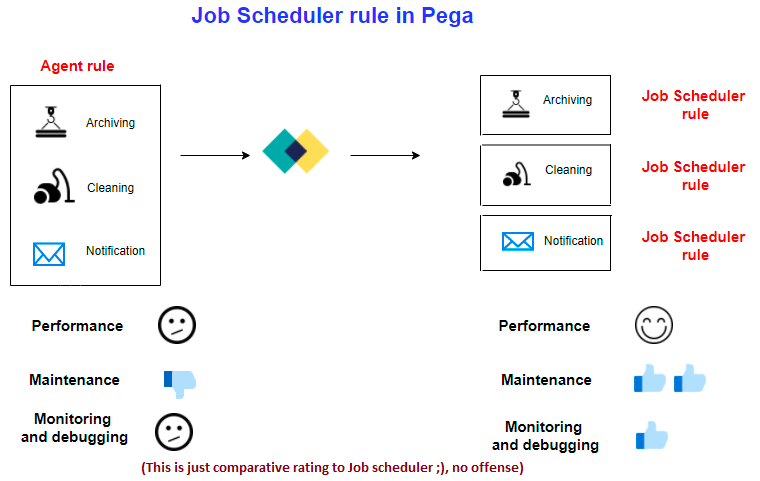
Before starting with the configuration of Job Scheduler rule, let’s briefly compare the advanced agent against the Job scheduler rule.
Difference between Job Scheduler and Advanced Agents
1. Rule configuration
Agent rule is tightly tied with a ruleset name and includes one or more jobs or advanced agent activities along with standard agent activities in a single agent rule. Configurations like access group is applied to all advanced agent activities in the single agent rule.
Each Job or the advanced agent activity needs to be replaced with an individual Job scheduler rule. So configurations can be applied individually for each job.
AsyncProcessors/System Runtime Context is used to resolve the job scheduler rules.
2. Agent schedule disappearance
Agent schedules are the data instances created for the agent rule. These data instances can be easily updated in production to enable or disable the agents.
With the Job scheduler and queue processors, no more agent schedule instances. Using admin studio, we can easily enable/disable the job schedulers.
3. Performance
Similar to advanced agents, Job schedulers can also be scheduled to run on a node basis.
Pega claims that Job scheduler processing is more efficient in performance comparing using Advanced agents.
4. Monitoring and diagnostics
Both the advanced agents and Job schedulers can be managed using the admin studio landing page.
There are some configurations, you can do to gather the performance statistics.
You can follow the link for more details – https://community.pega.com/knowledgebase/articles/system-administration/84/configuring-performance-tool-job-scheduler-rules
The above article talks about storing the Job scheduler performance statistics under pr_perf_stats table.
To know more about the perf stats table and columns, you can check this link – https://community1.pega.com/sites/pdn.pega.com/files/help_v718/procomhelpmain.htm#howto/howto2/logusagetable.htm
Okay. Now let’s look at some OOTB Job schedulers.
OOTB Job Schedulers
Step 1: Switch to admin studio
Click Resources -> Jobs
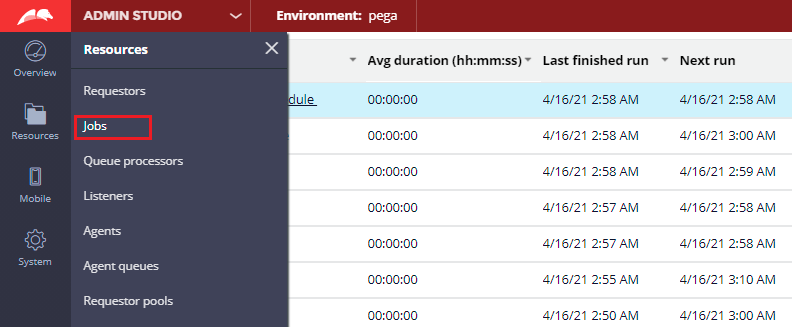
There you should see all the OOTB jobs.
Note: The OOTB jobs in the list vary based on the Pega version.
Click and open the Job – pzDelayedQueueProcessorSchedule
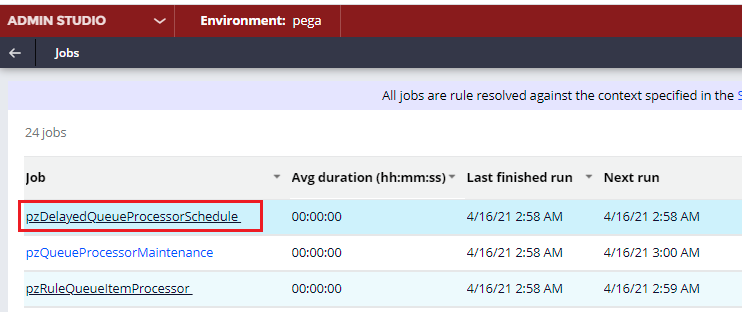
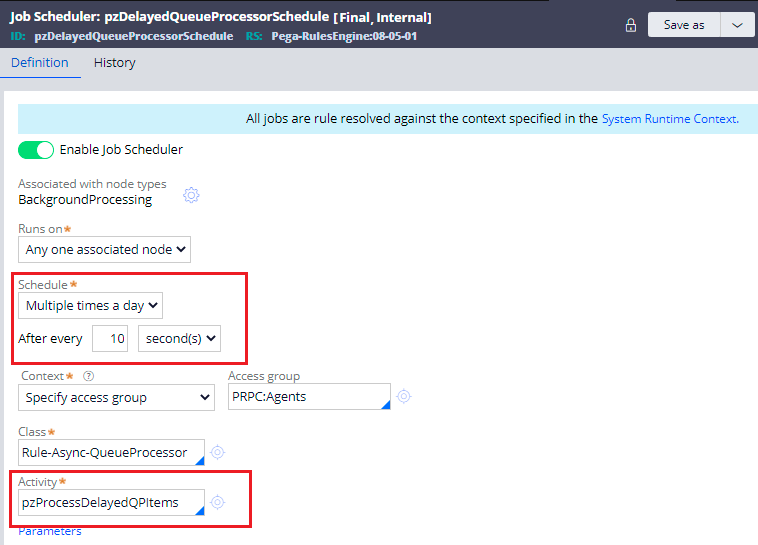
You can see the configurations of the corresponding job scheduler rule.
You see the OOTB job, runs every 10 seconds and executes the activity – pzProcessDelayedQPItems.
Note: This is an interesting Job scheduler that is responsible to process delayed queue item entries
Remember in my Queue processor post, we discussed delayed queue processing. When we delay the queue processing, it makes an entry into System-Message-QueueProcessor-DelayedItem with pzTimeForProcessing that gives the time at which it needs to be processed.
At the deadline time, the message should be pushed to the Kafka topic for queue processing. The Job you see in the above screenshot helps to perform that job of pushing 😄
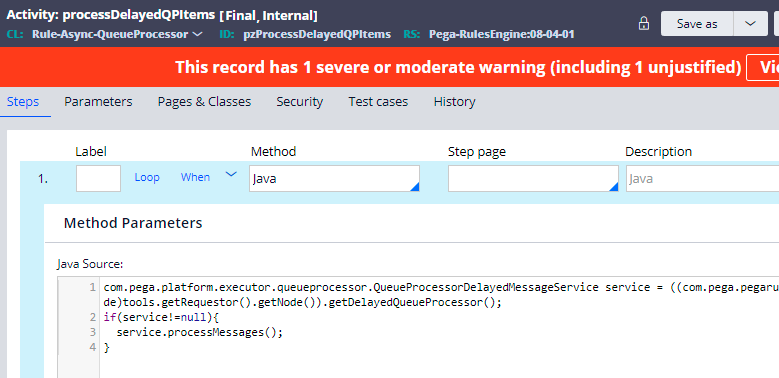
Till now we saw, Pega by OOTB schedules jobs to perform certain system operations.
Again, you can make a decision to either enable or disable the Jobs from admin studio. Most of the OOTB jobs are meant to serve some important purpose, and do a thorough analysis before disabling. Also, Pega doesn’t allow you to disable the main jobs.
Try disabling the Delayed queue processor schedule from the admin studio. You cannot override, because it will break the queue processing!!

What are the business use cases for a job scheduler?
1. Sending out an email
This is one of the common use cases of Job scheduler where you need to schedule sending out emails to customers, team or it can be an error notification to users.
2. Statistics and calculation
You may have a use case where you need to calculate some counters– for example, days past due amount for the loan application, to calculate the due amount every day. You may need to gather some application statistics periodically.
3. Clean up
You may need to clean up some old cases, interactions, data instances periodically from your system.
So basically, for the use cases that involves some background jobs to be done in a periodic manner, Job scheduler is the best solution.
Let’s start with the configuration of a new Job Scheduler rule.
What are the configuration points of a Job Scheduler rule?
Create a new Job Scheduler
Records -> SysAdmin -> Job Scheduler -> Create new
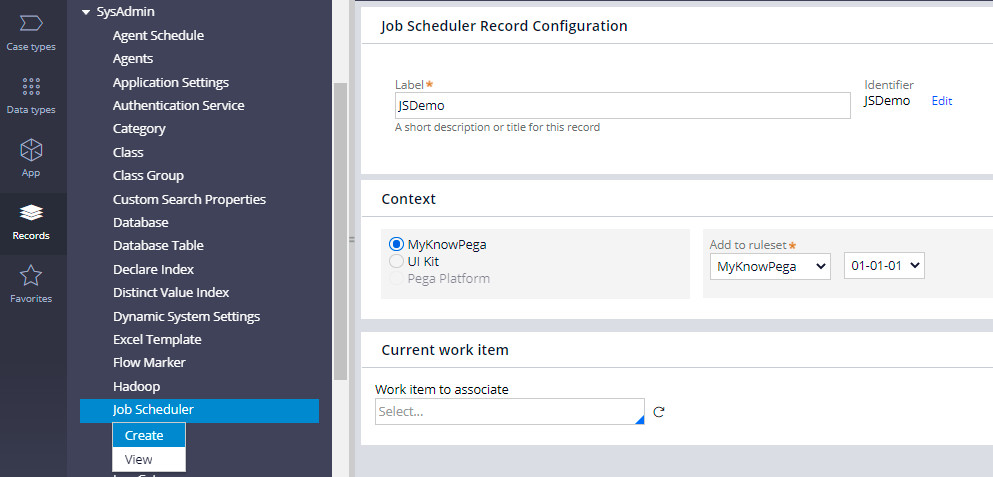
There is a single main tab to configure
Definition tab
Enable Job Scheduler – A toggle button. This is self-explanatory. You can either enabled by default or keep it disabled for now and enable it later point in time.
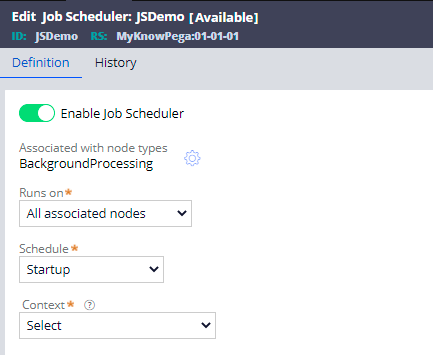
Run on node types –
Every Job scheduler should be associated with the node type. Using the settings icon, you can associate the Job Scheduler with one or more node types.
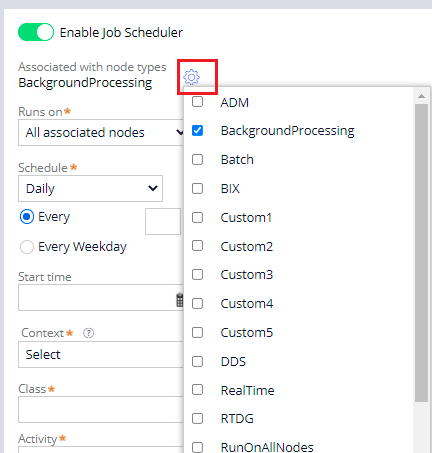
Most of the Job schedulers are associated with Background processing node that is dedicated to performing background jobs. If needed you can associate with other node types to run the job.
For more details on node classification, you can visit my blog article.
Runs on – You can choose two options.
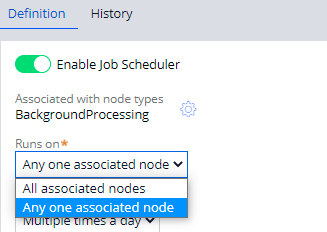
a. All associated nodes – With the node classification, each node/server will be associated with the node type. So if you associate with node type = background processing, then with this configuration, the job runs on all the nodes that are tagged to background processing node type.
b. Any one associated node – Most of the time, you want the job to be running only once at a time. Your associated node type – say background processing has two nodes/servers running and hence your job can run twice at the same. For example – sending out an email at 11 PM. You don’t want to send the same email more than once. In such a situation, you can use Any one associated node option.
Scheduling –
There are three main types of scheduling
- Startup
- Periodic
- Recurring
Startup schedule – If you want to perform any job at the pega server start up, then you can use this option. Few OOTB Job schedulers use this scheduling to persist node details or other statistics at the time of startup. So it just runs one time at the server start up. Next run will be on the next server start up.
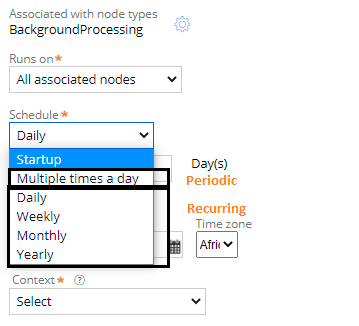
Also this option is visible only when you make the Job scheduler to run on All associated nodes.
Periodic schedule –
Use the option – Multiple times a day.
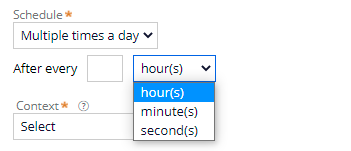
Here you can configure to run the job after every 5 seconds or every 5 minutes or every 5 hours, whatever every you want 🙂
Recurring schedule –
You got 4 options here
Daily –
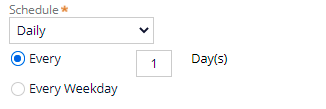
You can schedule to run every 1 day, every 2 day to every ‘n’ day you want. Also you can schedule to run every weekday alone.
Weekly –
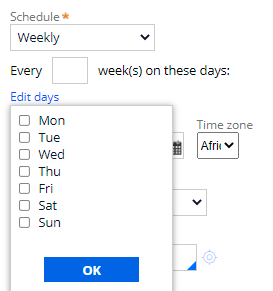
Similar to daily schedule, here you can schedule every 1 week, 2 week to ‘n’ week. You can select the days on which it can run.
Monthly –
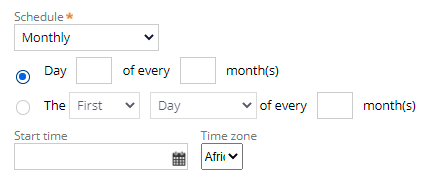
Here you have quite lot of configuration to run on any day on a month on a monthly basis. You can just check on different options.
Yearly –
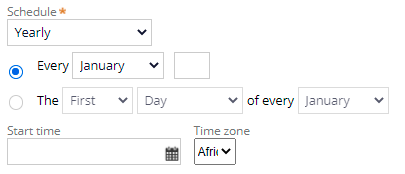
Similar to monthly schedule, you get lot of configurations to run job yearly at any date.
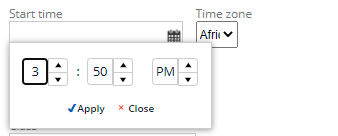
With all the recurring options, you also get a start time and time zone on which the job starts.
Class and Activity –

Here you can specify the main job activity that is responsible for the operation.
For now, I created a demo activity that just logs an entry on execution.
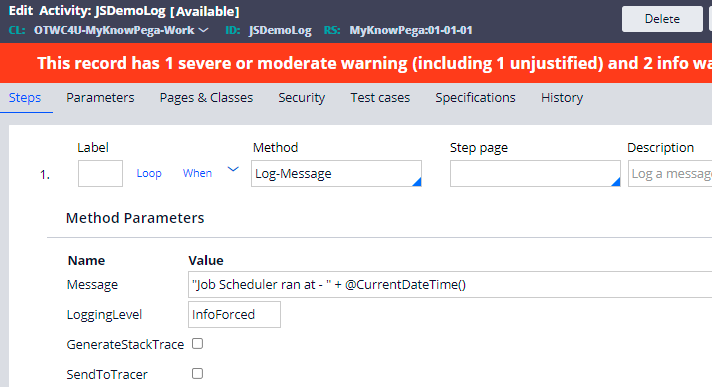
Context – To rule resolve the Job activity, you need some application context right. Context helps in specify the application context under which the job activity can be rule resolved.

You see either you can use System Runtime Context or you can specify the access group.
For Pega 8.1 and 8.2 versions, you will see AsyncProcessor requestor type option instead of System Runtime Context.
For more details on both options, you can visit my previous article on it.
Let’s come to the Alerts configuration at the end of the post!
For now, below is my configuration for the Job scheduler. It runs every 1 minute.
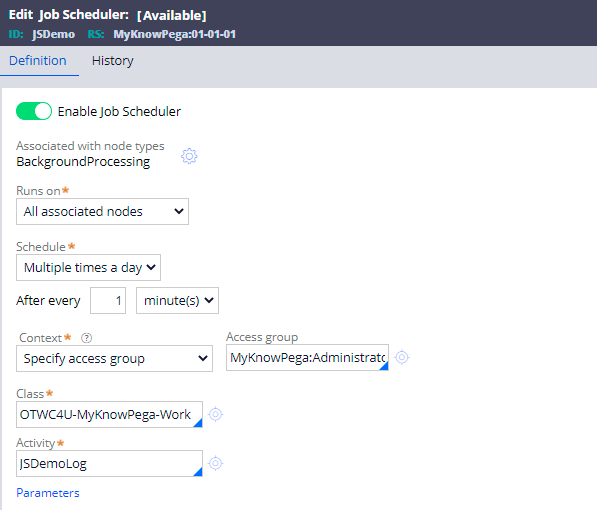
Save the Job scheduler rule.
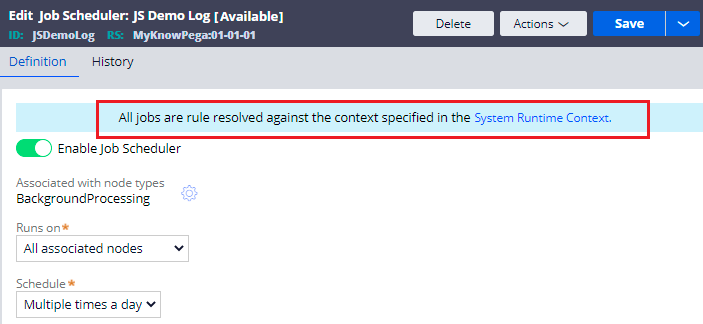
You will see the banner ‘All job schedulers are rule resolved against the context specified in the System Runtime Context’.
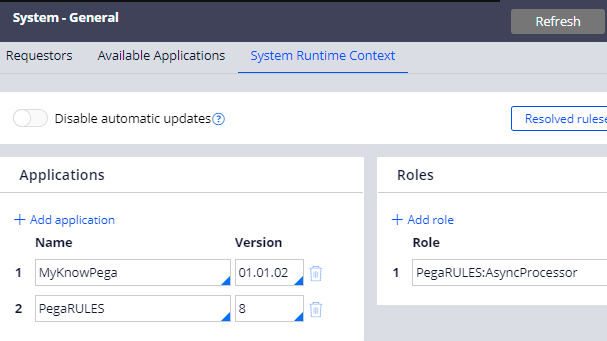
Make sure the right applications are added in the System Runtime Context. You can click and open the System Runtime Context link. I already added my application.
Switch to admin studio. You should see the new Job scheduler.
Note: If you don’t see it in admin studio, make sure to update the System Runtime Context or AsyncProcessor requestor type context.
Since I configured it to run every 1 minute, you see it is already executed 4 times with a success rate 100%.
You can also verify the log messages under Designer studio -> Configure -> System -> Operations -> Logs -> Pega logs.

Already it ran many times 🙂
Okay, now let’s see some operations from the admin studio.
1. Trace the Job scheduler.
Similar to agent tracing, you can trace your Job scheduler from the admin studio.

2. Disable the Job Scheduler from admin studio.
You can use the Override link, to disable any running Job Scheduler. I just clicked the override link and you see it is disabled and next run is not applicable.
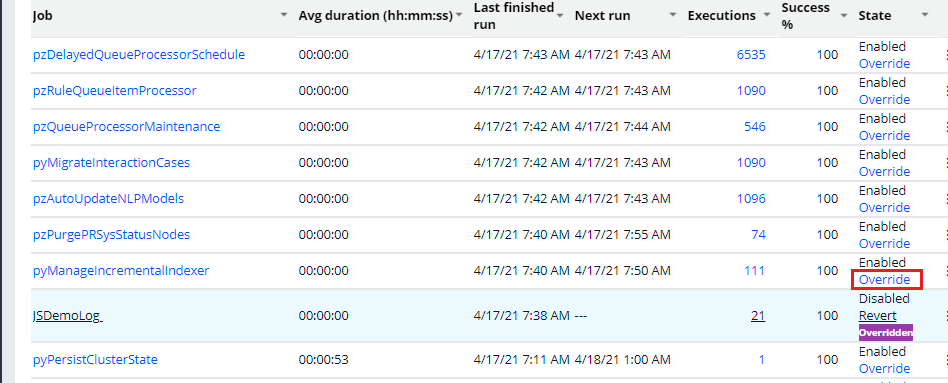
There may be some scenarios where you need to disable the job schedulers.
Error handling – If the agent activity ends up in any run time error, then you can verify it from the Success % or from your log files. You can start by analysing the exception, meanwhile, if you want you can disable the job scheduler to not further cause more exceptions.
If you click on the Executions count link, then it give more details and status on each run with exception details if any.

3. Revert the override and enable the Job scheduler.
You also get an option to revert your overrides.

Let’s see some technical configurations
Pega uses the class instance System-JobScheduler-Override to maintain the overrides.

You don’t need to worry about this instance, pega takes care in the processing.
Activity – pzDoTempAction gets called on clicking Override/Revert link. The activity inturn invokes the Job Management APIs to start or stop.
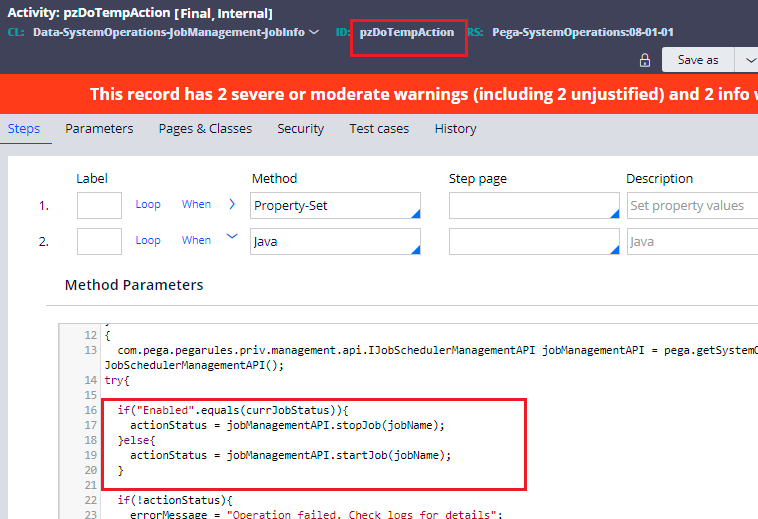
Interesting!! There are some Job management APIs that can help to start/stop the jobs.
This solves a requirement if you want to automate the start stop of jobs.
How to start/stop jobs using Pega API?
Step 1: Switch to admin studio -> resources -> APIs
You can find the APIs for job schedulers, queue processors.
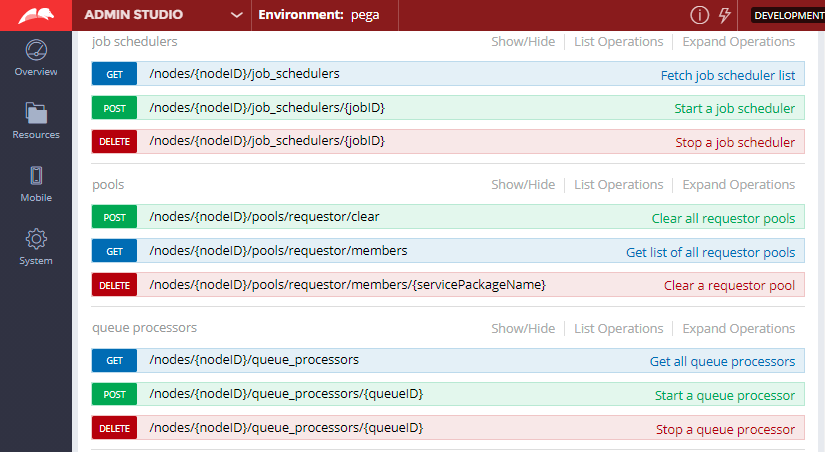
Note: Somehow try it yourself option from admin studio is not working as expected.
Step 2: Switch to dev studio and open the service package – API
Find the service REST and open it.
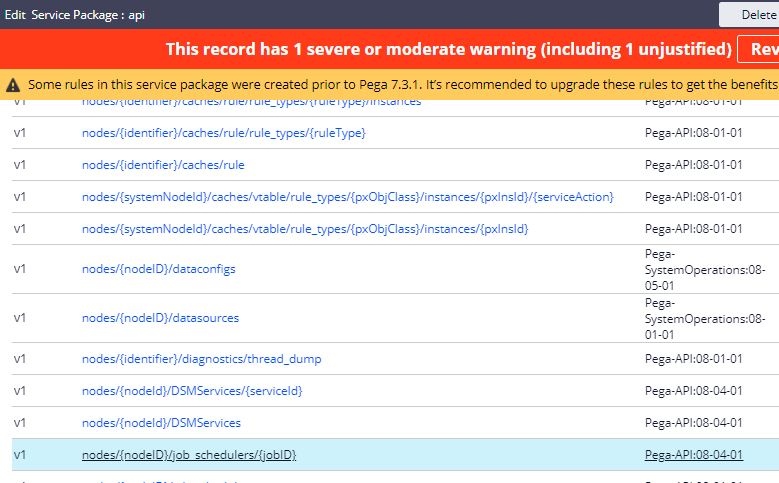
Important note: For now, I disabled the TLS/SSL setting in the service package instance since my personal edition is on http. In real time you will not perform this action.
Step 3: You will find the service REST supports node ID and Job ID in the resource path.
POST action to start the job and DELETE action to stop the job.
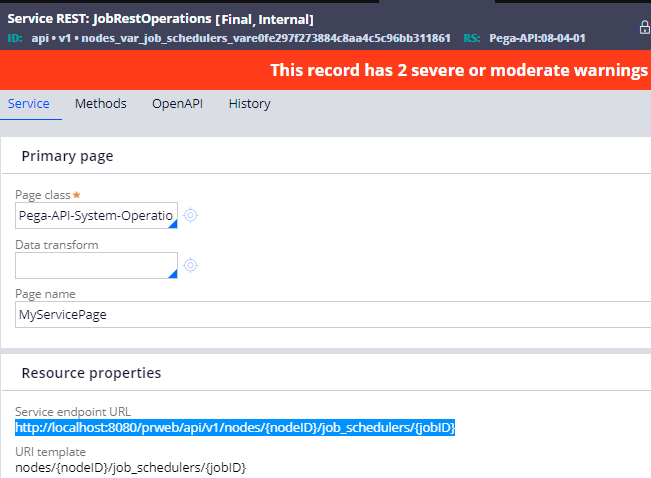
Step 4: Start the job using DevOps API.
Open Postman and copy the URL.
In the resource path – Node ID = all and pass the Job ID name.
Note: As per the API documentation, in node ID parameter it accepts only ‘all’
I also added the basic authentication operator ID & password.
Select the POST method.
Click send.
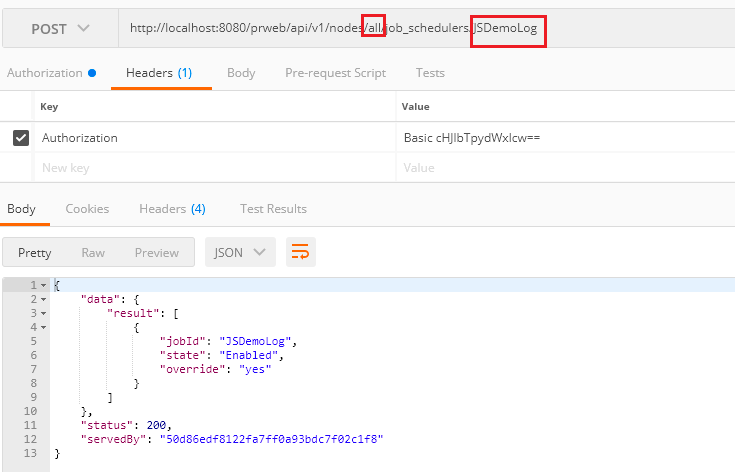
You will see status 200 from the pega node ID. In admin studio, you will also see the job automatically started 🙂
Step 5: Stop the job using DevOps API.
Just change the method to DELETE and click send.
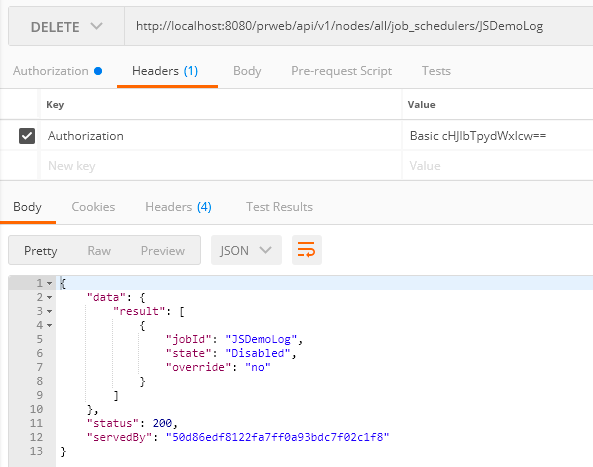
You see status 200 and the job is disabled. You can verify it from the admin studio as well.
What is the Job Scheduler thread pool?
Thread pool Collects threads that the job scheduler uses to run. You can think a little bit like the requestor pool, we saw before.
By default, Pega engine allocates the thread pool size of Job scheduler to be 5.
It means at a time, 5 Job schedulers can run simultaneously.
Let’s say you configured 6 job schedulers to start at 12 PM. At 12 PM, the first 5 job schedulers get allocated a thread and the 6th one needs to wait for the thread to be released by any fast running job scheduler.
In some scenario, if you want to override the default value, you can update the prconfig file and change the value.
<env name=”initialize/jobscheduler/threadpoolsize” value=”5″>
Update it only when necessary.
Ok, now there is one configuration we didn’t discuss before.
Alerts Configuration
It is important that your job scheduler should not be running long. One of the main reasons is that it eats up the thread resource and other jobs may be waiting long.
You can configure the alert threshold for each job scheduler rule.

By default it was configured for 10 seconds. So if your Job runs more than 10 seconds, then an Pega ALERT will be generated and can be acted upon.
Let’s quickly test it.
For demo purpose, In the job activity, I added a wait method of 12 seconds.
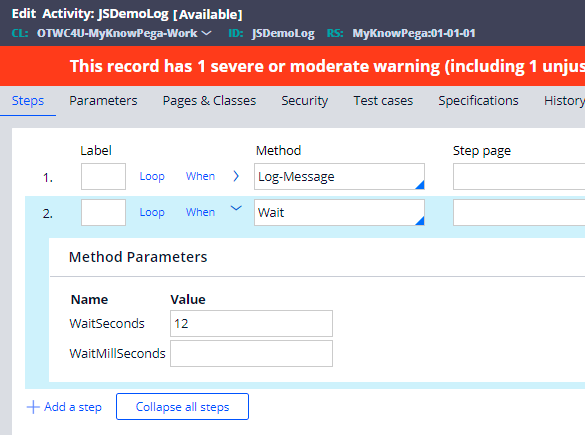
Save the activity.
Make sure your Job scheduler is up and running and check the Alert logs.

An alert PEGA0118 is generated. You can find the alert details in the following link
https://community.pega.com/knowledgebase/articles/pega0118-alert-long-running-job-scheduler-activity
One last topic before we complete this post!
How to replace the agent with the Job scheduler rule?
It is pretty simple.
Step 1: Create a new Job scheduler, use the same agent activity and configure the right schedule.
Step 2: Open the agent rule and disable it.
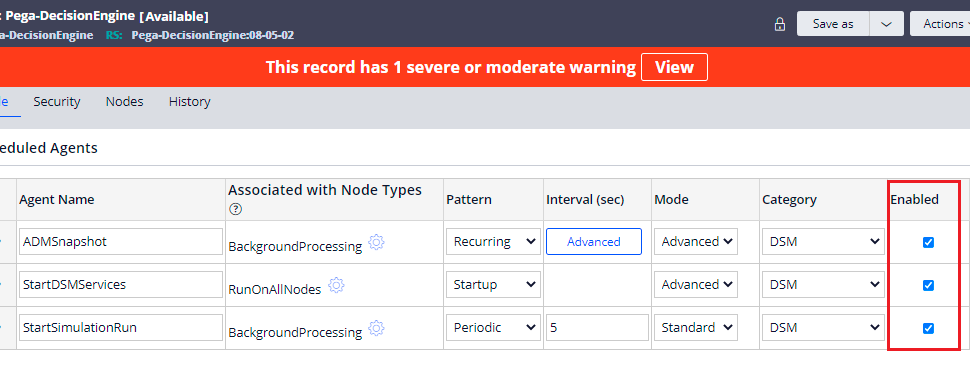
Important note: When you change the configuration in the agent rule, make sure to delete the agent schedule instance so that it gets recreated with the updated configuration.
As a short recap,
– Job Scheduler is introduced in Pega 8 version and set to replace the advanced agent.
– Job Schedulers provide better performance and easy to maintain comparing the agents.
– They get rule resolved against the AsyncProcessor requestor type context in 8.1 and 8.2 and again System Runtime Context from 8.3 onwards.
– Most of the schedule and associated node configurations resemble same like the agent configuration.
– System defaults the Job scheduler thread pool size to 5. By updating prConfig file, you can increase the thread pool size if you need to run more than Job Schedulers at the same time.
– Pega 0118 can be generated if the Job schedulers run beyond the configured threshold.
– Using the admin studio Job landing page, you can easily enable, disable or trace the Jobs.
– You can also use the OOTB Pega APIs to enable/disable the Job schedulers using a service call.

