Connect SOAP – Usage and Configurations in Pega
In this blog article, we will try to understand about Connect-SOAP in Pega.
Update: The concept of SOAP Connector remains the same across different Pega versions. Most of the screenshots in this blog article were reused from Pega 7 version and few were updated. Use this blog article to learn the concepts and you can try the entire tutorial in the latest versions as well.
I recommend you to visit another blog article on Service-SOAP. We will be consuming the service hosted by Service SOAP example in the blog article
Let’s get some basics about SOAP
What is SOAP?
– Simple Object Access Protocol
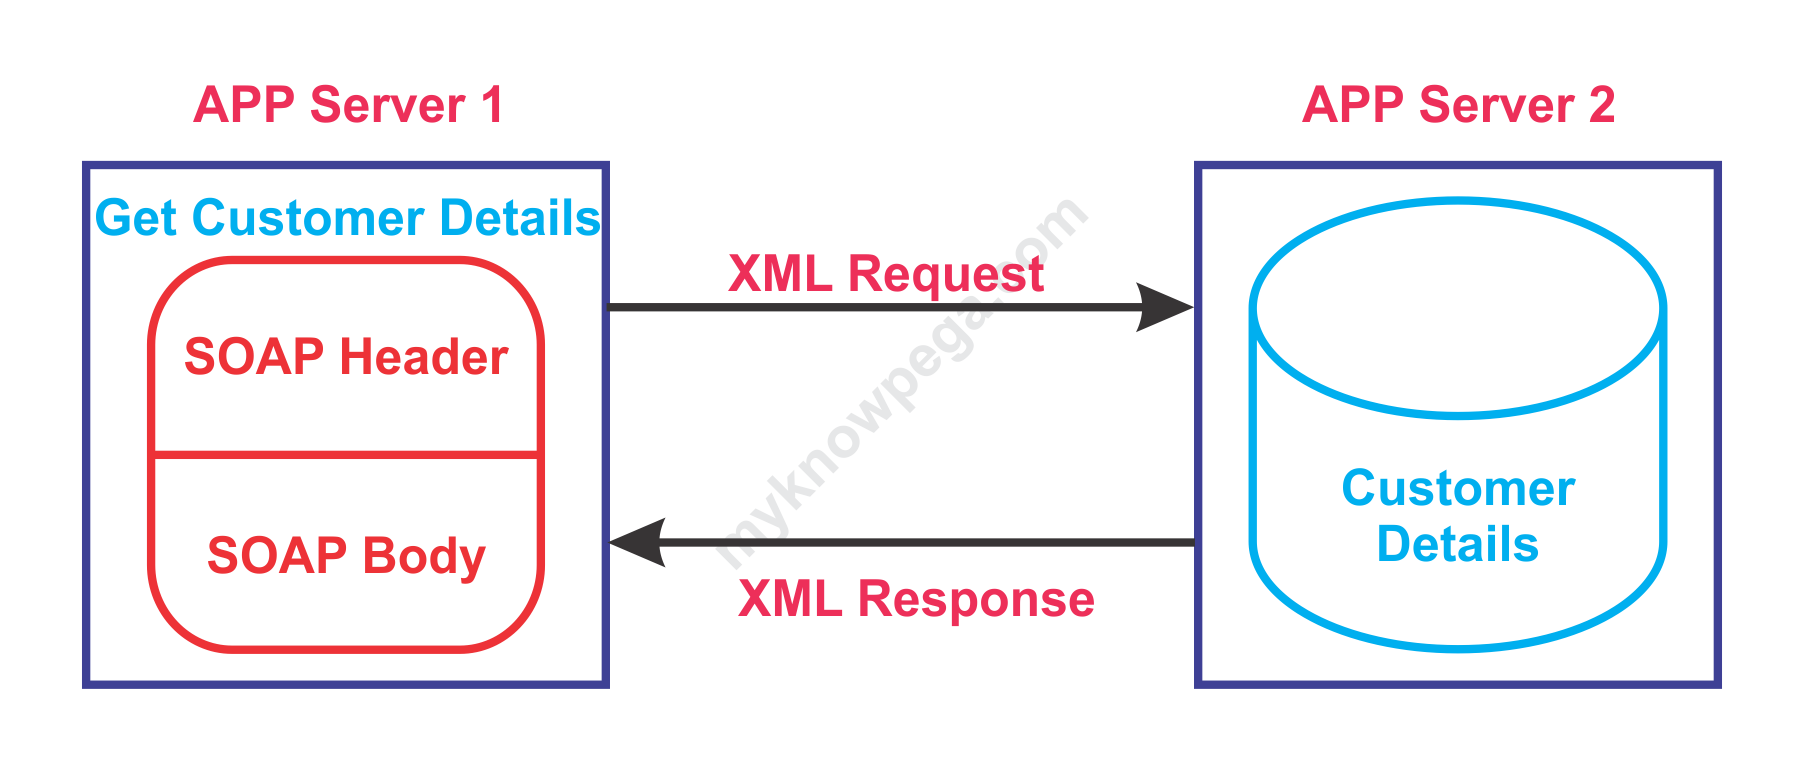
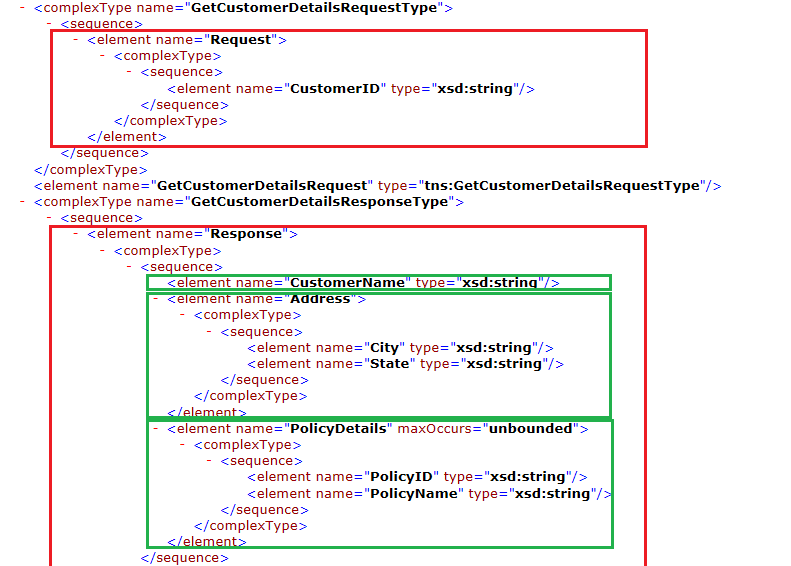
What are we doing in the above pic!?
We are sending the request to access the customer details – Object accessing
Enjoying this content?
Access the author’s full video courses here at MyKnowAcademy.
Explore Courses →
Object – Customer details
It is simple protocol ( Really 😁)………………….. SO it is SOAP
SOAP is a web service.
What is a Web service?
– It is service that supports communication via World Wide Web
Machine to Machine communication, by transferring the message in machine readable formats like XML or JSON
SOAP and REST are the commonly used Web services
Let’s see a scenario, where we can use a SOAP service 🙂
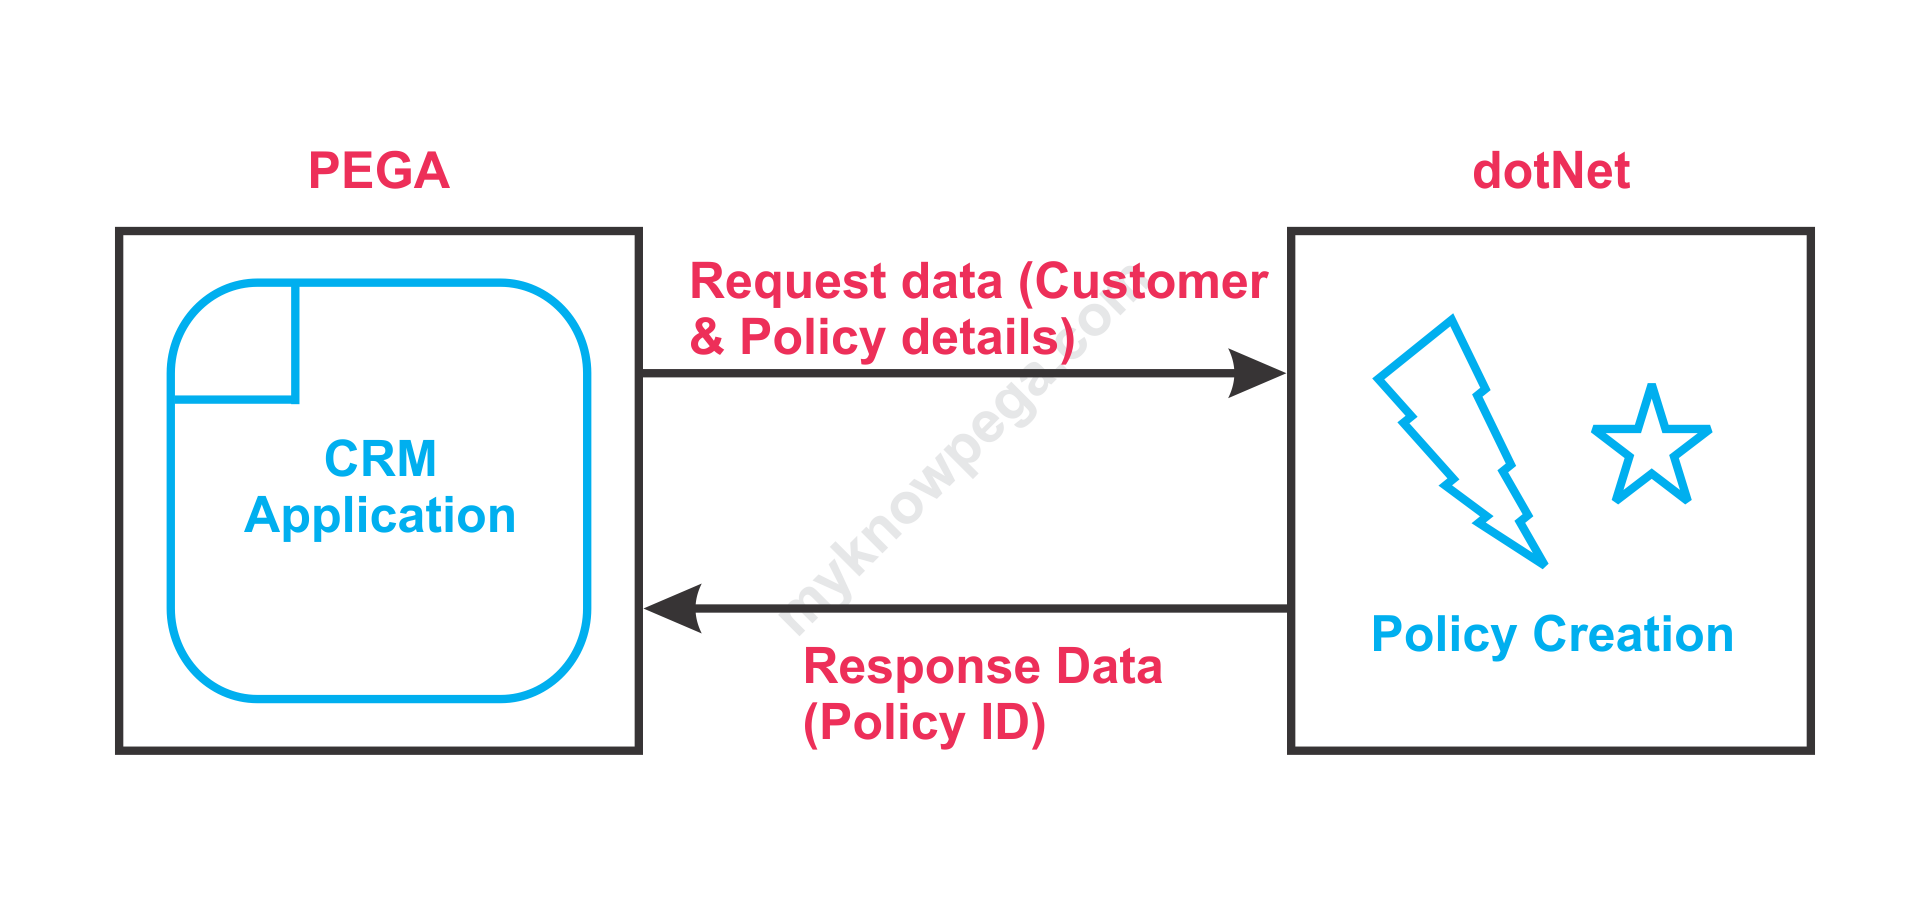
We know that an organization can contain different applications running on different languages in different platform. Consider any Insurance organization – Let’s call it as “XYZ”. Imagine there are 2 main process – Quote creation and Policy creation.
- Quote creation is handled by Java application
- Policy creation is handled by dotNet application.
Now XYZ organization planned to provide some good customer support. So Obviously, they have to Seek Pega help to provide the Customer service solution ( CRM product): D.
Now we have 3 applications
Customer service part is handled by Pega application.
Now say a customer called the customer service application and need to create a new policy. What will you do here?
Two approaches are there
Approach 1: Replicate the policy creation process in the pega application (build all the required rules, cases etc)
Approach 2: make use of the existing policy creation process handled by dotNet application.
What is your suggestion 🙂 Re-USE.
It means we need to communicate with the dotNet application and tell them to create a new policy.
To achieve this, a web service should be hosted in dotNet application and exposed, say Policy Creation service.
Pega application will be consuming the service.
We see now many new pega application prefer using REST web service over SOAP service
Advantages of REST over SOAP – I have explained in details in my Service-REST post.
Let’s see what are the advantages of SOAP over REST 🙂
1. SOAP is a standard protocol. Everything is predefined in a standard WSDL file. WSDL file includes all the required details to create a new SOAP integration. In REST JSON files are used to create only the input output data structure. We need to get the other details from the service providers.
2. Security – In addition to SSL , authentication security SOAP provides WS security. REST don’t support WS security. SOAP is more secure than REST.
3. SOAP can use HTTP/HTTPS or SMTP other means of transport layer protocol whereas REST depends only on HTTP/HTTPS protocol.
4. SOAP supports two phase commit, whereas REST don’t support.
We can see some common terminologies used in SOAP?
SOAP Nodes – Between sender and receiver, there can be many nodes used in transferring the SOAP message. All those are called SOAP nodes.SOAP Message – Information that can be communicated ( Policy details) or transferred between nodes.

SOAP Envelope – It encloses and identifies the SOAP message. Mandatory
SOAP Header – A SOAP header can contain one or more blocks. Each block can identify individual receivers. Optional
SOAP Body – Contains the body of the message. Mandatory
SOAP Fault – when any particular node fails to process the SOAP message, the error details are stored in Fault content as a SOAP body child element. Optional.
WSDL File – XML based language. External system use this WSDL file to describe the web services available. They provide a standard way for web service providers and consumers to work together.
Please go through my previous post on WSDL file basics. It will be really helpful proceeding further.
How to implement Connect-SOAP Integration?
First we will see the requirement scenario
We will be using the same scenario, we used for Service SOAP.
The external system hosts a Web service – GetCustomerDetails. Here the external system is the same Pega application.
So here we will be configuring a Connect-SOAP to consume the GetCustomerDetails.
We will see the Customer ID as request parameter and get all the customer details as response.
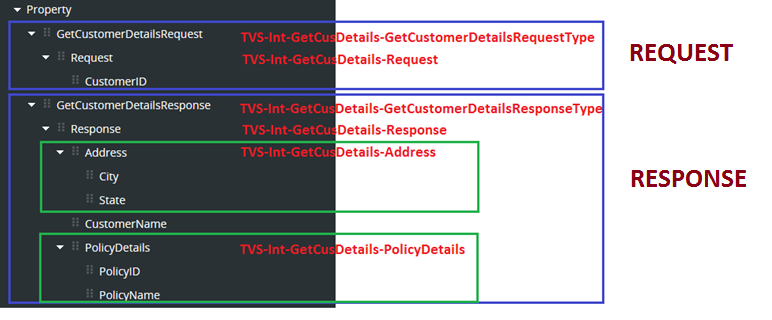
Request – CustomerID
Response – CustomerName (Single Value), Policy Details (page list), Address Details (page).
What are the basic parameters required from the service providers to consume the service?
a) Services – Describe the WSDL file service name.
b) End point URL – Address location

c) Operation – We know that single service can contain more than one operation. GetCustomerDetails.
d) Style / Use – Document / Literal
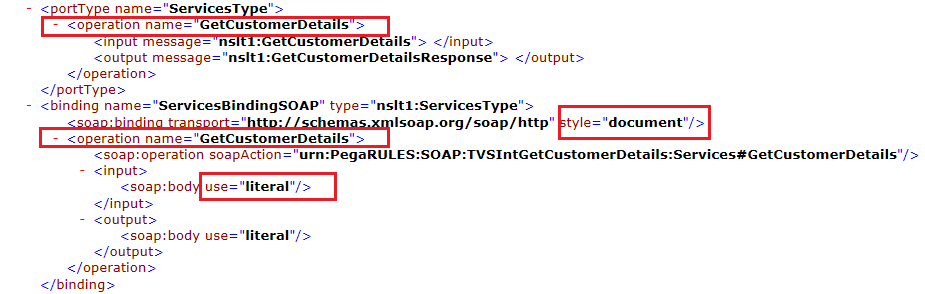
e) Message
Request – GetCustomerDetailsRequest
Response – GetCustomerDetailsResponse

f) Request, response data model properties
You see all the details are available in the WSDL file.
If you don’t’ have a WSDL file, then do the following. You don’t want to create any properties or classes manually.
Step 1: Open any starter flow.
Step 2: Go to Design tab -> Generate services. Click on it.
Step 3: It opens the service SOAP wizard. You can just follow the wizard steps and complete it.
You will end up having a valid WSDL file.
Note: The Integration wizard can consume the WSDL file and make use of some existing OOTB activities to create the integrations. All process are automated by the wizard.
What are the pre-requisites to configure Connect-SOAP?
Like Service-SOAP, we don’t want to create any Integration class or data model properties prior. Wizard takes care.
To use wizard, we need the WSDL file from the service providers. This is the only pre-requisite.
How to use the Connect-SOAP Integration wizard?
Pega provides a simple wizard to create the Connect-SOAP Integration rules.
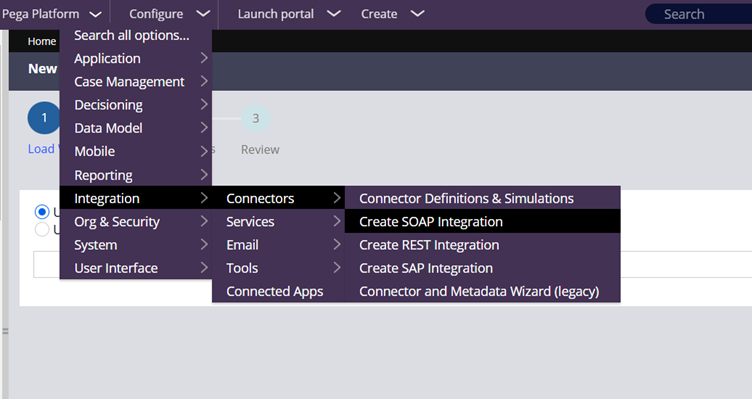
Step 1: Designer Studio -> Integration -> Connectors -> Create SOAP Integration
Step 2: You will be landed in the wizard first screen.

Now the wizard process starts!
Step 2.1: Load WSDL
Please go through my previous post on WSDL files – top to bottom explanation.
You have two options to load the WSDL.
a) Upload WSDL via URL
b) Upload WSDL from file
Note: WSDL document can be downloaded and available in local machine or it can be hosted in another server.
Upload WSDL via URL – Here WSDL file is available as an URL and hosted in different server. You can use the URL to access the WSDL file.
Most probably, the external app servers will be secured using credentials. So when you use this option, you may be prompted to provide the credentials.
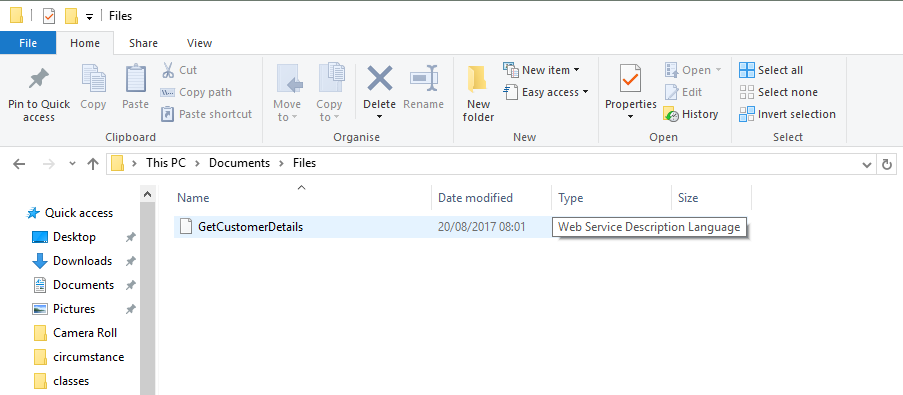
Upload WSDL file – Here WSDL file pre-downloaded in my local system.
I will explain, how I saved the WSDL file from the service-SOAP.
Step 1: Open the service package data instance and check the WSDL file.
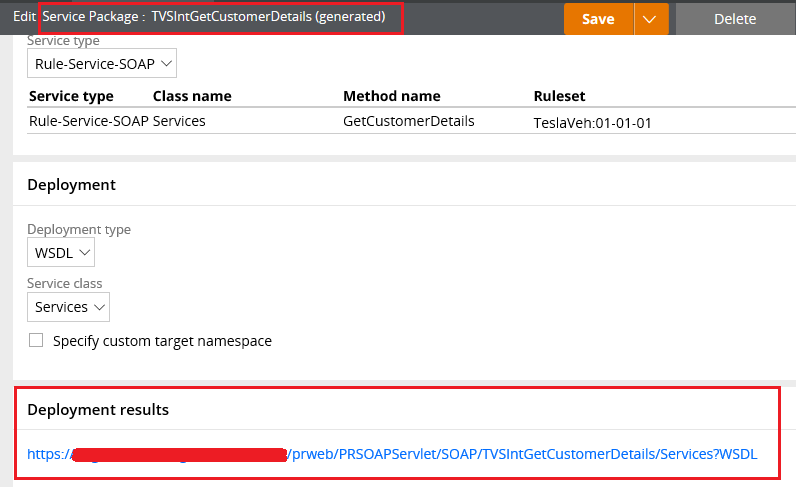
Step 2: click on the WSDL file and save the contents in notepad WSDL file.
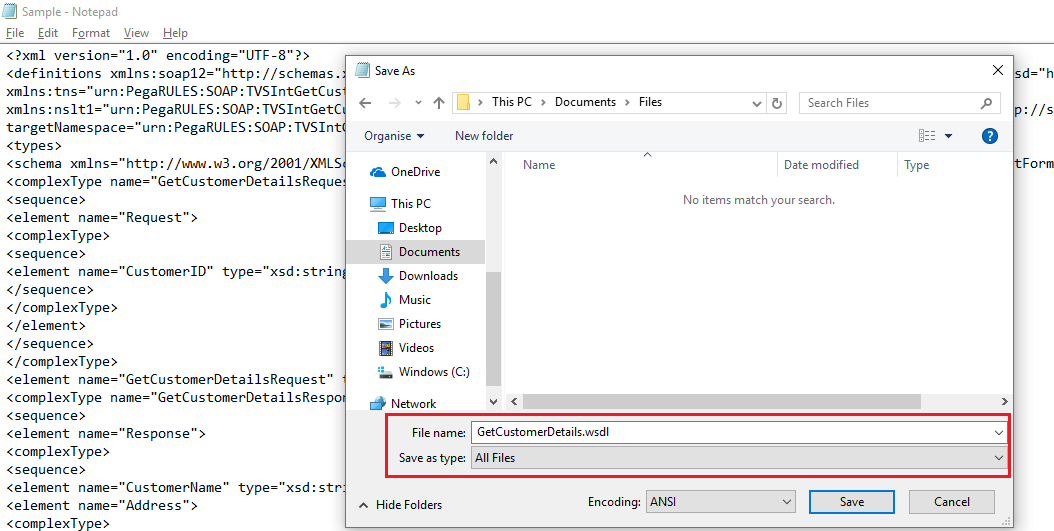
Step 3: WSDL file is available in my local folder.
Let’s get back to wizard.
Use the browse option and load the WSDL file.

Click on next.
Step 2.1: Select Operations.
You can see all the details are populated from WSDL file
Service Name – ServicesService
Port name – ServicesPortSOAP
Endpoint URL – URL specified in the WSDL file
Operation – GetCustomerDetails.
Note: You can test the service prior using test button. Click on the test button.

Click on next.
Step 2.3: Review

Integration layer – You can specify the Integration class integration rule set here 🙂
Deciding of Class layer is very critical for your connectors that can decide if the connector can be reused across applications.
As a general thumb rule, If the connector is more application specific you can create it in Application Integration layer or if it more specific to Enterprise we can create it under Organization Integration layer or other modular reusable Int- layer
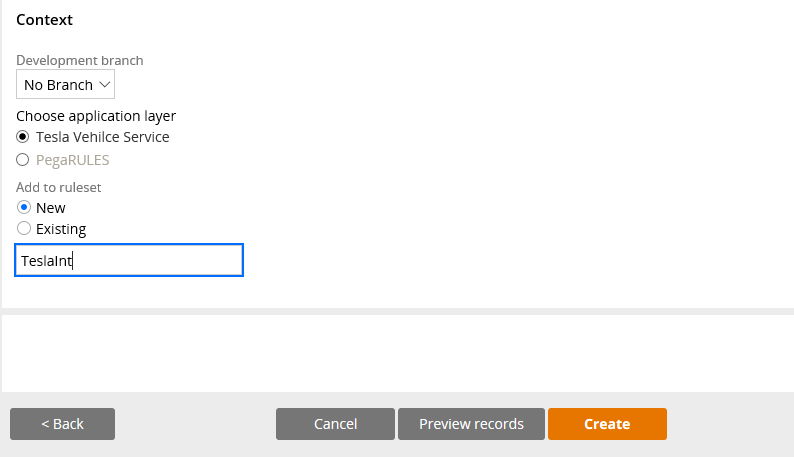
Context – I have specified to create a new Int ruleset. You can make use of any existing ruleset.
Click on preview records to verify the records the wizard create.
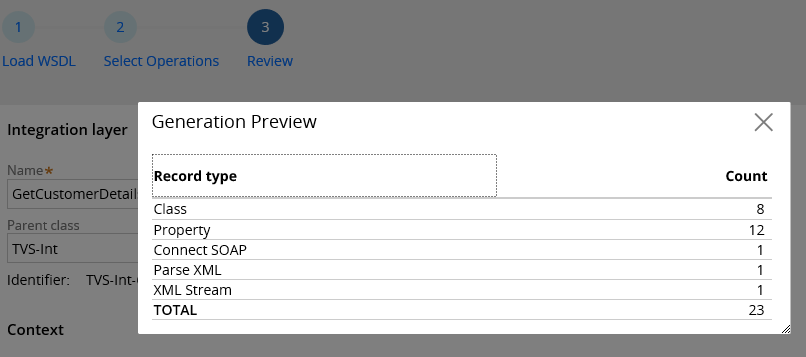
Looks simple right!!
5 types of rules will be created. Now click on create to finish the wizard.
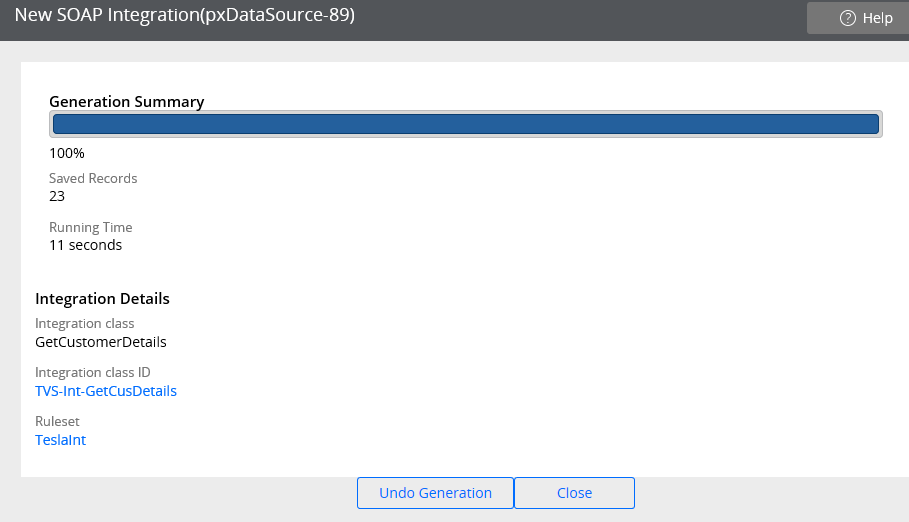
You can see the confirmation screen for the wizard.
What are the rules created with SOAP wizard?
1) Integration class
You can see the wizard created 8 classes.
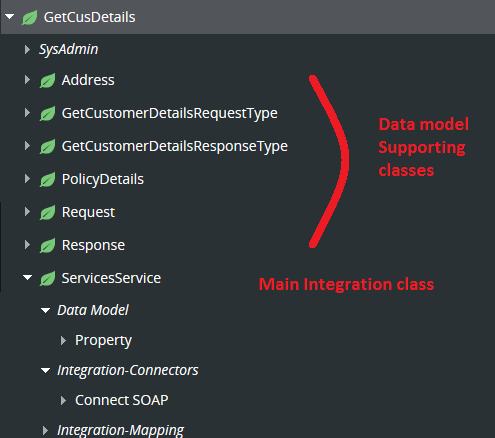
TeslaVeh-Int-GetCusDetails – Service class
TeslaVeh-Int-GetCusDetails-ServicesService – Main integration class that holds the main request response, response properties, Connect-SOAP and integration mapping rules – XML Stream, Parse XML
We know page type properties refer to some page definition. Other classes basically support these request, response data model properties.
Let me expand the main integration class.
You can see all the main integration rules – properties, connect-SOAP, XML stream, Parse xml rule are included
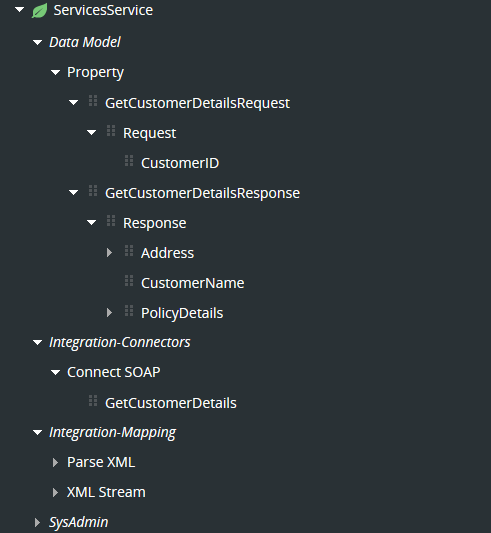
2) Data model properties
You can see the data model for the request, response properties.
You can open and check all the properties.
There are 6 page type properties and so 6 page definition classes.
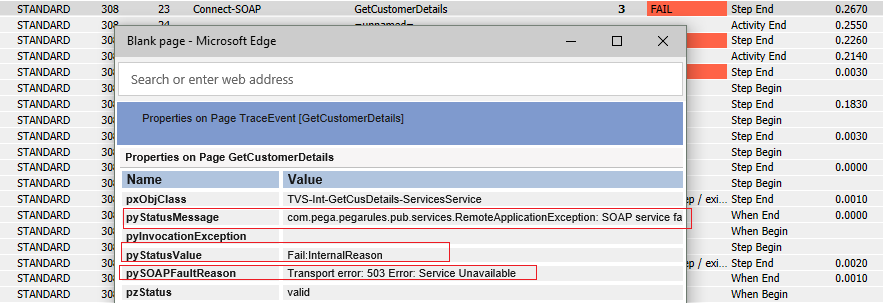
3) Connect-SOAP rule – GetCustomerDetails
What are the configurations in a Connect-SOAP rule?
There are 6 main tabs.
a) Service
b) Request
c) Response
d) Faults
e) Advanced
f) WSDL
Service tab
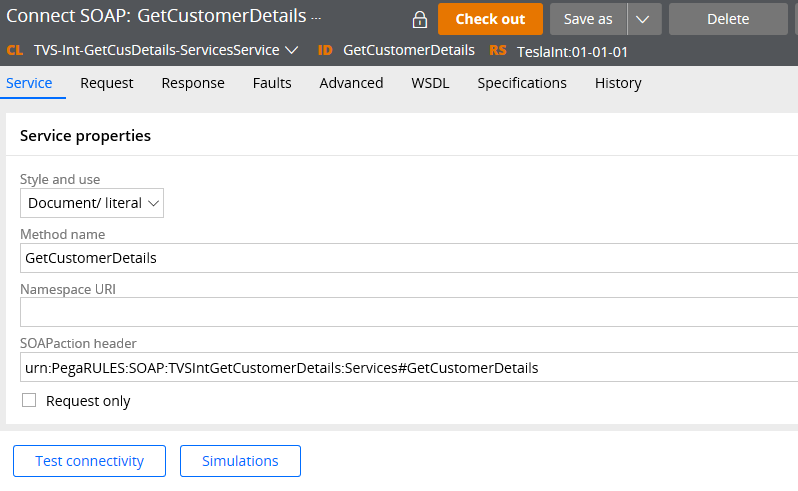
Service Properties – You can see all details are just populated from the WSDL file.
Style and Use – Document/Literal
You have 3 options here.
a) Document / Literal
b) RPC / encoded
c) RPC / Literal
What is the difference between RPC and document?
– Document style model is used when the SOAP message body is XML instance. Use RPC when the SOAP message body is simple data type (string).
– So in document style, we send message as discrete elements where as in RPC style message send as XML content.
You have two models to use for the above styles.
- Encoded
- Literal
So totally 4 style combinations are available
1. RPC Encoded –This is deprecated. Use to support legacy services
2. RPC literal -Use it when the request is simple parameters (Can be directly mapped from clipboard)
3. Document Encoded –Not applicable in Pega
4. Document Literal –Use it when the request is in XML format.
For more info – Please go through the WSDL structure post.
Method Name – Operation name populated from the WSDL file – GetCustomerDetails
Namespace URI – Populated from the WSDL file. Optional
SOAPAction Header – Refer to the header request message. Populated from the WSDL file. Optional
Request only – there many be some situation, when we need to send only the request message and don’t expect any response from the service. In such case, you can check this option
True – Asynchronous. Once system sends the request, connection is terminated.
False – Synchronous. System waits for the response.
Authentication
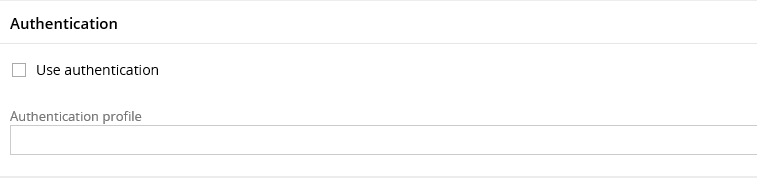
If the service providers, expect any authentication, then you can use this option to authorize the request. You can use an Authentication profile instance to configure the authentication credentials.
We will see about authentication in separate post.
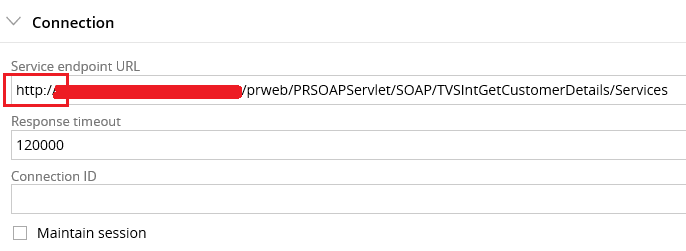
Connection
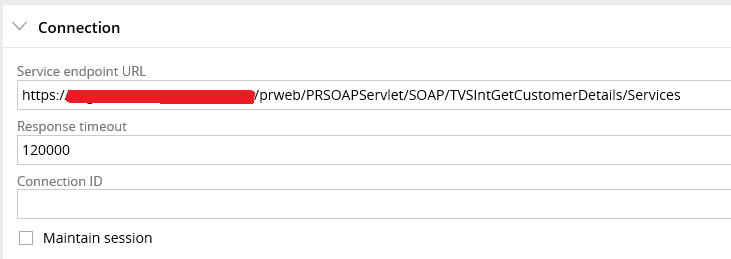
Service endpoint URL – This will be populated from the WSDL file – Address location value.
This is the URL, where the service is hosted. You need to hit the URL to make use of the service.
Response timeout – In milliseconds. This is a key area that supports synchronous response.
Imagine an external document application hosts a web service. The web service expects the document names as request and zip all the documents in a single file and send the document name as response. Now say, you have requested to zip 1000 documents. Here the service may take some time to zip 1000 records ( huge size). It means it takes some time to get the response.
So how long can we wait for a response. It all depends on the business requirements.
If you want to wait indefinitely for the response, you can have the value as “0”or null (leave empty). Else you can specify a certain interval in milliseconds. Once the timeout is reached and the service returns a timeout error.
Connection ID / maintain session? –
This is applicable for stateful sessions with the service provider.
Please go through my previous post on stateful vs stateless sessions.
In short, stateful sessions are used to maintain the same session for logically related connectors. Same session refers to sharing clipboard pages.
You can have a connection ID, kind of token that can be used in all the logically related connectors.
Maintain session? –
True – session is maintained. The clipboard pages are not cleared
False – If this is the last connector in the logically related connectors, then uncheck this. So the session will not be maintained. Clipboard pages will be cleared.
Error handling – Same as all connector rules.
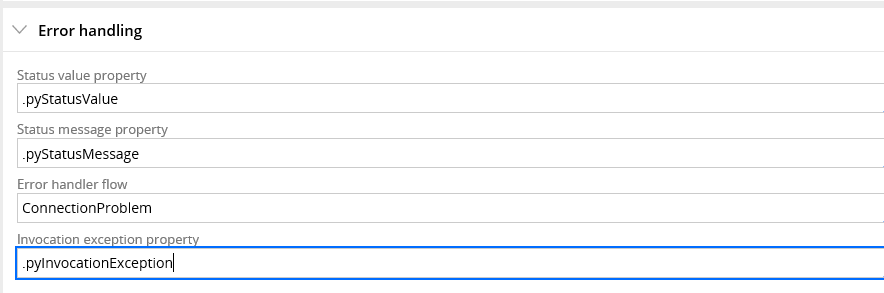
pyStatusValue – Holds the HTTP code. 200 for success and other codes for failure
pyStatusMessage – success message or error message
Error handler flow – You can make use of a flow to handle error.
Say for example, You have created a case and using the connector in the flow rule. If the service fails, we can make use of this connection problem flow to handle the error.
Invocation exception property – Java object to hold the jave exception stack.
Processing Options
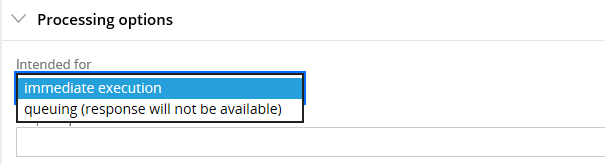
Intended for –
a) Immediate execution – synchronous execution. The connector activity waits for the service response.
b) Queuing – asynchronous response. The calling activity continues without waiting for results. The Connect-SoAP queues an entry to background processing.
Asynchronous processing is a complex topic. I will explain it in a separate post.
Request Processor – You can specify a connect request processor instance to support synchronous processing.
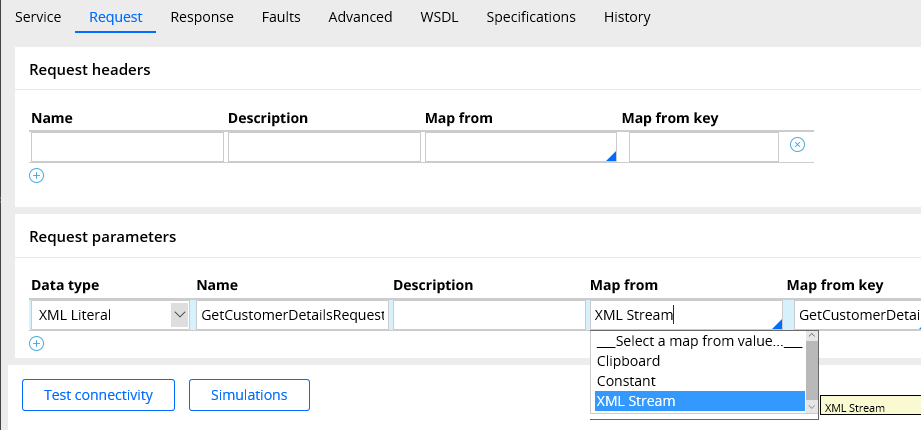
Request tab
This is same as all connector rules.
Request header –
Some service can expect some fields in the request headers. For example – authentication parameters. We can set those fields, in the request headers.
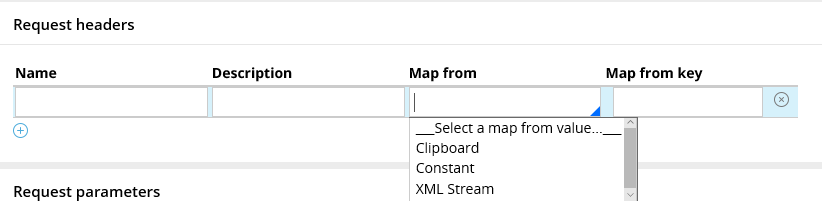
You can either map from clipboard, constant ( simple request headers) or XML Stream for complex request headers.
Request parameters – Specify the body of the SOAP message.

Data type – You will have a variety of data types to choose from
This is same as all connectors.
Response tab
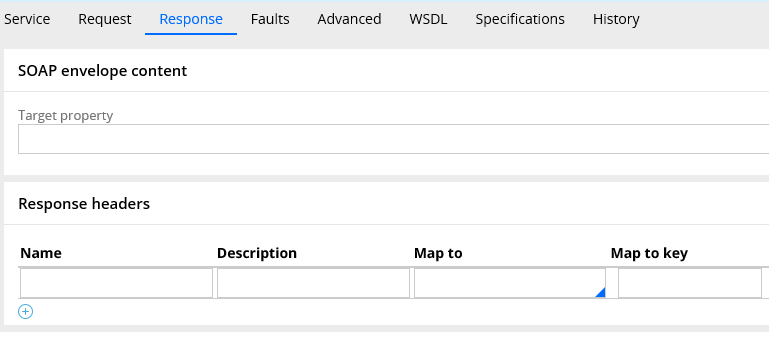
SOAP envelope content – If you need to capture the entire XML response content, you can use this option. Specify a single value property to hold the entire xml content.
Response Headers – Same as request tab
You can parse the response headers.
Response parameters –

You can specify a method to parse the response body message.
Same as request tab.
Faults tab
This tab is used to record the SOAP fault code and details. All the fields are defaulted to standard properties.
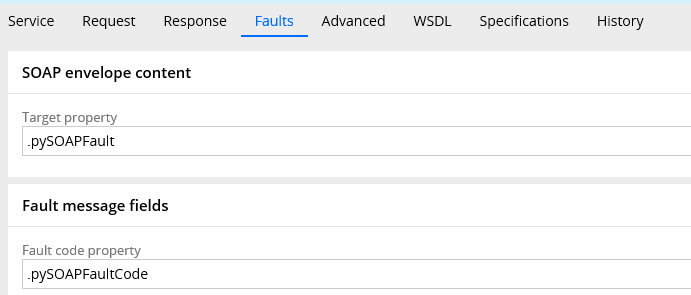
We already error handling in service tab is used to handling the exception cause by Connect-SOAP method.
So what is the use of Faults tab?
When there is SOAP fault return by the web service, then this tab will be useful to capture the Fault details.
The common fault code is ‘VersionMismatch’ SOAP 1.1 – SOAP 1.2
Please follow the link and search ‘fault code’ to know more details
http://www.w3.org/TR/2007/REC-soap12-part1-20070427/
SOAP envelope content –
Target property – single value property to hold the entire content of SOAP envelope that contain the fault message.
Fault Message fields.

Fault code property – single value property to hold the SOAP fault code
Reason property – single value property to hold the SOAP fault reason
Detail property – single value property to hold the SOAP fault details
Advanced tab
This tab is pre-populated when you create a new Connect-SOAP
This tab is mainly used for following reasons
a) To update the AXIS, SOAP, HTTP versions
b) Web services security configuration
c) SOAP service header field configuration
d) Compensating action configuration
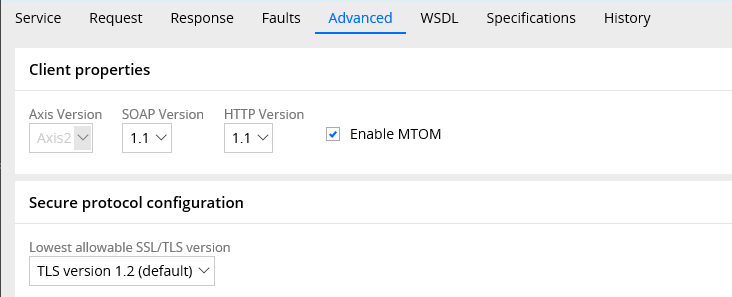
Client properties
Axis version – It can use Axis 2 / Axis 1.2.1
SOAP Version – Based on the binding port in the WSDL file, this field will be auto-populated
SOAP 1.2 – Binding port SOAP 12SOAP 1.1 – For ports other than SOAP 12
HTTP Version – It can be HTTP 1.0 / 1.1
This will be based on service provider server compatibility.
Enable MTOM? – We know that SOAP messages involve many nodes between sender and receiver.
This mechanism helps in effective transmission of binary data to and from web services.
Secure protocol configuration
Lowest allowable SSL/TLS version – For connection with HTTPS end points, we can determine the secure protocol.
It will be defaulted to highest TLS version.Web service configuration
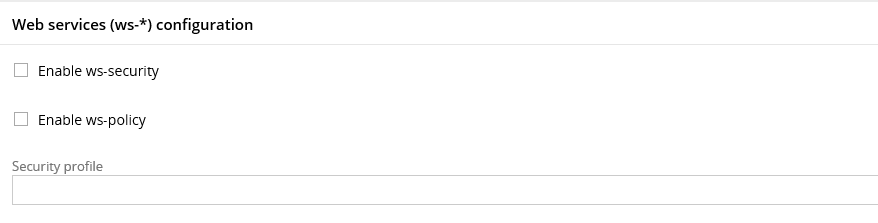
This is used to secure the SOAP connection.
You can make use of either WS-security instance or web service policy instance to secure the connection.
WS-Addressing
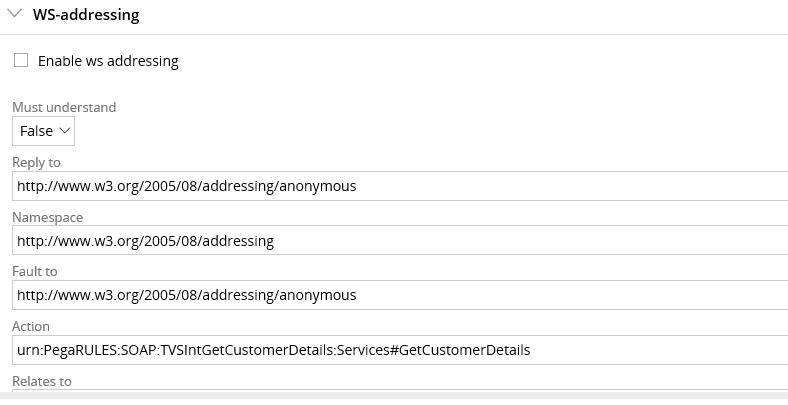
Address the SOAP header fields. This will be pre-populated by the wizard.
Compensating action and data
This block helps in executing some action, when the connector rule succeeds in receiving the response.
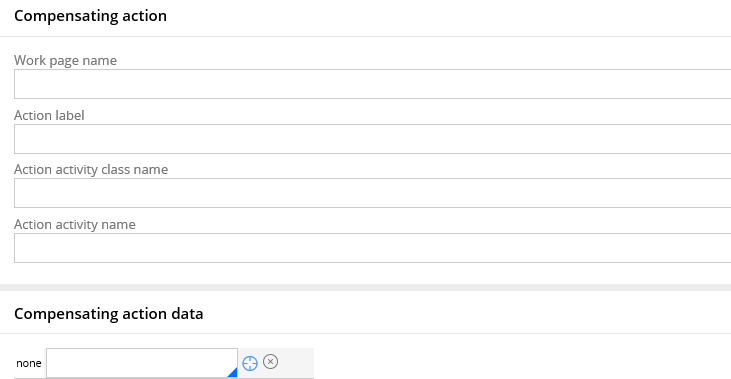
This is mainly used with work item page context.
Say for example, imagine purchase request case invokes GetCustomerDetails and the service returns a valid response. In this case, we can use an activity to run on pyWorkPage and can execute any compensating action.
Compensating action can be another service call to get the Policy details ‘GetPolicyDetails’.
Compensating action data – Used to send the parameters.
Mostly you wont update anything in advanced tab and accept the values defaulted by the SOAP wizard.
I never used compensating action.
WSDL tab
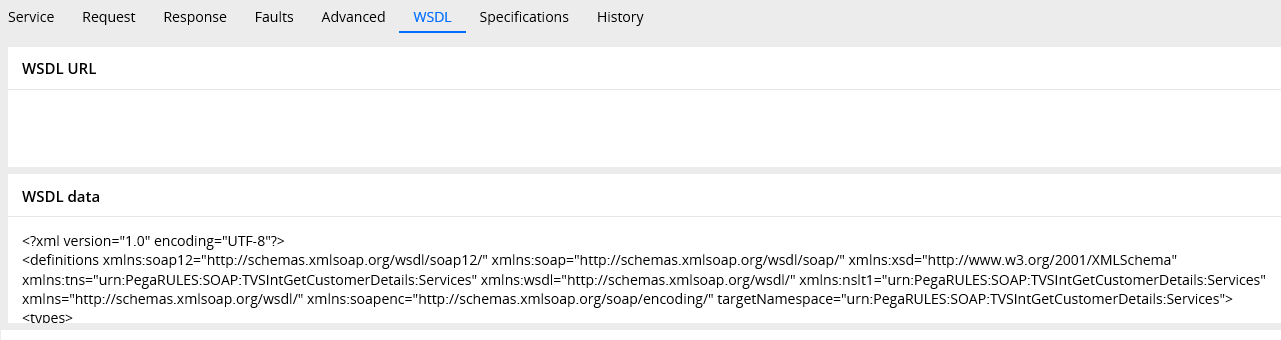
This is the read-only tab.
You can find the source of the WSDL content, from which we created the new Connect-SOAP.Remember the wizard first step.
You can load the WSDL data either from the WSDL URL or from WSDL file (data) loaded from local drive.
4) XML Stream rule
You can see the XML stream rule created by the wizard – GetCustomerDetailsRequest
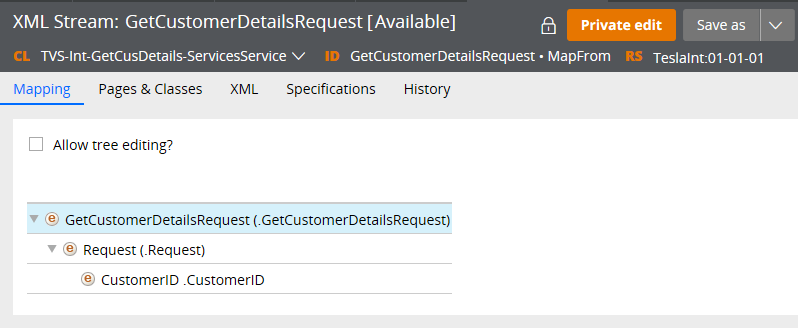
For more details on XML Stream, you can visit my previous post
5) Parse XML rule
You can see the Parse XML create by the wizard – GetCustomerDetailsResponse

For more details on Parse XML rule, you can visit my previous post
How simple is this :). We have successfully created all the Connect-SOAP integration rules using SOAP wizard.
How can you undo the wizard creation process and delete all the rules created by the wizard?
Step 1: Designer studio -> Integration -> Tools -> Wizard cleanup
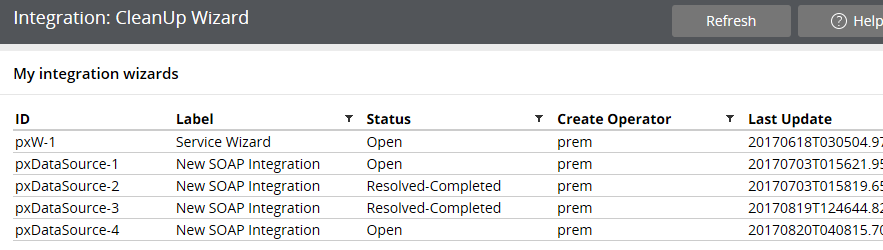
You can see, whenever you start a wizard Pega creates a work item using OOTB activities. You can see the label and ID. For every SOAP integration wizard, pega creates a case with id ‘pxDataSource’. Once you complete the wizard, pega resolves the case – Resolved-Completed.
Step 2: Click on the pxDataSource ID row which was created by you.

Step 3: You can click on Undo generation to delete all the rules created by the wizard.
Note: The wizard will not delete the rulesets created. Please make a note and manually delete the newly created rulesets.
Where can you reference a Connect-SOAP rule?
1. Activity – You can use Connect-SOAP method in a activity to invoke the SOAP integration.
2. Integrator shape in flow rule – Connect-SOAP method -> Connector activity -> Integrator shape -> Flow rule. You can invoke the SOAP integration inside a flow rule.
3. Data page – You can load the Connect-SOAP response as the source for any data page
How to test the Connect-SOAP rule?
Step 1: Create a new test activity – GetCustomerDetails
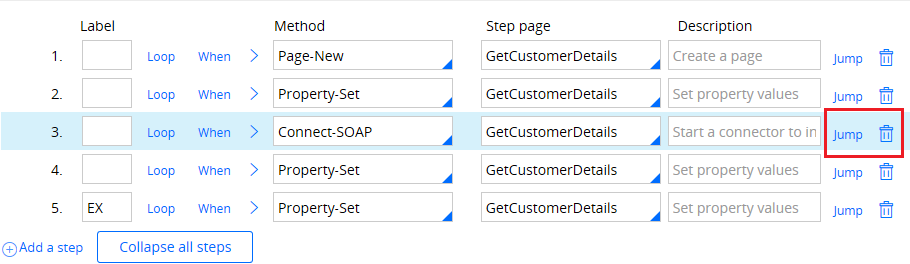
Step 2: Add 2 steps , Page-New followed by property-set to set all the request parameters.
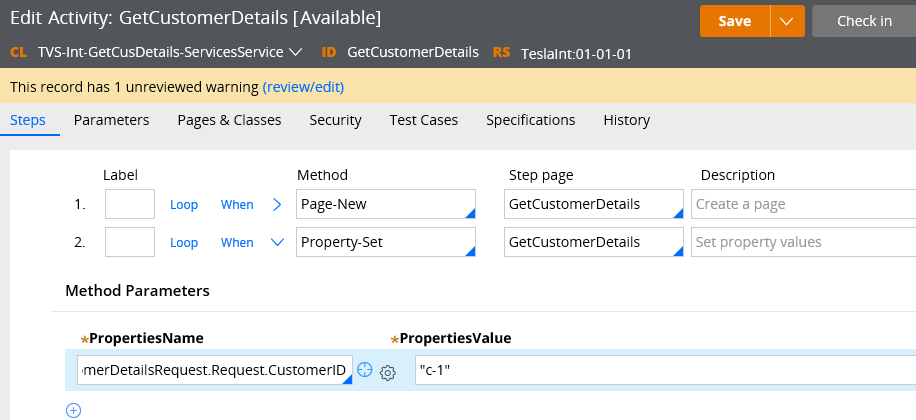
Step 3: Use Connect-SOAP method and invoke the ‘GetCustomerDetails’ service.
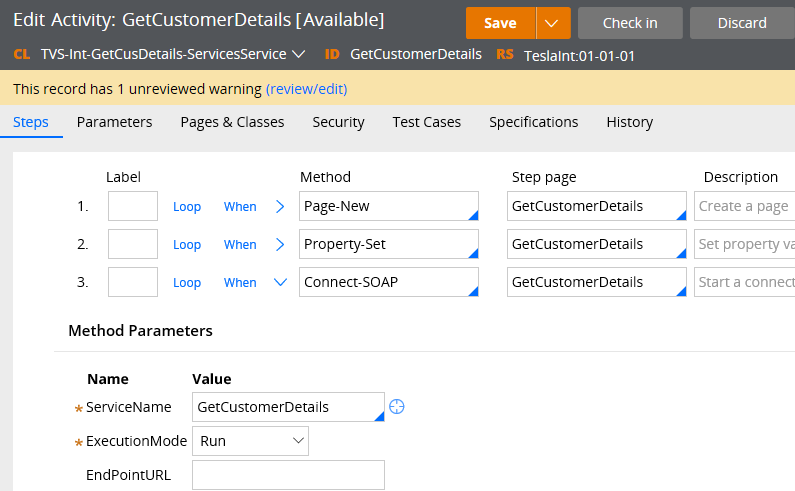
Step 4: Trace open the rule and run the activity. Click on the step page to check the response.
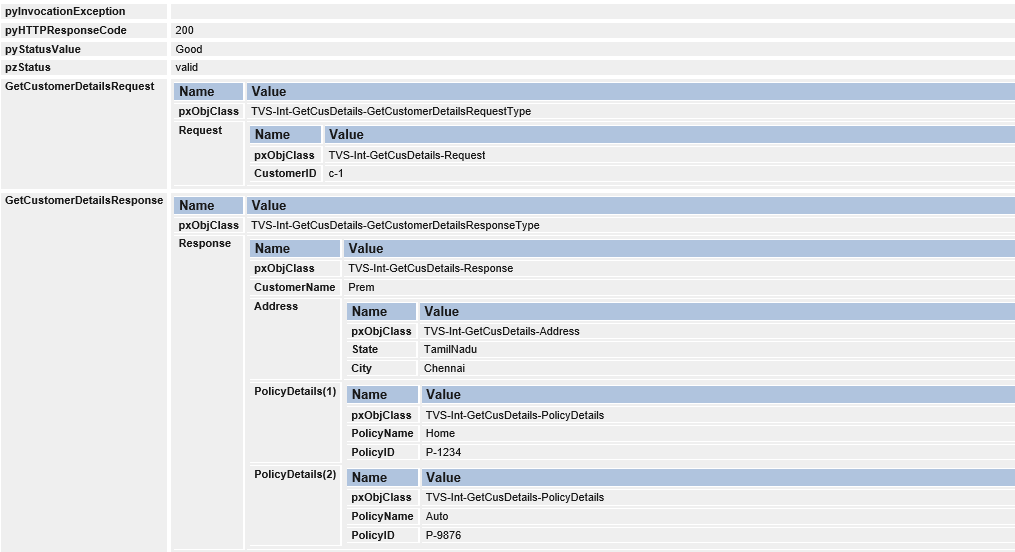
You can see the service returns the expected result 🙂
How to Error handle in Connect-SOAP rule?
There are 3 ways to error handle
a) Transition step in connector activity.
b) Using Error handler flow in connect-SOAP rule service tab
c) Using faults tab in the Connect-SOAP rule
Transition step in the connector activity.
Pre-requisites to test transition error handling
1) Add a step to set parameter ServiceExecute to ‘true’ – Success Condition.
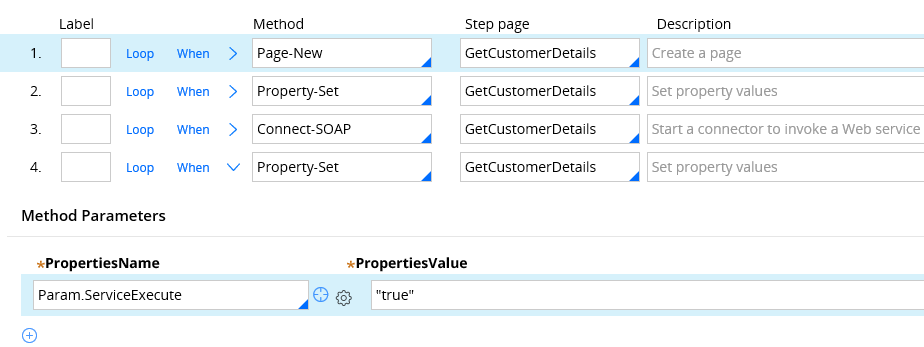
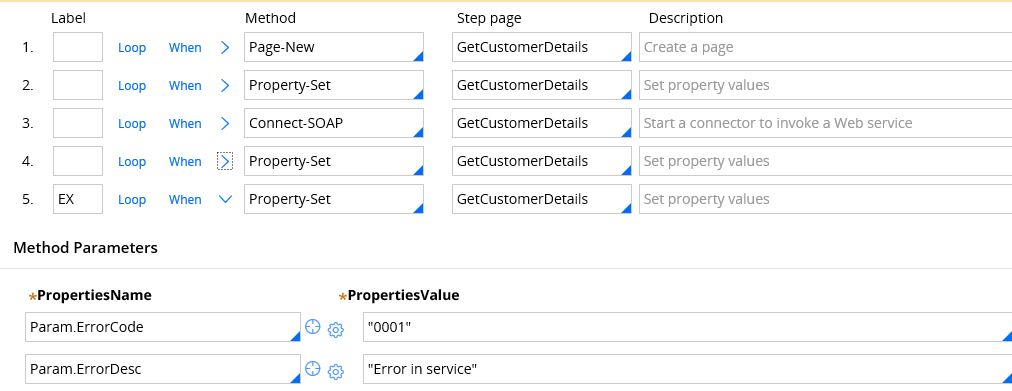
2) Now add step 5 to set error code and error desc parameters.
First, I didn’t add any transitions in the Connect-SOAP method .
3) In the Connect-SOAP rule, update the endpoint URL from https -> http ( you can reverse in your own choice)
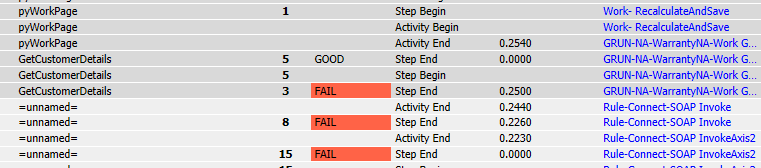
Now trace open the rule and run the activity.
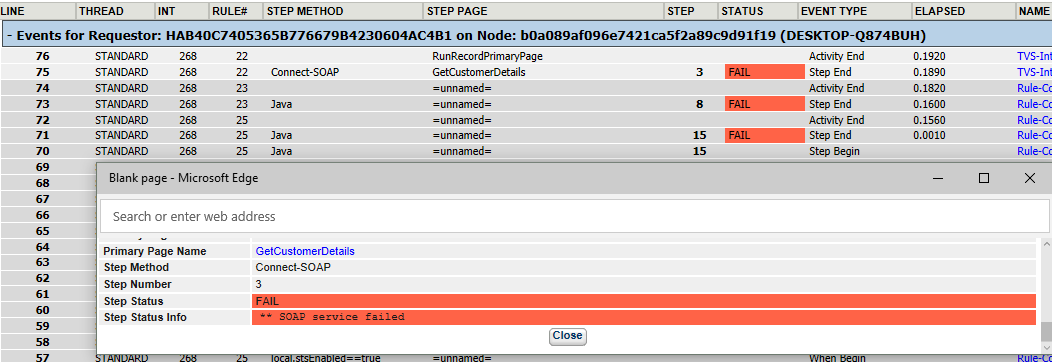
You can see activity run, throws exception and abruptly stops at step 3.
This will cause the run time exception and stops the process. You may get the same error screen in user portal.
You can also click on the step 3 step page to check the error handling property values.
Now Let’s handle the error in step transition.
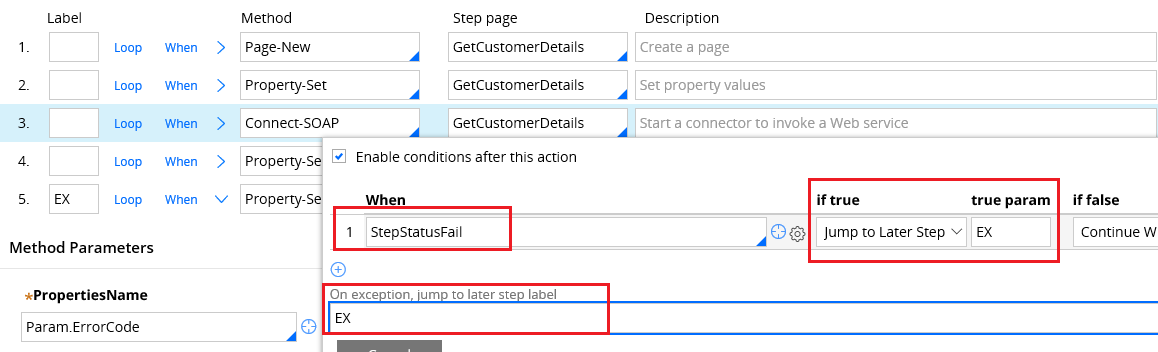
In the transition step, you can use StepStatusFail when rule, to check the step status.
If the method status fail, then we will jump to EX label step (5th step)
We have another option – On exception, jump to later step.
You must use these option, when you use Connect methods. Connect method may result in java exception. This option can capture java exception and jump to exception step.
Note: Always check the method status as well as java exception in transition error handling.
Now trace open the rule and run the activity.

You can see, we have handled the exception in step 3 and jumped to step 5.
Error handling in flow execution.
How to invoke Connect-SOAP from a flow rule?
Step 1: Copy the activity to work class and update the activity rule to Usage – Rule Connect in security tab ( testing)

Step 2: Open any exiting flow rule in work class ( or create a new flow rule).
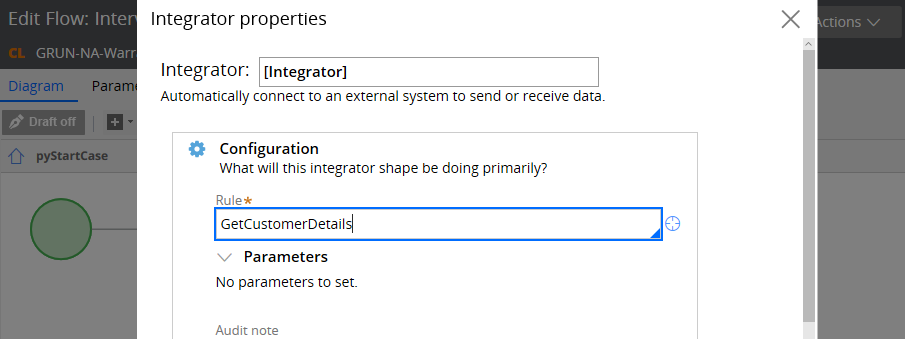
Step 3: Update the flow and add an Integrator shape.
Advanced shapes -> Integrator shape
Configure the ‘GetCustomerDetails’ activity in the Integrator shape
Step 4: Don’t remove the exception handling in activity transition step.
Step 5: Trace open the rule and run the flow.
You can see exception is handled in the transition step and the ConnectionProblem is not executed.
Step 6: Remove the transition from the connector activity Connect-SOAP method.
Step 7: Now open the tracer and run the flow.
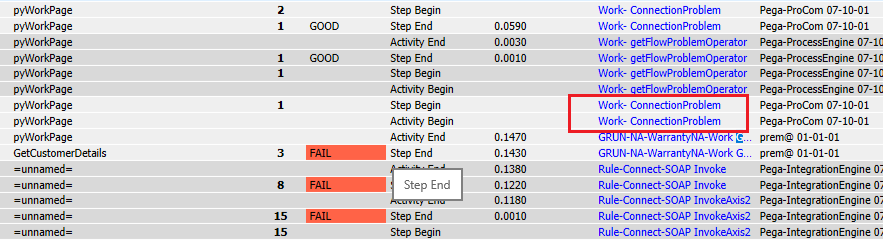
You can see ConnectionProblem flow gets executed from step 3.
Note: You can customize the connectionProblem to meet your business requirement.
What are the things to remember, when you configure Connect-SOAP?
– When you are using wizard, you need the WSDL file or WSDL file location as the only pre-requisiste.
– Wizard can create all the supporting integration rules related to Connect-SOAP integration.
– Connect-SOAP supports only XML as messaging format.
– You can also secure the SOAP connection using WS-Security.


