


In this blog article, we will understand some new information about the XML mapping rules – Stream-XML. One more step closer towards SOAP Integration ????
I would suggest you to visit the blog article on WSDL unfolding –
Update: The activity rule methods remains the same across different Pega versions. The screenshots in this blog article were reused from Pega 7 version. Use this blog article to learn the concepts and you can try it out in the latest versions as well.
We know that SOAP supports XML messaging formats.
It means, say if you want to communicate with other systems through SOAP protocol, you need to send the message in XML format.
Similarly, If Pega hosts a SOAP service, then other system needs to send the message in XML format.
So, Now tell me how message is processed within Pega application.
Properties. Yes properties help in storing data.
We know different modes of Pega properties
Single value, value list/group, Page, Page list/group etc.
So we have the data as properties, who will be converting the data to XML format?

XML Mapping rules.
What are the XML mapping rules?
In Pega, we got 2 XML mapping rules.
XML Stream – Maps the clipboard data to outgoing XML formats
Parse XML – Parse the incoming XML to clipboard data.

First we will see XML Stream rule.
How to create a new XML Stream rule?
1. Mostly Integration wizards, help in creating XML stream rules. We may need to update the existing stream rules to add new elements.
2. In rare condition, we may need to manually create new XML stream rules.
Step 1: Records explorer – > Integration mapping -> XML Stream rule -> Create new

Step 2: Enter the identifier and XML Type
What is XML Type?
This forms a Key to the XML stream name.. You can assign some valid name here.
Note: You can use MapFrom XML Type when you need to use this XML stream in Pega service response.
Where do you refer XML mapping rules?
1. XML mapping rules are mainly used in web service rules
Connect – SOAP , dotNet, Email etc
2. In Activity methods can use XML mapping rules.
a) Property-set-XML – refer XML stream
b) Apply-Parse-XML – refer Parse XML rule
How to configure XML rules?
Mostly the Connect/Service wizard , helps in creating XML mapping rules.
Let’s straightaway go to through the XML stream rule
I already created a sample XML stream. I will suggest you open any existing simple XML stream.
We will walk through each fields.
There are 2 main tabs.
- Mapping
- XML

Purposefully first I am going to explain the XML tab
XML tab

You have 2 blocks,
1) XML schema
Schema URL – You can specify the URL of the XML Schema document here.
This is applicable only for Auto-generated XML.
What do you mean by schema URL?!
– XML Schema provides documentation on the available elements and attributes.
– XML Schema can be available in either XSD or DTD documents.
Just click on the below URL to see a Sample XSD Schema URL
https://www.w3.org/TR/2002/REC-xmlenc-core-20021210/xenc-schema.xsd
This Schema URL can be external or it can refer to the ServiceExport directory in web servers.
You can see the above URL referring to service export directory
file://web:/StaticContent/global/ServiceExport/Services.xml
2) XML generation
Auto-generated XML – Maximum use this option, to Auto generate XML.

– It means the XML source is auto-populated based on the configuration in the mapping tab.
– If you uncheck this option, then mapping tab content will be disabled. (Like the same as Non- auto generated HTML section)

Use SOAP 1.1 encoding
You can use this option to add the attributes referring the element data types.
Let me show you.
a) This is XML source with encoding

You can see the xsi:type attribute added to the elements.
b) XML source without encoding

You won’t find the data type attributes.
Remember, encoding will help people let you know the data type for each element. So what do you say. Use Encoding 🙂
This is applicable only when Auto-generated XML is checked.
Add type attribute to root element –
This is applicable only when SOAP 1.1 encoding is unchecked.
Use this option to add the data type attributes only to the root element ( parent node)

You can see the xsi:type attribute added to the root element alone 🙂
Omit extra spaces – Always check it. This will eliminate the extra spaces without altering the content.
Generate for – JSP
XML source – When Auto generated, this will be altered based on the configuration in mapping tab.
When non-auto generated, you need to manually update the XML content for this XML stream rule.
Mapping tab
Helps in mapping Pega properties to XML structure.
Allow tree editing?
Only one selecting this, we can manually add the attribute or element or delete those elements.
If you uncheck Allow tree editing

You can see Add element, Add attribute and Delete buttons are missing 🙂
What is the difference between attributes and elements?
First, the XML message format is not only limited to SOAP. It can be extended to Email, file also.
Check out the below example
Sample 1:
<CustomerServiceRequest CustomerType=”Platinum”>
<Name> Prem </Name>
<Age> 26 <Age>
</CustomerServiceRequest>
Sample 2:
<CustomerServiceRequest>
<CustomerType>Platinum</CustomerType>
<Name> Prem </Name>
<Age> 26 <Age>
</CustomerServiceRequest>
In sample 1, we added Customer type as attribute and in sample 2, we added customer type as element.
So now tell me, what is attribute?
Attributes, can be used to refer the data characteristics.
Note: There is no such restriction like we should use only attributes or elements in any situation.
But prefer elements over attributes, when you refer any data.
In HTML, we normally use these attributes to define the styling characteristics like Bold, background color etc, but In XML maximum we use individual data ( prefer element).
Whenever, you host a SOAP service, Pega creates only elements and no attribute will be Added.
When you consume any external service(Connect), then attributes are possible.
The main differences between elements and attributes are
1. Attributes can contain only single value, while the element can be extended to hierarchical structures.
2. Similarly we can extend the elements and add new elements inside (like page property, adding new single value property inside a page), but we cannot extend attributes.
Note: You can see elements are identified by ‘e’ and attributes by ‘a’
Element properties
Step 1: Just double click on the CustomerServiceRequest element.

Node Name – This is just a label name.
Node Type – Attribute / Element
You can specify the node as either attribute or element.
Below you have 3 tabs.
Mapping tab
Mapping Mode –

You got 3 options to choose from – Standard, Literal XML or Apply rule
What are these 3 options?
a) Standard – When this option is selected, Pega constructs the XML message based on this node and its child node.
This will be default selected.
b) Literal XML – When this option selected, Pega constructs the XML message based on the XML content from source property (mapping tab)
c) Apply rule – When this option is selected, Pega constructs the XML message from the other referred XML stream rule. It’s like calling another XML stream rule.
a) Standard Mapping Mode
We have 3 fields to configure for standard mapping mode.

Context Page – If the element refers to Page / Page list property, you can refer the property in this field.
In our case, it is page property – CustomerServiceRequest, which hold the customer details.
Context Class – This will be pre-populated based on the Context page property.
Source property – You will this, when the element refers to any single value property.
Open the CustomerAge element and check the mapping tab.

You can see, for CustomerAge single value property, Context page is null & Source property holds the single value property.
Note: Context class here, refers to the Parent context page class.
Let’s check the XML table – XML source (auto generated content)

Here XML source is generated based on the nodes available in the mapping tab.
b) Literal XML mode

Here Source property is mandatory. You need to specify the Source property, from which the XML content can be copied.
Let’s check the XML source page.
You can see the XML content is copied from the source property.

c) Apply Rule mode
Here you can specify another XML stream rule, from which we can build the XML message

Stream Name – Specify the new XML stream rule name to refer
XML Type – enter the second keyword to XML stream name.
It’s like calling another XML stream rule. Let’s check the XML source page.

Node tab
In node tab, you have 5 configuration points.

Node Namespace – This is just a identifier. You can add a namespace prefix to the element. In case you have same time of element, this will serve as a unique identifier.
It is not a mandatory option. Cool 🙂
Optional –
Imagine when CustomerAge property is null for certain cases. So here in the XML stream, we can configure the element to behave Optional. It means,
– If the element is null, then it will not be added to the XML stream message.
– If not checked, the message will always contain empty element tags with no values.
Nillable – This is related to Optional field and applicable only when Optional is not selected.
So when optional is not selected and the clipboard data is null, then we can send a special attribute within the element “xsi:nil”.
Select Nillable option and check the XML source page

Substitution group – It can be None/ type/ element.
We will see in detail in Parse XML rule article.
Type tab

You have 5 configuration points here.
XSD Base Type – This is applicable when we use SOAP encoding 1.1
We know SOAP encoding specifies the data type. Here in this field, you can specify the Data type of each element.
Note: When the type is simple like decimal, Integer, then you can directly refer the name here ( for single value property). When the type is complex ( page type property) then you can specify ‘anyType’
Check for the page property, XSD base Type is anyType

Type Name – This is applicable when we use SOAP encoding 1.1
You can specify any valid name here. This name will be used in referring to data types.
Check the XML page.

You can see the Type name for CustomerserviceRequest page. ( You see ns1 – name space)
Similarly for CustomerName element, we didn’t add any Type name so default value “xsd” used.
Type Namespace – This is applicable when we use SOAP encoding 1.1
You can specify the namespace value here ( unique identifier)
Default value – You can also have an option to specify a default value for the element.
For customer age, I added default value to be 26.
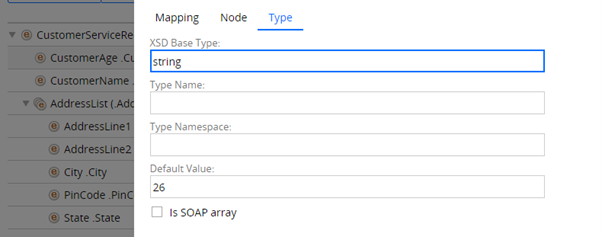
Now check the XML page – you must see the JSP directives with when condition.

Is SOAP Array – This is applicable when we use SOAP encoding 1.1
When selected, the element should contain immediate child as a repeating element.
These are all just some understanding about the XML stream rule :). Maximum we will not create a new XML stream, but we may update it.
How do I update a XML stream rule?
a) Add a new element
Say you need to add Gender under CustomerServiceRequest.
Step 1: Select the node to which you need to add an element.
Step 2: Click on Add element button.

Step 3: Double click on the node and open the properties.

Step 4: You can update the node and type tab.
Step 5: Save and check in the XML tab.

You can see Gender added to the XML source.
Now CustomerGender property in Pega, can be send in the XML message request.
b) Add a new attribute
I need to add a attribute Salutation to CustomerName
Step 1: Select the CustomerName element.
Step 2: Click on Add attribute button.

Step 3: double click on the new node and add the salutation property.

In attribute node, all Mapping, node & type tab more or less resemble the element node.
Step 4: Save and check in the XML tab.

You can see the salutation attribute added.
How to use the XML stream in Activity method?
Step 1: Create a test activity – TestMappingXML
Step 2: Populate the request page with all required values.

MappingFile.CustomerServiceRequest will contain all the details.
Step 3: Use Property-Set-XML method to set the XML content to pyNote page.

I am going to use the same XML stream, I used before.
Let me open it again for you.

Step 4: Use a show-page for testing.

Step 5: Run the activity and check the page.

You can see the pyNote is populated with XML content with all values we provided.
We will end the post here. I hope you got some good information on XML stream rules.

