Configure Reports in User portal

In this blog article, we will see more in details about how to create reports and personalize from user portal.
The below article is applicable only for UI-Kit based applications.
Update: The concept of Reporting remains the same across different Pega versions. Most of the screenshots in this blog article were reused from Pega 7 version and few were updated. Use this blog article to learn the concepts and you can try the entire tutorial in the latest versions as well.
In earlier versions, normally developers create the reports for the business users. Developer use, report definition rules to create reports and UI rules to display them in the user portal.
In the recent releases, you might have come across many features made configurable to business users. The most important one is reporting!!
Business users can themselves create reports from the user portal. Obviously at back end, report definition rules are created.
How can you create a rule at the back end?
Just think broader. Pega rules are mostly configurable.
To create a new rule, you need values for some configuration points.
Take report definition as example, what are the major configuration points required to create a new report definition rule?
- Report name
- Report class
- Reporting ruleset
- Columns to include (format)
- Filter conditions
Normally as a developer, you can configure these details in the report definition rule form. So what about business users, who have( or don’t have) only minimal knowledge on report definition rule form.
Pega provides a template to the business users, to fill the require details :).
On saving, Pega creates a report definition at the back end. Is it a radical automation :D. Yes it is
Filling the template is always easy for any business people. Job done.
How to create a new report from the user portal?
Step 1: Login designer studio and launch the manager portal.
Why manager portal? – default manager portal provides reports in the dashboard left navigation.
Step 2: On the dashboard left panel, click on the ‘Reports’

You get the recent reports column in the work area and categories in the right panel.
Step 3: Go to right panel

Here you got 2 buttons.
- Add report
- Add category.
You can also find the list of categories available.
What is private category and public category?
– You can create a new report under a category.
– Categories help in grouping the reports. For example Sales reports, service reports etc.
– So whenever you create a new report, you can have it in private category and do all the changes. It is more or less like having a private checkout and doing all the changes. It will not be shown to other Operators.
– Once you complete your changes. You can publish your report from private to public category.You can also directly publish it to public category.
Note: Public category include – standard and shared category. More details on category, we will see at the end of this post.
System automatically creates a new private category My Reports, whenever you create a new report. We will see about it soon.
So, here I am creating a new public category. Click on Add category and specify the category name and type.

Click submit. You can see a new public category with 0 reports.

Now you may get a question, how this is stored in Pega?!
Pega creates a new rule under category rule type J:). We will see more in detail later in this post.
Step 4: Click on Add report.

Error!!. you must have a local ruleset available to create a category/report
This is a valid error. As I mentioned before, we will be creating a report definition rule at the backend.
We know every rule should we within a ruleset and to create one, we need an open ruleset version.
So, in this scenario, we need an open ruleset version 🙂
What are the prerequisites required to enable report creation from user portal?
1. Separate reporting ruleset
Step 1: create a new ruleset Records -> Ruleset -> New

I am creating a ruleset as “PKSReporting” – <Org Name>Reporting.
Step 2: Uncheck ‘Use checkout’ option.

Why do you do this?
Usually in Production environment, we don’t create any new rules. So, ‘Allow rule checkout’ will be disabled in all users operator ID for security reasons.

So, to enable users to create report definition in particular ruleset, we have to disable ‘Use checkout’ option.
Note: Usually in all production rulesets, use checkout option will be disabled.
Here multiple users can update the rule at the same time without any lock.
2. Specify the reporting ruleset in the Production rulesets array in the application rule
Step 1: Open the current application.
Step 2: specify the reporting ruleset under Advanced->Production rulesets. Save the application rule.

3. Specify the reporting ruleset in Operator Access group
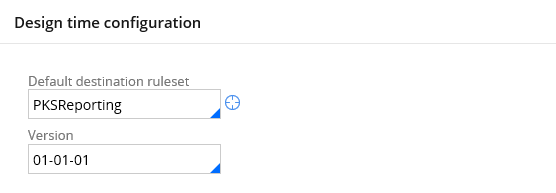
We need to specify the reporting ruleset as a destination ruleset in design time configuration.
Since, I am using my own operator ID, I am updating the my access group.
Note: Usually you update the users access group who can create reports in production
Step 1: Open the access group -> Advanced

Step 2: specify the reporting ruleset under design time configuration.

Step 3: When you save the instance, you may get this error.

This is because, you need to specify the reporting ruleset in the product rulesets array in the access group form.

All perquisites are set. Let’s continue creating the new report.
Step 5: Go to the user portal and add a report.
Now you don’t have the error.

Here, you can specify two things.
a) Case type –
Technically – determines the Applies to class for the report definition.
Functionally – determines on which case instances, we need to report on.
b) Report type – List / Summary

Here, I am choosing Case type – Sales & Report type – List. Click submit
Step 6: you get the report editor window.

Hope you know, how to add columns and filter using report editor.
You can also visit the below link for more details.
Step 7: I am removing all the filters and adding case ID & Customer name as the display columns.

After adding columns and filter options, click done editing.
You get a modal dialog to enter the report name and save the report under either private or public category.

You can see Pega created a new private category ‘My Reports’.
I am going to save the report under Private category.

Click on the private category. You can see the report ‘Sales Case details’.
What are the actions you can perform on reports and categories?
a) On Categories
Click on the settings icon near the categories. You can edit the category name.

b) On Reports
Click on the settings icon, you got five options.

Edit – You can edit the report title and description.
Move – You can move the reports to another category within private or public category. Source report gets removed.
Copy – You can copy the report to another category between private and public categories. Source report is not removed.

I am copying this report into Sales reports public category.

You can see the report got copied in Sales Reports.
Delete – You can delete the report.
Note: Deleting the reports, make the corresponding rule blocked.
Schedule – You have an option to schedule the report.

Task Scheduling – You have few options to schedule the report delivery ( time and error hadling).
Task Output Processing – You can attach the report in PDF or excel. You can select the operators you need to send notifications. You can either attach it in the email or send a link to download.
You also have an option to configure notification message. Click on the button.

You get fields to enter the email subject and message. Click submit.

You can see the report is scheduled and subscribed.
Now let’s see what really happens at the back end.
What are the rules and data instances that support reporting?
Step 1: Open the reporting ruleset.

Step 2: Click on the All rules count link.

You can see three types of rules got created
- Category
- Shortcut
- Report definition
First, let’s see the report definition rule .
Report Definition
Click and open the rule.

Now you open the same report from user portal. Click on edit report and remove the pylabel column.

Save the report. Now come to designer studio, and refresh the report definition.

You can see the pyLabel column removed automatically. So the changes you do from the portal will get reflected in that report definition.
Note: You can also perform the vice versa. Updating the report definition rule directly, can reflect the changes when viewed from the user portal.
Category
There are 2 new categories created. One private category and one public category.
Click and open the Sales report category.

Public category can be owned by two ways.
ALL – Standard. ( Accessed by all people)
<Access group> – Shared ( Accessed by specific people under the access group)
What is the difference between standard and shared categories?
– Standard categories can be accessed by everyone. Shared categories can be accessed only by particular access group.
– Pega creates the standard category by default, when the user has enabled checkout in the operator rule form. Shared category is created, when the same is not enabled in the operator rule form.
– Standard categories are denoted by owner type ‘S’ while shared categories are denoted by ‘A’
Note: private categories are denoted by ‘P’
Let’s test this.
Step 1: Use any manager operator ID and uncheck the Allow rule checkout option.

Note: Also make sure the manager access group is specified with reporting ruleset.
Step 2: Login to manager operator ID and create a new public category – TestShared.

Step 3: Now check the category rule in the reporting ruleset.

You can see Owner type ‘A’ shared and Owner as Managers access group 🙂
You can also create a new category – Records -> Reports -> Category

You can specify the Owner type and owner name!
Shortcut
Click and open any shortcut rule in the reporting ruleset.

You can see the ID highlighted
MyReports – category name; P – owner type; Prem – Owner name (private); Sales case details – rule name.
You can see each shortcut points to a report definition rule.
Just imagine shortcut as a pointer to the report inside category. If you copy the report to new category, then a new short cut will be created.
You can also create a new shortcut rule via Records ->Reports -> short cut

What are the instances that support scheduling reports?
Make sure you schedule a report as discussed previously.

a) Scheduled task instance
Pega creates a new instance under ‘Pega-ScheduledTask-Reporting’.
You can open by two ways.
- You can see those instances by navigating Configure -> Reporting -> Scheduled Reports

You can also click on the task name to see the contents. Case id is PX-ST-3

You may have to move this scheduled task instance to higher environment.
In such case, you can include the instance pzInskey in the product rule and move it to higher environment.
2. In the app explorer, you can open the class ‘Pega-ScheduledTask-Reporting’ and click on it to see the instances.

You can click and open the instance and get the pzInsKey.

Include the same in product rule and move it to higher environment.
So here a case is created, but how the notification is sent periodically.
On hearing periodically, you may remember agent processing.
b) Queue instance
You can open the class ‘System-Queue-ScheduledTask’ and get the queue items.

You can open the instance and get the pzInsKey. The same can be deployed to higher environments.
We are at the end of Reporting


