


In this blog article, we will see more in detail about the most commonly used assignment types in Pega
Update: The concept of Assignment remains the same across different Pega versions. Most of the screenshots in this blog article were reused from Pega 7 version and few were updated. Use this blog article to learn the concepts and you can try the entire tutorial in the latest versions as well.
Generally what do you mean by assignments?
A piece of work allocated to someone.
BPM – Business Process Management. Pega is a BPM tool. Every BPM application involves processing Cases and performing work.
Who will be processing this work?
It can be performed either by someone or it can be automated.
So, If a particular task is to be performed by someone, then we can say he/she is assigned to a task.
Let’s relate this to Pega.
Loan Approval process
Consider bank ABC provides personal loans. ABC Bank uses Pega application for loan processing.

We will use the above picture.
Step 1: Person A fills out the loan request application and applies for the loan.
Step 2: The Bank receives the loan and creates a loan request case. Say Loan – 1. (Case creation can be initiated by many ways like Service Email or any other services)
Step 3: Now the case Loan – 1 is assigned to a workbasket.
What do you mean by workbasket?
– You can consider the workbasket as a parking place for work.
– Cases/work waits here until some people or some automation process handles it.
Step 4: Now bank employees can pull cases from the workbasket and process the case individually.
It means the cases are moved from the workbasket assignment to the worklist assignment.
What do you mean by worklist?
– Worklist means the list of cases/works assigned to individual operators rather than waiting at a parking place.
Step 5: After processing the request, the employee sends the case to the bank manager’s worklist. The bank manager can either approve or reject the case.
The case is resolved.
Now technically, the case lifecycle can be described in 5 steps
- Case creation
- Assigned to workbasket – waits for bank employee
- Assigned to worklist – bank employee picks and processes the request.
- Assigned to worklist – bank manager approves/reject the request.
- Case resolved.
First, let’s create a new loan request case with simple stages and steps. In the middle explain more aboutthe worklist and workbasket.
My Initial design is to have 4 stages.

In the case creation stage, I am going to collect the information.
Now let’s understand both the worklist and workbasket through the tutorial exercise
What are other prerequisites for the tutorial?
1. Actors / Operators
We will use 2 actors.
- BankEmployee1
- BankManager
Step 1: Create 2 operator IDs using the above names.

Note: Ideally, both operators can have their own access group with roles. To stay in the context of this tutorial, I provided them with default manager access group
2. Workbasket
Now let’s see how we can create a new workbasket.
Step 1: Records -> Organization -> Workbasket / Work Queue ->right click Create
Update: In the later versions, Pega renamed the rule from Workbasket to Work Queue. Both refer to same concept ????

You can specify the workbasket name and description
Note: Always provide some meaningful name. My suggestion is to append a queue at the end.
Step 2: Fill out the workbasket form.

General
Type – Standard / Robotic. This was introduced recently supporting robotic automatic. Let’s select standard.
Organization
You have to specify the organizational structure to which this workbasket belongs.
We can use our current org/div/unit name.
Work group – a group of related people working together. Ideally in every application we have different work groups for different people.
For now, use your default organization workgroup. In our application, it is Default@PKS.

Contacts
You can list the operators that are related to this workbasket.
Say for example, a Bank clerk should be notified whenever a new loan request arrives in the workbasket. Then you can include the bank clerk operator ID in the contacts array. It accepts more than one operator.
Then you can use default activities like NotifyAssignees or NotifyAllAssignees to notify the contacts 🙂
For now, we leave it blank
Roles
This will provide the security for the workbasket.
Say for example, you need only Bank employees to pick items from the workbasket and process the loan request, then you can add the Bank employee role in the Roles array.
Then only operators who possess the specified role can pick up the cases from workbasket 🙂
For now, we leave this too blank! Save the Workbasket rule form.
We are done with the prerequisites.
Let’s go ahead and configure a new Loan request case with the right assignments
Step 1: Case Designer – Add a new case type Loan request

Step 2: Add the 4 stages.

Step 3: Start adding steps
Stage 1 – Add a collect information step

Click on Configure View and Input the fields. I am just collecting some basic information.

Stage 2 – we will configure the process manually.
Stage 3 – Use approval/reject shape.

You can specify Route to – specific user and specify the Bankmanager operator ID. You can also assign the case to the workbasket here.
Specific user – Worklist
Work queue – workbasket
Step 4 – Resolve the case.
Stage 2 – Process Creation
Let’s create a new process for stage 2 manually. All you have to create is a new flow rule.
As per our design, In the second stage first we need to route the assignment to workbasket and then it will be routed to the bank employee worklist.
Step 1: Go to stage 2 and use the dropdown icon and select “Add process”.

Type the process name as loan processing and save the rule.

Then click on Open process on the right side to open the flow rule created by the case designer.

There you see a new flow created with a single assignment shape. Now you can customize this flow as like as you want 🙂

Step 2: Workbasket assignment
How to configure a workbasket assignment?
Note: In our case already an assignment shape is added by case designer.
Include the assignment shape from the Add Shapes icon.
Double-click on the assignment shape to configure the assignment.
Routing – Who should complete this step

Current operator – Route to the current operator who is executing this flow. – Worklist assignment
Operator – In the dropdown, you can select any operator to whom you can assign this assignment – Worklist assignment
Work queue – In the dropdown you can select any workbasket name – Workbasket assignment.
Custom – you can write your custom activity of type Assign and use your own logic. – Worklist / Workbasket assignment.
Use business logic – You can use a decision tree to return the user to whom you can assign – Worklist / Workbasket assignment based on business logic.
In Our case select Work queue and then select the LoanProcessingQueue workbasket name.

Note: As a best practice, do not hardcode work queue names directly, Instead try to make use of DCR functionality. For demo purposes, we will hardcode.
Save the flow rule. Also remember this thing when you deal with assignments.
Assignment – A step that requires human input.
It means the assignment shape-out connector should always use a flow action rule to perform user input. So whenever the flow enters the assignment shape, it waits either in workbasket or worklist until user performs any action 🙂
As of now, we will include some dummy OOTB flow action. ( the only reason is we don’t want to drag this article!!)

Note: You can create your own flow action and section with input fields.
Now let’s test the workbasket assignment
Step 1: Launch the user portal and create a new Loan request case. L-7
Here is the first stage where we collect the information.

Step 2: Click on submit.
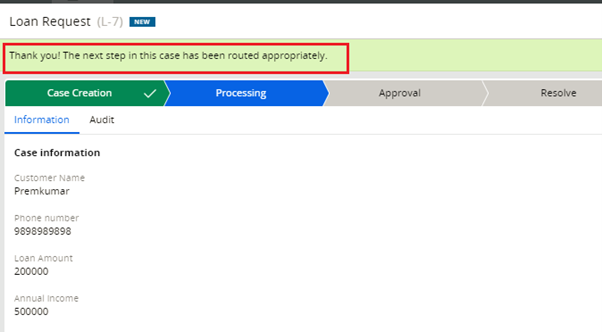
The next step is routed appropriately —??? Yeah, its in the workbasket 🙂
Step 3: Check on the Work queues widget and click on the workbasket.

You can see the case L-7 is routed appropriately 🙂
Let’s go back and repeat the steps. Before clicking on Submit in step 2, turn on the tracer.
Remember to check the DB query in tracer settings.

Let’s analyse the tracer output
Step 1: On submitting the collect information, the assignment is completed and then the second stage is entered. Flow ‘LoanProcessing’ starts.

Step 2: Activity of type ‘Route’ – ToWorkbasket is called. This is a router activity and accepts the workbasket name as parameter.
Step 3: Then the flow assign starts with new assignment creation.
How Pega saves the assignment?
Pega persists the assignment.
It means a new assignment is saved in a dedicated database table.
Step 4: AddAssign activity is called. This activity creates a page ‘newAssignPage’ and saves the details to database table.

Note: Whenever you open an assignment, you can see all the assignment details in the newAssignPage. You can check the content of this page via Clipboard tool.
If you open the Assign-Workbasket class and use test connectivity, You can see it is mapped to pc_assign_workbasket table. It means all assign-workbasket instances will be stored in pc_assign_workbasket table.

Also, note the key of the Assign-Workbasket class.
pxRefObjectKey – pzInsKey of the case.
pxFlowName – In our case LoanProcessing
Remember no two instances can have the same class keys. So what do you understand here?!
It means for a case, you cannot have more than one assignment within a single flow. Let’s put the other way around. A case can have more than one assignment. This paves the way for parallel processing ????
Finally, in tracer, you can see an insert query was executed in pc_assign_workbasket table.

It’s time to check in database table.
I used the below query
select pxcreatedatetime,pxassignedoperatorid,pxflowname,pxrefobjectkey,pxrefobjectinsname from pc_assign_workbasket where pxRefObjectInsName = ‘L-9’

pxAssignedOperatorID – the column name speaks. Identify to whom the assignment is assigned. In our case it is workbasket name – LoanProcessingQueue
pxFlowName – LoanProcessing
pxRefObjectKey – Reference Object key . Loan request L-9 pzInsKey.
pxRefObjectInsName – Reference object pyID. – L-9
Now let’s see about worklist assignment processing
I will make this short, since this is the exact replica of Workbasket
Step 1: Add a new assignment shape behind the workbasket assignment in LoanProcessing flow.
Loan request review

Route to – Current operator. It means the case will be assigned to the bank employee who picks the case from the workbasket.
Note: My next post is on GetNextWork where we can avoid this cherry picking of cases 🙂

Again I used Actionstub as flow action. Save the rule
Step 2: Login as BankEmployee1. Click on the Loan processing queue workbasket.
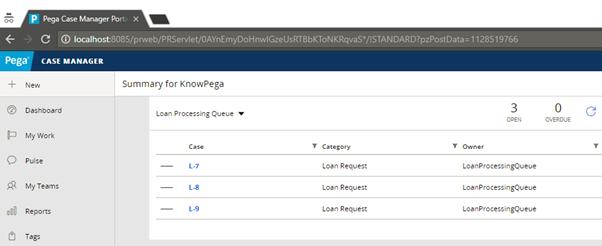
Let’s open L-8 this time
Start the tracer on click of submit.
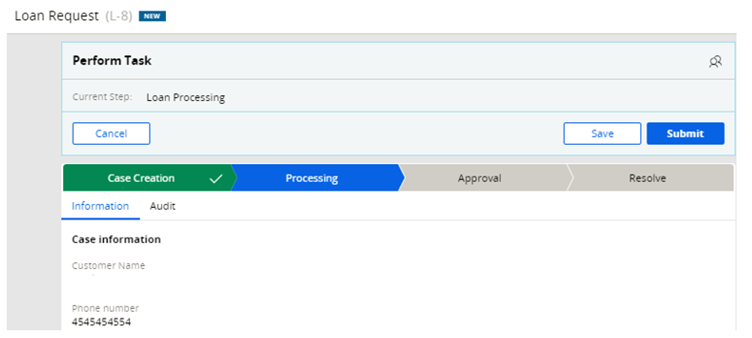
ActionStub flowaction just displays the current step.
Wait…… you need to remote trace the requestor – bank employee.
Open tracer and start remote tracing bankEmployee1

You can L-8 is assigned to current operator. Loan request review

Tracer shows ToCurrentOperator is called to assign the case.

Assign-Worklist class is assigned to pc_assign_worklist table.
Let’s go to database and query the pc_assign_worklist table.
Just alter the table name and case ID in previous query . That’s it.

You can see it is assigned to BankEmployee1.
So what happens to the previous workbasket assignment?
Rerun the workbasket query

You can see the assignment is removed.
I hope this is enough for workbasket and worklist.
Note: To display the workbasket and worklist assignments use report definition on the respective tables.
Hope you enjoyed this long post!

