Service REST – Usage and Configurations in Pega
First of all, don’t think INTEGRATION is a difficult topic in PEGA. I would say Integration is much easier than creating an activity rule.
Pega makes it simple for developers. All you need to do is configure the Integration rules. Pega takes care of the rest. Pega provides useful wizards and guides the developers in creating Integration rules.
Integration is full of fun. You will be transferring data between applications. Play with your data.
Let me start from the basics. Every BPM application needs some data to process.
Think of any application; banking, finance, insurance; everywhere, we need some data to process.
Pega stores the data in the form of property rule type. Data can be stored either in the memory or can be persisted in the database.
Okay fine. Now tell me, “To process any request, is it mandatory that all the data should be available within Pega?”
Enjoying this content?
Access the author’s full video courses here at MyKnowAcademy.
Explore Courses →
No. That is not required. Data can be available in other application too.
If we need some data from other applications to process a request, then we can use a connector rule.
If some other application depends on Pega data, then we can use service rule to service their request.
What is the difference between Connector & Service?
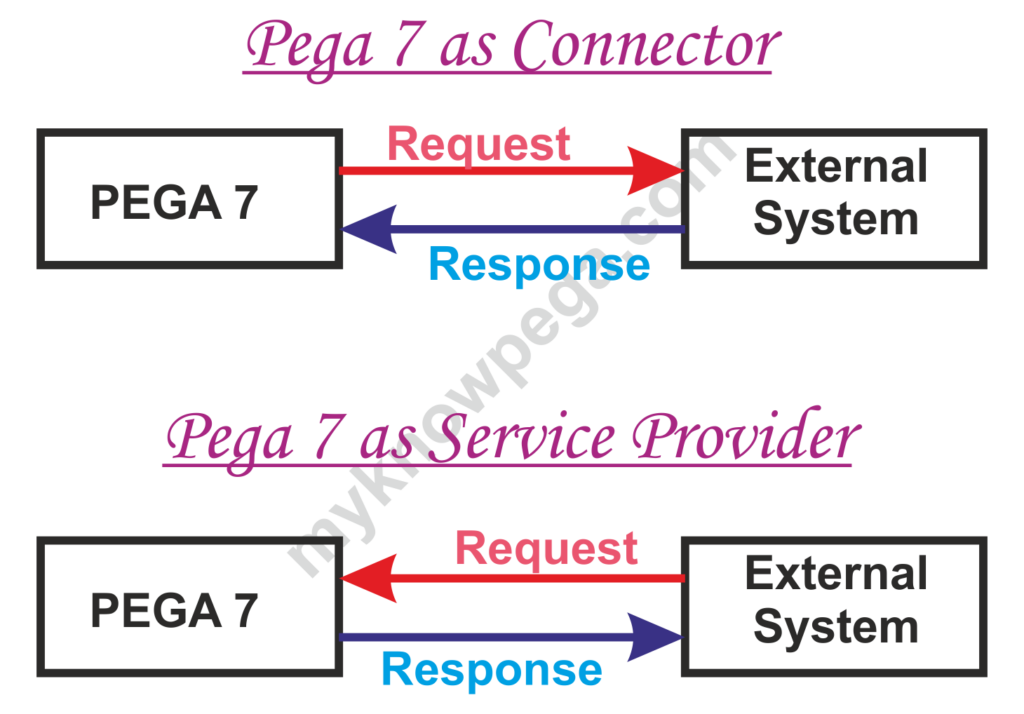
The below picture speaks.
Imagine you have opened a Chrome web browser. Hit Google map application.
What happens at the back end?
– We hit the Google maps server.
– We are the client requesting the data.
– The protocol used is HTTP protocol and the server sends a response.
– The browser paints the UI with HTML and response content.
Hit the URL shown below:
http://maps.googleapis.com/maps/api/geocode/json?address=Chennai
You will get the raw response data. This is how the server sends the response.
HTTP protocol is used above.
What is a protocol?
– Set of rules that ensure proper communication between applications.
– In web services, there are many layers.
Ex: TCP, UDP, HTTP protocols support transportation between applications.
Ex: XML, SOAP are messaging protocols.
JSON – Replacement of XML.
What is REST?
– Representational State Transfer.
– It uses HTTP protocol to transfer messages from server to client.
– REST can use JSON/XML as messaging format. But maximum we use JSON.
Why is JSON preferred over XML?
First, we need to know why we use JSON or XML.
Imagine, there are two close friends from different countries – France & Spain.
Spanish guys don’t know French like French guys don’t understand Spanish. So how will they communicate with each other? Yes, through some common language like English.
Similarly, there may be many applications built on different languages like C, Java, and Dotnet. They need some common web service messaging formats to communicate.
JSON & XML are the most commonly used messaging formats.
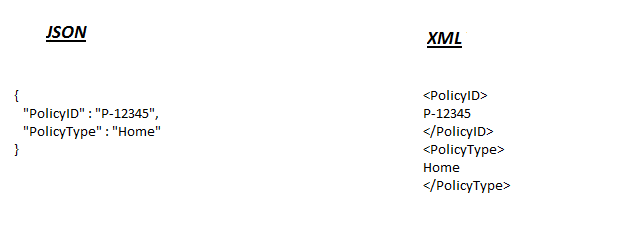
You can point out the differences.
– JSON is more easy to read when compared to XML.
– JSON supports only text and number type, whereas XML supports many data types like images etc.,. XML is basically a Mark up Language.
– JSON can also be considered as lightweight comparing to XML
Why REST is preferred over SOAP?
– REST can use JSON, XML or HTML as messaging formats to transfer data, while SOAP can use only XML.
– REST uses only URI to expose the service to the outside world, whereas SOAP needs to expose the service interfaces.
– As we saw before, the difference between JSON & XML, SOAP uses more bandwidth and resources for XML message formats.
– When SOAP use HTTP as the transport layer, it can use only POST method, while a REST can use all 5 HTTP methods like GET, POST, PUT, DELETE, PATCH
– REST is quicker than SOAP.
But there are a few advantages of SOAP over REST:
1. SOAP is more secure compared to REST. SOAP can secure the connection using WS-Security and HTTP SSL, while REST can secure only via HTTP SSL.
2. SOAP can use HTTP, SMTP and other transport protocols, where as REST depends on HTTP protocol alone.
There is no such condition that you should always use REST over SOAP.
Think about the pros and cons, then decide, but prefer REST 😉
How do we configure Service-REST?
First, let’s see the requirement scenario.
The external system needs to access the policy details stored in Pega system.
Let’s say the request is PolicyID and the response is in JSON format.
{“SampleResponse”:
{
“PolicyType”:”Home”,
“PhoneNumber”:”9999999999”
} }
Let’s see, how we can implement this.
Unfortunately, Pega doesn’t provide us with any wizard to create Service-REST.
Step 1: First you need to create the Integration class structure manually.
The big question is under which layer should we create an Integration class?
If the service is more application specific you can create it in the Application Integration layer and if it more specific to the Enterprise we can create it under the Organization Integration layer.
Let’s say we decide to create it under the Organizational Integration layer.
Tip: You can create all the Integration classes as Abstract classes and not concrete.
- One main Integration class to hold the service rules.
- Other classes to support request and response messages.
In our example,
Request – PolicyID – Single value, no need to create any class structure
Response – Complex structure, we need to create a class for SampleResponse
{“SampleResponse”: -à Page structure
{
“PolicyType”:”Home”,
“PhoneNumber”:”9999999999”
} }
Main integration class:
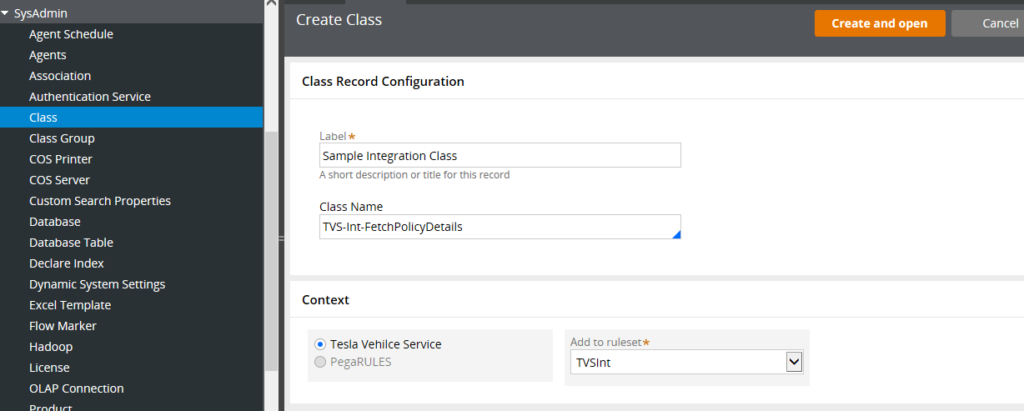
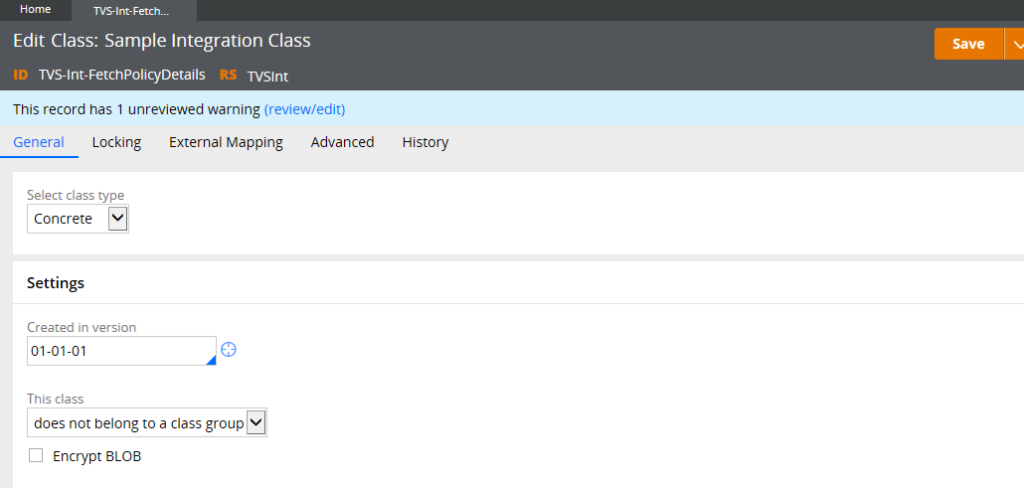
Specify the configuration fields in the class form.
Although I used the Concrete class, Please use the abstract class!!
Response page class:
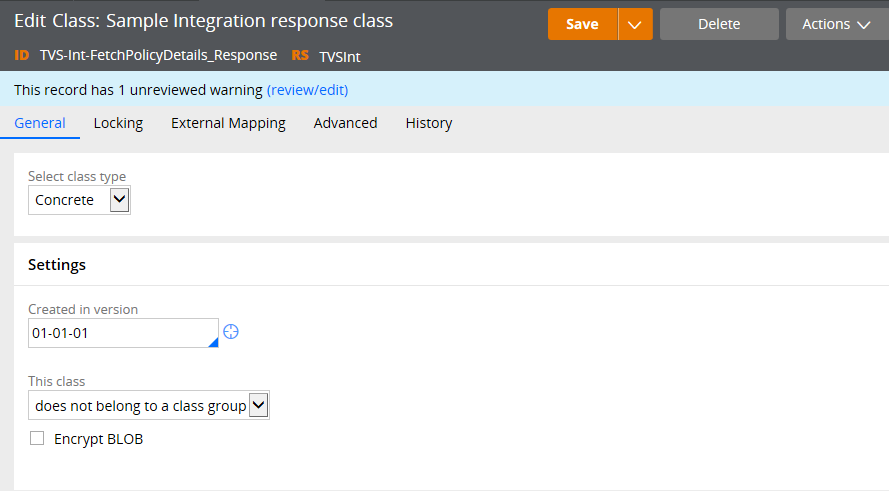
Now class is ready. “What will be our next step?”
Step 2: Create the request & response properties.
Request – Since the request is a simple single value, we can create a single value property in the main integration class.
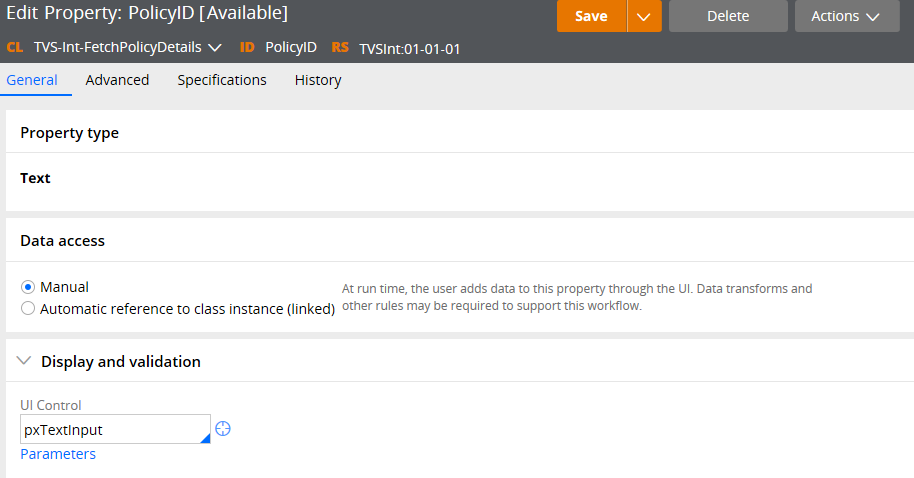
Response – It is a complex structure.
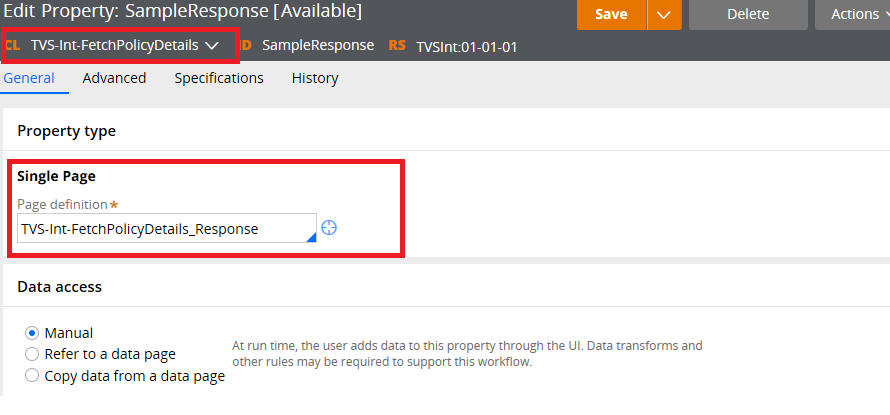
We need to create 3 properties.
SampleResponse – A page property to hold the response.
PolicyType, PhoneNumber – Single value property in response page class.
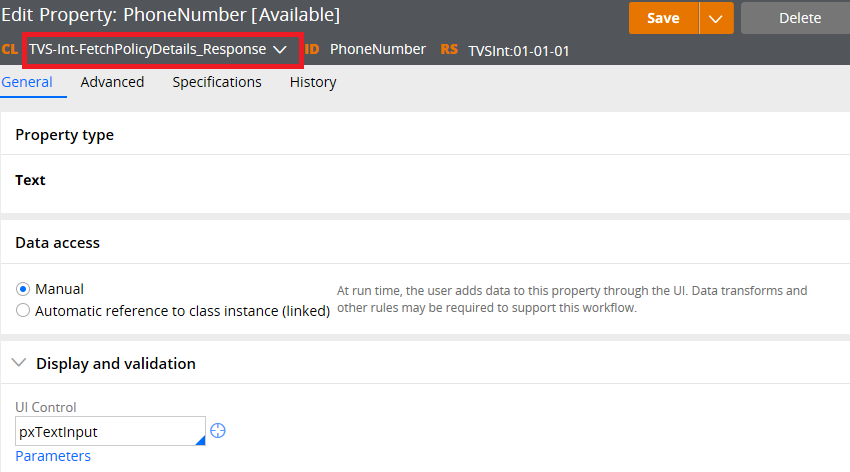
Now class and property structure are ready.
Important note: As per the latest versions, Pega recommended design is not to create Integration layer every time for your services. Instead, you can directly use your data layer. For example, if you just need to return the policy details, which are stored under a data type. You can skip the Integration layers and straight away create the Service-REST Primary page class as the Data layer.
Step 3: Create Service-REST rule.
It is part of Integration-Services category.
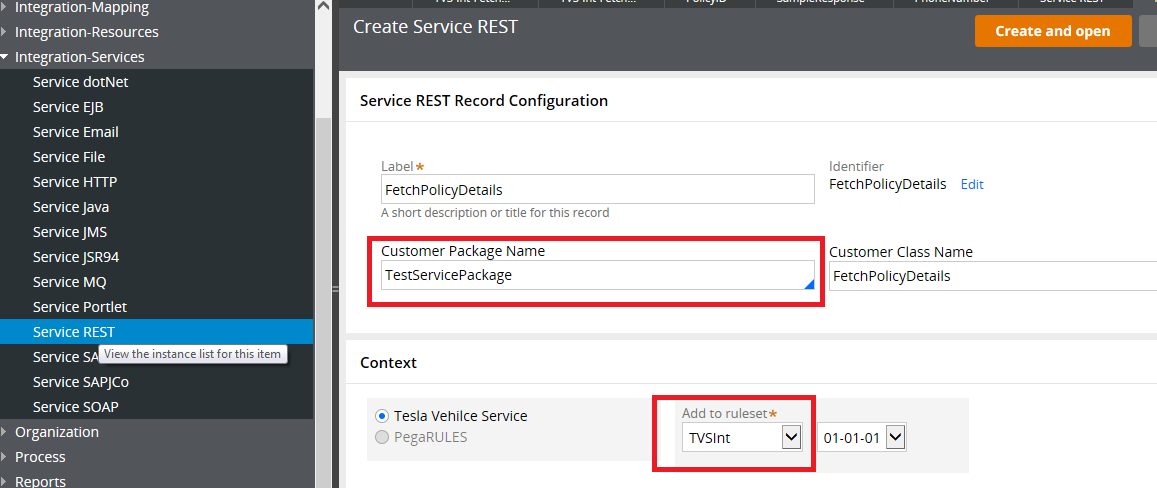
Customer package name – Specify the service package name.
We will see more about the service package in a separate article.
It is advisable to create the rule in Org Int ruleset – TVSInt
There are 2 main tabs:
- Service tab
- Methods tab
Service tab
Primary Page
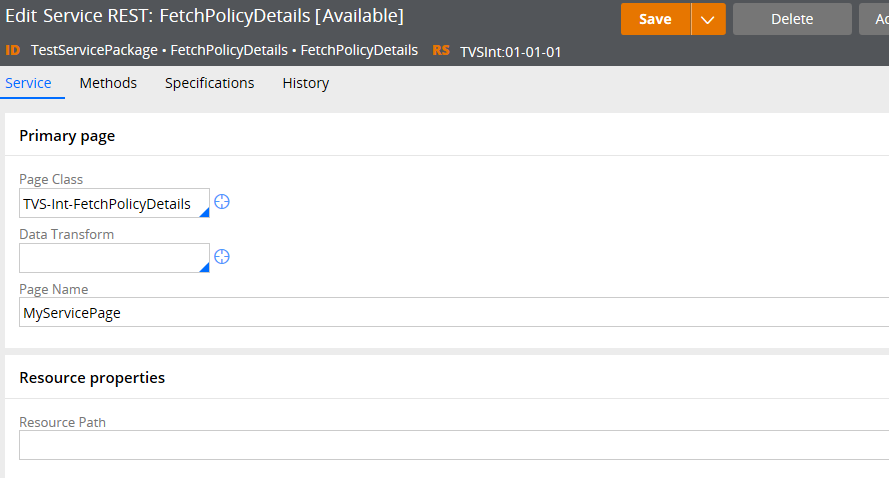
Page Name – You will see the default page as ‘MyServicePage’. You can keep it as such.
Page class – Specify the main integration class.
MyServicePage will contain the request properties. You can update those properties using data transform.
Resource Properties

First, let us see the paths and query strings in the URL.

This is the URL structure.
So, when you expose a new Service-REST, you can verify the URL in the service package rule.

The URL will be of this format,
http://11.12.124.32:8080/<ServicePackageName>/ServiceClassName/ServiceMethodName
Protocol://<HostName>:<PortName>/<Package>/<Class>/<Method>
You can add a few more resource paths to the URL.
For example, if you wish that the URL should contain two more resource paths, then
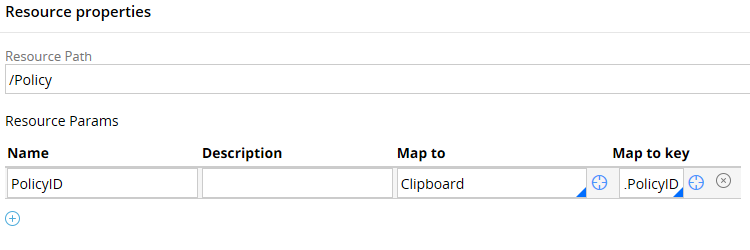
Now the URL will be,
http://host:port/<ServicePackageName>/ServiceClassName/ServiceMethodName/Policy/<PolicyID>
Here, policy is the resource path and PolicyID will be set dynamically based on PolicyID value.
For this testing, we leave that blank and proceed.
Processing Options
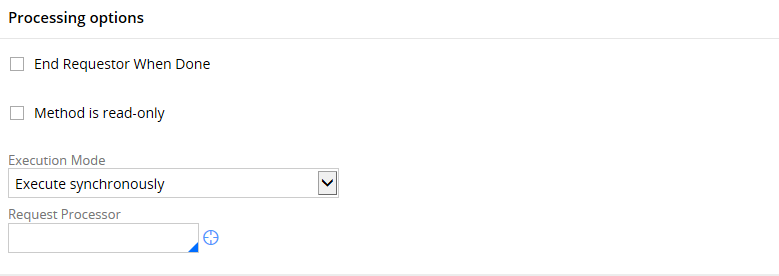
End Requestor when done – This is applicable only for stateful sessions.
Now you can ask me.
What is a stateful session?
Please go through the ‘Requestor types’ post, to get the basics of how a requestor gets created for Service processing.
A requestor in memory will contain clipboard pages to support processing.
After processing a request, this requestor can end and all the pages can be cleared.
But, why should we populate the clipboard pages again and again for new requests which belong to same service? We can maintain the state of those clipboard pages in memory and reuse it for new requests.
This is called a stateful session. If the clipboard pages are cleared after processing a request, then it can be called a ‘stateless’ session.
We can specify these values in sthe ervice package rule.
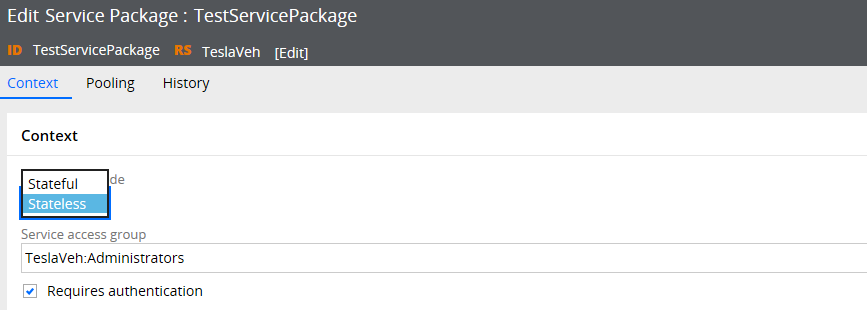
Services will be included in the Service package rule and inherit the context we specify here.
If we need some service to behave statelessly, even though the service package is stateful, then check this checkbox.
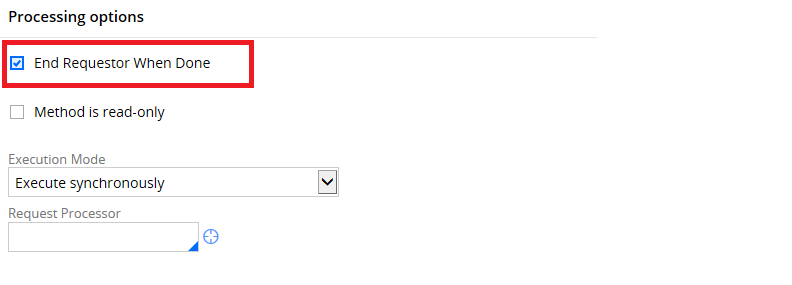
Method is read only – Leave it unchecked always.
Execution Mode
- Execute synchronously – Selecting will enable the service to process the request synchronously.
- Execute asynchronously – Queues the request to batch processing agent, to process the request asynchronously.
Request Processor – Is a rule type that supports asynchronous parallel processing.
Methods tab
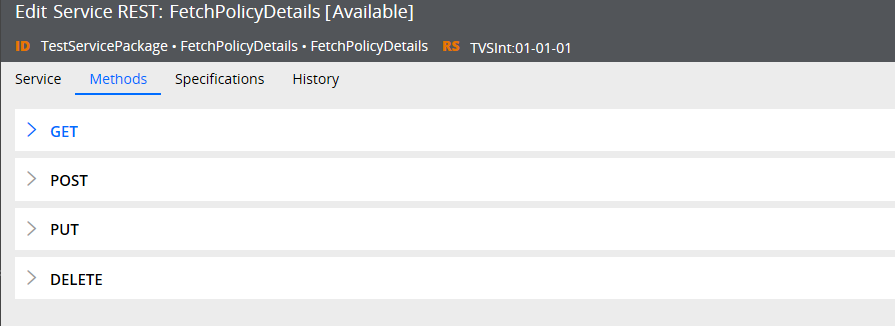
We know REST follows HTTP protocol and supports 5 methods:
- GET
- POST
- PUT
- DELETE
- PATCH
GET Method
Normally we use it to get some resource from server.
POST Method
Updates the resource in the service. It can also create.
PUT Method
Same as above, not able to figure out the exact difference. Most of the time we prefer POST method instead of PUT method
Follow this link to get more details:
https://stackoverflow.com/questions/630453/put-vs-post-in-rest
DELETE Method
Normally, we use it to delete some resources from the server.
PATCH Method
Can be used when we want to update only a few fields of a resource without replacing the entire resource
In Pega, for Service – REST, normally we use GET, POST.
The main difference between these two are:
1. In GET method, we don’t need the request body. We can send the request as query string.
2. In POST method, we will send the request in request body.
3. When the request is very simple, like our case – Only PolicyID, then we can use GET method. Also we are only retrieving data, so GET is perfect choice.
Let us use the GET method here.
First, we need to specify service activity.
Step 4: Create a new service activity – Handle all the processing logic in the service activity.
For now, I hard-coded the response in the MyServicePage.
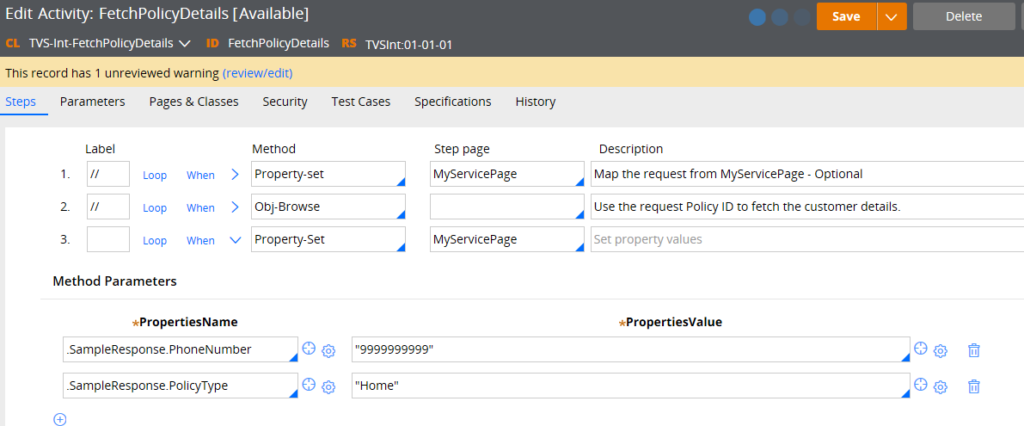
Now, service activity is ready. Specify the service activity in Service-REST rule.
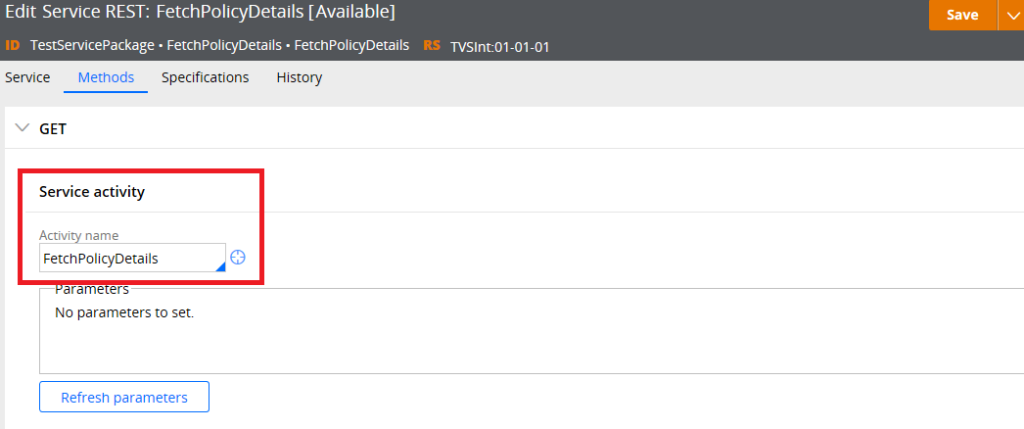
Now, let us specify the request parameter PolicyID in query string parameters.

By the way, we have successfully configured Service-REST
Its time to test our service. Let us test the same using PostMan application.
How do you test your Service API?
- You can either ping the URL or use some external testing applications like PostMan.
- You can run the Service rule manually by providing the request parameter.
Postman – Application used to test APIs
Step 1: Just search in Google and open the app.
Step 2: Select GET method and input the URL.

Step 3: Open the service-REST rule and do open rule trace.

Step 4: In the Postman app, click send button. You can verify the response.
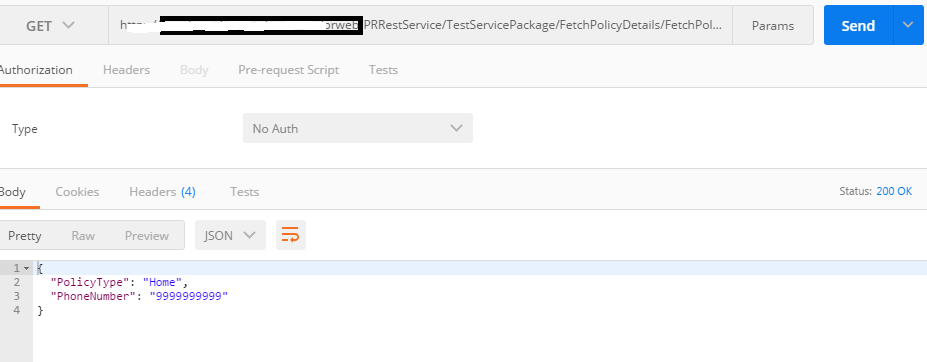
Step 5: You can see the service activity run from the tracer.

We have successfully tested GET method.
Let’s try authentication.
In Step 4, you can see that we didn’t send any authorization, because we didn’t add require authentication in service package rule.
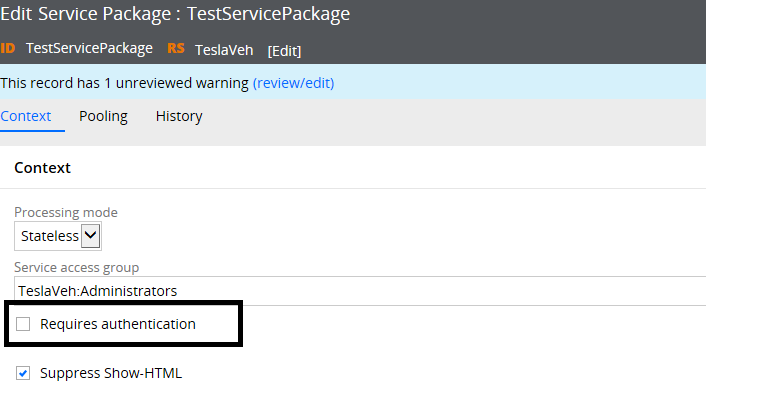
Now, check requires authentication and click send on Postman app.
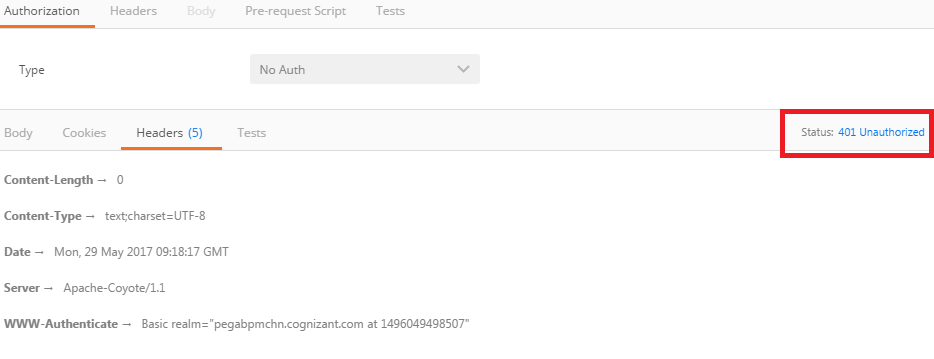
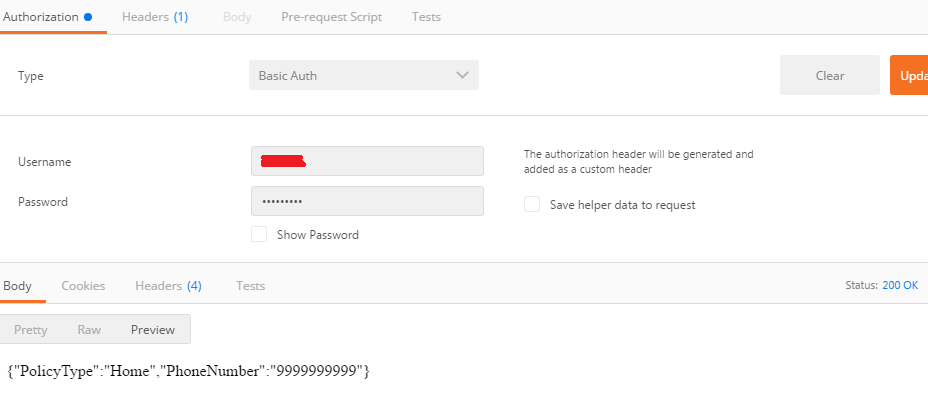
Now provide the authorization parameters and click update request.

Then click send. You will receive the response.
Okay, “Shall we test the same using POST method?”
Step 1: Update the service –REST rule.
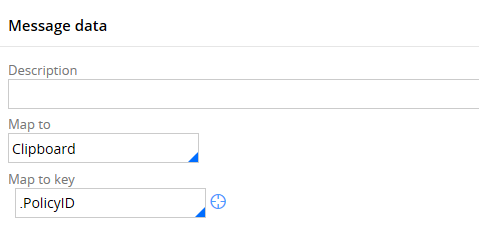
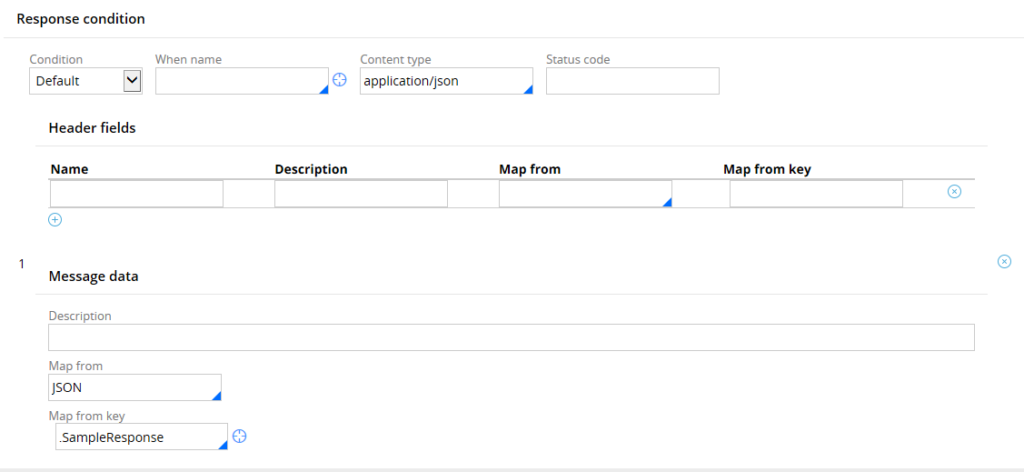
Remove the query string and send the request in request body. Use the same service activity.
Request
Response
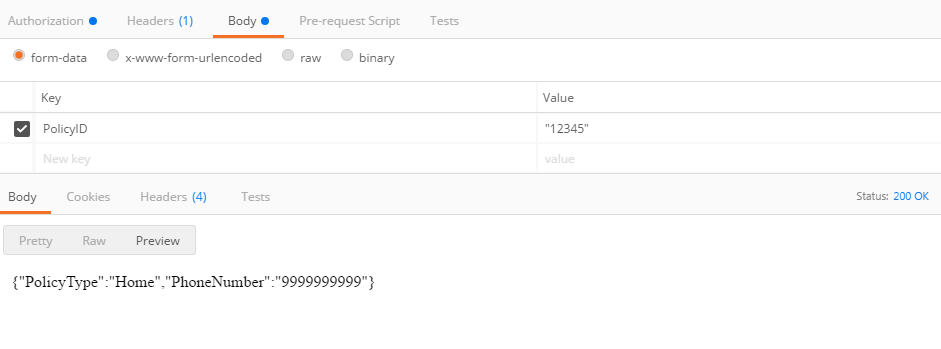
Step 2: Go to Postman app and test it.
Happy paths are done.
How to handle errors in Service-REST?
There are two ways we can handle error:
- Service-REST response conditions.
- Service activity handling business exceptions.
Service-REST response conditions
Click on the plus icon to add more response conditions.
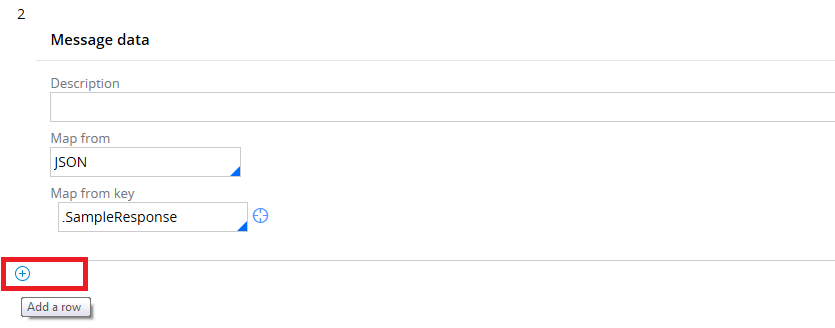
We will catch mapping error in our example.
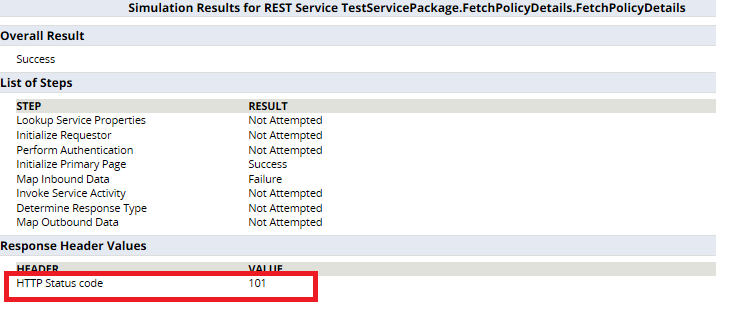
I added a new response condition – Mapping error and set the error code to ‘101’.
Update: As a best practice try to use 4XX range for error scenarios.

If you are having more than one response conditions, then move the default condition to the last.
For a change, we can run the rule and test the exception.
Step 1: Go to actions button & click run.
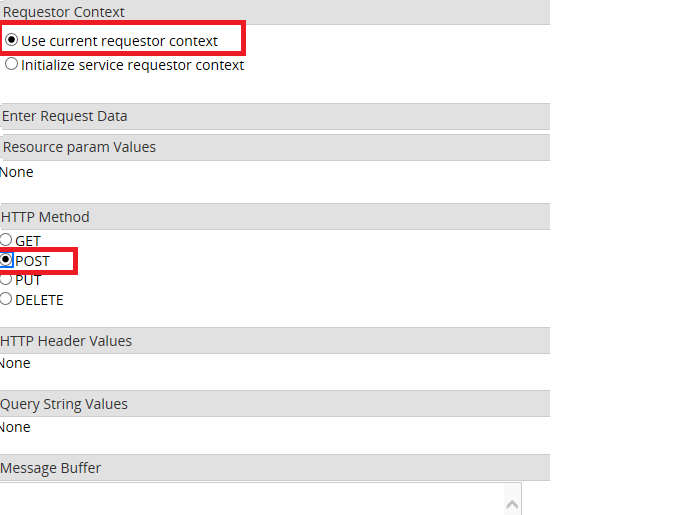
Step 2: Select method as POST and don’t provide any input. Execute it.
Step 3: You will get the error code.
You can test for variety of response conditions Pega provides in the service rule.

Service activity handling business exceptions
In the service activity, you can use the business logic to capture the exception and send the error details in the response page.
For Ex: Policy ID is null.
Step 1: Open the service activity.
Step 2: Introduce a step to check if policy ID is null in the pre-condition.
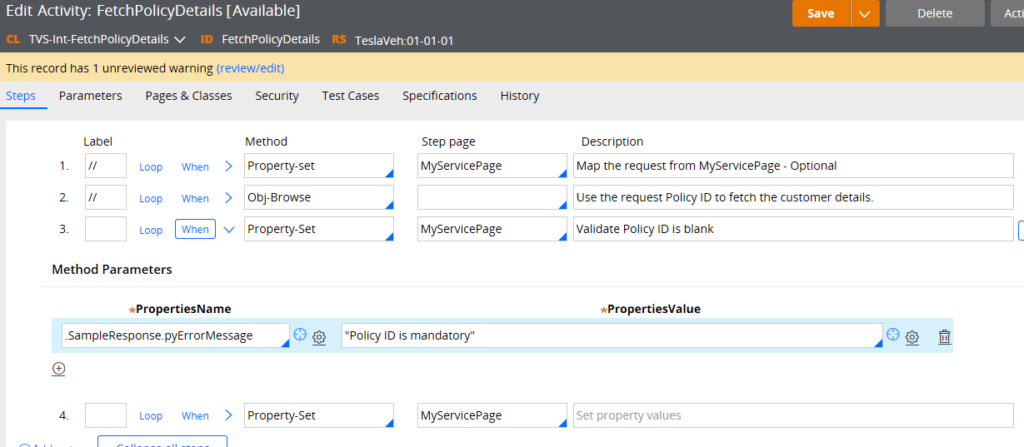
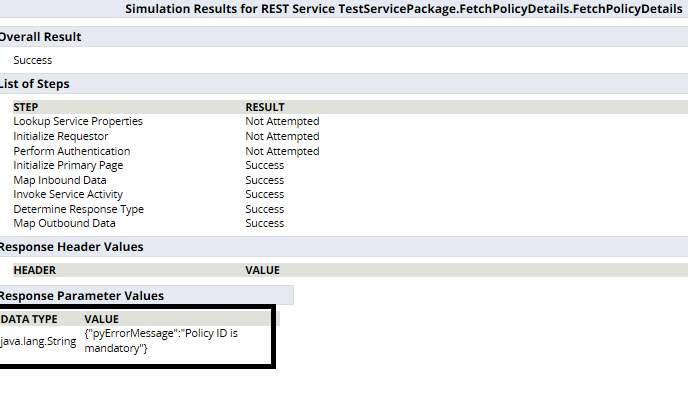
Step 3: If null, then set the error message in the response page and exit-activity in the transition.
Step 4: Now, run the Service REST rule with PolicyID as null.
Things to remember:
– Decide what type of service we need to expose like creating a new work item from the request parameters or just processing the request and sending the response values etc.,.
– Default service URL format is http://:///
You can add the resource path to this URL and can be parameterized:
– Decide the request parameters you need to process the request. Share the same with the client. Also get the required response values, the client anticipate from our service.
– Decide on which HTTP protocol, we need to use – GET, POST, PUT, DELETE. Maximum, we use GET or POST.
– Create the Integration class structure, Request response properties, Service-REST rule.
– Build your own business logic inside service activity. Set the response values in the service activity.
– You can use JSON, XML, HTML formats as input. Preferably, use JSON to gain its advantage over XML.
– Decide if authentication is required for our service. Authentication is recommended to secure our service.
In the next article, we will talk about Connect-REST.


