Notifications in Pega – Part 2 – Web Gadget channel

In this blog article, we will see how we can send out notifications from Pega. Notifications can be email, mobile push messages or an update on the notification gadget.
It is mandatory to go through my previous blog articles on WebSocket introduction. In the article, I will showcase the notification update using the out-of-the-box Notification gadget which in turn uses the WebSocket technology.
Business scenario – When a new sales case gets created automatically, then the special Intake team should be notified so that they attend to the case at the earliest possible.

This requires very minimal configuration, and everything comes out of the box.
Let’s step into the tutorial and achieve this functionality.
How to configure case notification in Pega?
Before getting into the steps, I would like you to show some pre-requisite set-up I did for this use case.
Pre-requisites
1. A new workgroup is created for the Sales Intake team. For now, two specialized operators – Thor and Loki were assigned to the sales intake team. Good boys 😉

Enjoying this content?
Access the author’s full video courses here at MyKnowAcademy.
Explore Courses →
Just created one with minimal configuration and the operators are updated to the workgroup.

2. I created a new Sales case type with no stages and steps. Just a sample case type for now.
These are two prerequisites for this tutorial. Let’s start configuring step by step.
Step 1: Create a new notification rule.
Records -> Process -> Notification -> Create New
Since we won’t reuse this across cases, I created it in the Sales class.

Step 2: Configure the notification rule
What is a notification rule?
The notification rule supports configuring the message and the recipients for any event case event that needs notification.
Currently by default notification supports three channels out of the box
- Web Gadge
- Mobile push notification
What are the configuration points in the notification rule?
There are three main tabs in a notification rule
- Notification Definition
- Channels
- Advanced
Notification Definition –
In this tab, you can define the message and the recipients of the notification.
To keep this tutorial simple, I am going to do minimum configuration and accept others by default settings.

Message details
Message – You can specify the message rule. Click and open the pyNotificationMessage rule, You will see the message content.

It accepts the parameter of NotificationName. I am going to pass the parameter as “A new Sales case”, so that the notification message should read – “A new Sales case is registered in the application”
Recipients –
In the recipient block, you can add one or more recipient(s) list.

It always expects a data page to source the operator details.
As per our business scenario, I need to send the notification to all the operators that are part of Sales Intake team (work group).
Step 2.1: Create a new Report definition to list all the operators that belong to the Sales Intake Workgroup
Wait.. Before creating, it is always good practice to check if any out-of-the-box report definition is available.
Open the records explorer on reports and filter the report definitions on Data-Admin-Operator-ID class

We do have a few useful report definitions and I am going to use the one above highlighted.
Step 2.2: Create a new data page to load the recipients list.
Records -> Data Model -> Data Page -> Create new
Again First, check the available instances by filtering on applies to class. Again, I found the best data page for my scenario out of the box 😊

Let’s dry run the data page to see if it returns both the operators Thor and Loki for the work group – Sales Intake.
It did.

Now get back to the Notification rule and configure the data page settings.

You may think, where there are two options in the recipient type – Operator ID and Email ID.
Operator ID – Is for Pega internal operators, where all three channels are possible
Email ID – Is for external parties, for whom we won’t have any Pega operators, so obviously they wont use Pega portal, hence notification through push messages or web gadget is not convenient. For them only email channel is applicable.
I mapped Operator ID to pyUserIdentifier.
Note: You can add multiple blocks of recipients sourced from multiple data pages.
Channels tab
You will see there are three available channel configurations.
- Web Gadget
- Mobile
Most of the configurations are self-explanatory.

You can either enable or disable the channels.
Message source
For Web gadget – section
Mobile – Message rule
Email – Correspondence rule.
For this tutorial, I accepted all by default. You can click and verify those source rules 😊.
Advanced tab –
Here you can specify some advanced configurations.

Category – You can specify a field value rule, to categorize the notification rules. Like sales related notifications can be put into Sales category. More for maintenance
Mute notification – Self-explanatory. When it is enabled the entire notification is muted
Not configurable from UI – From user portal, user can opt in and opt out foe the notifications. Just like some time you mute certain WhatsApp group notifications 😉
When enabled, the User cannot override the notification settings for this rule.
Additional information
We saw that the message (data) will be pushed from the server to the client. In specific requirements, If you need additional data to be sent, you can set it here as key-value pair.
Okay, for the last two tabs, I just accepted all the configurations by default.
Step 3: Configure the Case type step, to send a notification on creation.
Add a new automation step, send notification.

Specify the newly created notification rule.

We have completed the configurations 😊
Easy right?!
I want to reveal the underlying code from the server side and client side, but first let’s test the configurations.
How to test the case notification working?
Step 1: Log in to the Recipient operator and launch the case manager portal
As we saw from the previous post, make sure the WebSocket connection is open from the developer tools.
I verified successfully.
Step 2: Check the notification icon on the top right corner. Keep an eye on it. No notification yet.

Step 3: Now create a case from a different operator ID.
Important note: You cannot or don’t need to send notification to the create operator, so Pega by default filters out if the recipient list contains the create operator.
Step 4: Now check back the notification icon.
Cool like Facebook right 😀

Step 5: Click and open the notification icon to see the message.

Note: For email to work, configure an email account with right configurations and the operator record should be updated with the right email ID.
Now its time to reveal the underlying code
Notification architecture on the server side.
1. Notify activity – pxNotify
pxNotifyWrapper that accepts the Channel name as input calls this activity from the smart shape.
Let’s check the parameter tab

When you use the notification automation smart shape, then you don’t need to mind those, because Pega applies all those by default.
One interesting parameter is RecipientsList, which we can populate on your own and override the notification settings, which I believe no one want to d.
Please do the configuration in the notification rule and Pega takes care of the rest.

You can see right from the start that, the activity prepares a notification queue item.
So definitely standard agent (rightly queue processors from pega 8) is involved.
The activity enriches the queue items and queues to queue processor at 16th or 17th step. (I am using Pega 8.1)

You also see a DSS settings control whether to use queue processor or standard agents in pega 8.1
Note: The DSS setting is because queue processor starts eating lot of system resources (because of Kafka) and so system goes down quite often. We are using this DSS in my current project to disable the queue processor.
Please check the other step description on your own
2. Queue processor or standard agent activity – pzProcessNotification

One importing call activity is pySendNotification, which gets called from
pzProcessNotification -> pzProcessNotificationChannels -> pySendNotification
You see Pega has beautifully class specialized the channels.

Since we tested Gadget, lets open the rule and see how it is configured.

It uses, Publish-Notifications method. Remember the name 😉
In the next article, we will see how to create customer notifications, there this method will be used extensively!!
Why ChannelName parameter is kept empty?!!
Switch to Configure -> User Interface -> Notification Channels

There a channel name is already defined – Notification Gadget out of the box

This is also a sneak peek for my next post, where we will create a new channel.
So as an overview, we use publish-notification method to send the data to the channel.
Remember it uses, WebSocket as the underlying technology. Let’s check that on client side
Notification architecture on the client side
Let’s start by debugging from the Chrome developer tool.
Open the developer tool on Loki user portal, and refresh to get the WebSocket connection.

Now create a case and check the messages by clicking on the connection
You will see a new message. Click to view the message content.
You see the notification ID as well as the Sales case ID. Some good data are sent from the server to the client.

Now the final question is, how does the gadget, automatically refresh with the notification count. It is definitely Javascripting 😉
Stay on the network tab, instead of ws, select all.
Trigger the case again. You will see the network call. Click and open the instance
First the response tab, it got the count of 2, but from where the count increase +1?

In the initiator tab, you will see all the Javascript event handling code.

One interesting function is HandleDesktopNotification Callback.
1. Section rule – pyUnreadNotificationCount


Includes section pzSubscribeDesktopNotifications –

2. Function – handleDesktopNotificationsCallback
It uses the response data.
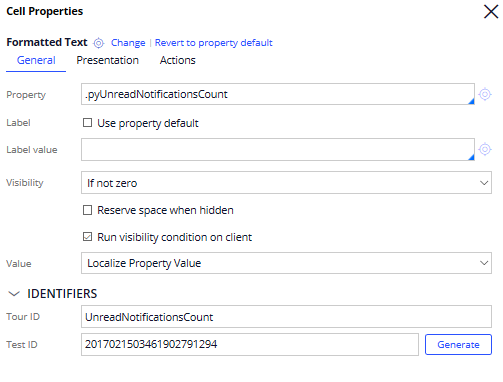
Get the data to ID element – UnreadNotificationsCount and set the value to increment 1.
Now you know for sure, where the data-tour-id is configured

So, if you call this function, a notification count will be increased for the property – pyUnreadNotificationsCount by +1. That is how it happens out of the box!!
We will end the long blog article here 😊 Hope you enjoyed it as well!


