Expose Pega local server to Internet via ngrok

In this blog article, we will see how we can expose the local host web server to the internet using ngrok tunneling.
Important note: This is only intended for personal use
We know that the Pega personal edition can be hosted in our local machine and hence we can access the apps using the host name – http://localhost:<portname>/prweb
Usually, most of the development servers or home projects we develop will be hosted on a local machine. You cannot access localhost apps from a different machine.
Say, there is 3 member development team working on a hackathon. They need to collaborate and work on a single pega app. Most of the big organizations have their own sandbox pega cloud environment which can be accessed over the internet for CoE related works. In our scenario, the 3 member development team cannot afford any cloud solutions now, so let’s find a way for them to work it out:)
Pega retired the Pega personal edition and you can now use the Pega community edition
What is ngrok?
– We can call it a utility that can expose the local web servers to the outside world.
– It creates a secure tunnel to localhost ports and provides us with an URL to access the web servers hosted on localhost.
Let’s see the steps involved in exposing our personal edition web server to internet.
Enjoying this content?
Access the author’s full video courses here at MyKnowAcademy.
Explore Courses →
Step 1: Start your personal edition. Keep a note on the port on which you access your application. I am using 8001 as my port.

Step 2: Signup on ngrok website (no credit card ;))
Important Note: As of 2024, ngrok changed their pricing plans but still support free plan. The tunneling set-up screenshots may differ. Please also follow their official documentation page
Click get started for free and sign up.
Step 3: Download and unzip your ngrok executables.
Visit the below link to download your ngrok based on your OS
https://dashboard.ngrok.com/get-started/setup
(you will also find all the setup details in the above page)

I unzipped the package under my C drive.

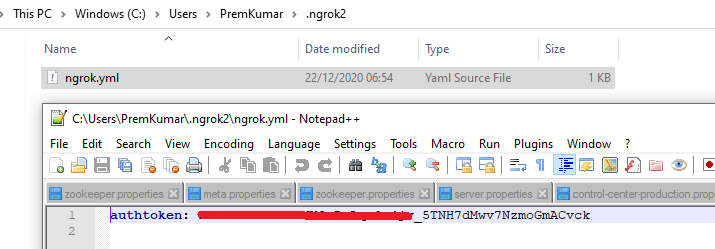
Step 4: Add your authtoken
Double-click to open the exe file.
In the webpage, you will find your authtoken and the command to insert your auth token inside ngrok.yml file.

Just copy the command and run it from the command line.

You will find the configuration file under your user home directory. You should see the authtoken added.
Step 5: expose the local server.
You can execute the command – ngrok http 8001 to expose the port to the internet by opening the tunnel.

You will see the tunnel status is online.

Also you find two URLs – http and https with ngrok.io domain name extension
Step 5: Hit the https URL with the prweb servlet from any device with internet access.
https://5b5a115c6dd0.ngrok.io/prweb
Important note: With free plan, you will get never get a fixed https domain. This will change when you stop/start tunneling
you should see the pega login page.

You can also track your HTTP requests from the console.

We have successfully exposed our local webserver to the internet using ngrok.
Once you close the command prompt or close the connection manually, then your tunnel closes. You may get this error.

In this situation, you need to run the exe file again and open the tunnel.
Also if you shut down the pega server you cannot access it over the tunnel, it is obvious 😊
There are a few limitations on the free account like – the hostname is randomly generated ID and expired in next 8 hours. You will get additional benefits when you sign up for other subscriptions.

Also one nice thing about ngrok is, that they have beautifully documented the configurations. If you are interested, you can explore the docs link for more details
https://ngrok.com/docs#getting-started