Connect REST – Usage and Configurations in Pega
In this blog article, we will try to understand about Connect-REST in Pega. Connect-REST is One of the most commonly used Connectors in Pega to integrate with external systems.
Update: The concept of REST Connector remains the same across different Pega versions. Most of the screenshots in this blog article were reused from Pega 7 version and few were updated. Use this blog article to learn the concepts and you can try the entire tutorial in the latest versions as well.
As usual I will start with a very simple example.
Why do we need friends?
– We can trust them and share our feelings with them.
– They help us in difficult situations.
– They can share our works as if it is their own and there will always be some mutual understanding between friends.
This list can go endless from starting a day with friends and ending it in HIGH 😁
Now, let’s come to our Pega.
Why Pega needs friends (other applications)?
Enjoying this content?
Access the author’s full video courses here at MyKnowAcademy.
Explore Courses →
1. Sharing data
Every business process revolves around data. This data can be available in other applications. Pega needs to have a friendship with them, connect with them and consume the data.
Pega can share their own data through services.
2. Support process outside Pega
Imagine a call center application. The policy creation process is not handled within Pega. Policy creation is handled by some legacy java application. Now when the customer calls in and requests to create a policy, then Pega can connect with java application for policy creation.

Integration Connectors serve the purpose
It is highly recommended to go through the previous blog article on ‘Service-REST’ post to learn the basics of REST
Things covered in the above post are,
- What is REST?
- Difference between JSON & XML.
- Why REST is preferred over SOAP.
- HTTP methods.
Also some tutorial stuff.
What is a Connect-REST?
It comes under Integration-Connectors category.
This rule helps in implementing connections with other applications using REST.
How do we configure Connect-REST?
Before configuring a Connect-REST rule, there are some prerequisites to collect from the service provider.
- The Service URL
- Request & response parameters
- HTTP method they host the service
- Authentication, if any
In the previous article on Service-REST, we created a new Service API right?!
We are going to use the same service API as the service provider
FetchPolicyDetails API specifications
URL – http:// <HostName>/prweb/PRRestService/TestServicePackage/FetchPolicyDetails/FetchPolicyDetails
Request – PolicyID
Response –
{ “SampleResponse”:
{
“PolicyType”:”Home”,
“PhoneNumber”:”9999999999”
}}
All three basic information are handy. Let’s straightly jump to configuring Connect-REST.
Pega provides a wizard to create REST Integration.
Guys, really it is a very simple wizard.
Let me walk you through the wizard.
Designer studio -> Integration -> Connectors -> Create REST Integration

This is basically a 4 step screen flow.

Connection – Specify all the connection details.
System details
Name – Enter the name of the system, which we are going to connect to consume the service.
Endpoint URL – Enter the complete URL of the service.

If you enter the complete URL path, then resource path will be pre-populated.
You can see how the path is identified. Words separated by ‘/’ in the URL.
You also have the option to make the resource path as parameter.

Why do we parameterize resource?
Say for example, I host a service based on geographical location. I provide one type of service for India and another for USA.
The URL can be – http://myknowpega.com/Service/{INDIA} or http://myknowpega.com/Service/{USA}. We can parameterize the country name in the resource path.
Query String parameters

For GET & Delete HTTP methods, we can specify the query strings.
First, let’s test GET method.
So we can specify the request as query string – PolicyID

Headers
If the service expects any header values, then we can provide those in header. Else, leave it blank.
Authentication

This makes use of the Authentication Profile data instance.
You can either create or use existing authentication profile data instance.
I will just touch on the basics with respect to Wizard. We will see more details in Authentication posts.
Authentication scheme –
a. Basic – Provides the user identifier & password values.
Here the service provider implemented basic authentication. We need to send the matching username & password to authenticate.
b. NTLM – Network LAN Manager – Microsoft security protocol.
c. OAuth – This is an interesting method of authentication. It avoids the basic authentication like providing username & password.
OAuth example – I think you might have come across this in many android applications.
Some applications provide a facility to sign in using Google or facebook. The underlying authentication mode is OAuth. We will see about this very soon 🙂
Since we are going to consume our own Service-REST, we will use basic authentication here.

Service is also hosted in Pega. So provide a valid Username & Password.
Remember in Pega service, authentication happens using service package data instance.
Host, realm, preemptive authentication; leave it blank. We will see it authentication profile topic.
We have completed filling the configuration in connection node.
Resource methods

Select the method on which the service is hosted. Here in the example, we have used GET method.
You have an option to override the query string and header fields on this screen.

Complete it and move to the third screen.
Data Model
Here, you can specify the configuration for request & response parameters.
Sample – We can use the sample request & response to create the Integration data model.
Integration data model – Integration classes, request & response property structure.
We have two options.
1. Add a REST response – Use this when your service is ready.

Click on the ‘Add a REST response‘.
After providing the request, click Run. You will get the sample response.

Click on Submit. You have taken a sample response now.
2. Add a file – Use this when your service is not ready & when you have the sample in file.
You can upload the sample request and response files.
Click on Add a file link.

You will have an option to choose a file. You can either choose JSON/XML .
If you have notepad ++, then you can easily create a json file.
You can also create the JSON file online. You can use the link,
http://www.jsoneditoronline.org/
Provide the response sample and save the file to your disk.

You can then upload the JSON file.


Now, we have provided the sample response to Pega.
Review

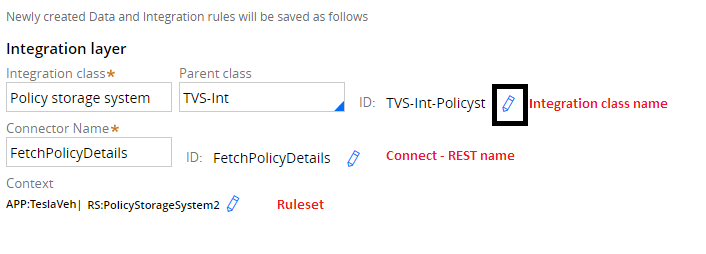
Integration layer
Deciding of Class layer is very critical for your connectors that can decide if the connector can be reused across applications.
As a general thumb rule, If the connector is more application specific you can create it in Application Integration layer or if it is more specific to the Enterprise we can create it under Organization Integration layer or other modular reusable int-layer
Here you can specify the Integration class name, connect-REST name, ruleset name.
You can update all 3 with the edit icon.
Data Layer
You can specify the data type, data page name and ruleset.
You can also update those using the edit icon.

You can also preview the record count.

Click on Create to complete the wizard.
We have created 22 records.

What are the rules get created?

FetchPolicyDetailsAPI – Main Integration Class
Expand the class.

It contains,
- Connect – REST rule– FetchPolicyDetails
- Request page – request
- Response page – response_GET
- Data transform – Sets the request value
Request –
Expand the request property.

TestServicePackage property is created because we made it as a parameter in resource path.
Request -> query_GET -> PolicyID
You may get a question now. “Why there is an extra layer out here? We can set PolicyID directly in request page. So, why is there query_GET page?”
Let me remind you the wizard screen.

A single Connect-REST rule can support all four methods. You can select all methods, with different request & response.
When you call from an activity, you can choose which method to invoke.
This is why Pega created a middle layer query_GET. It can be extended to query_POST/PUT/DELETE.
Response –
Each request will have a different response. So Pega creates a response page for GET.

Request, Response Class structure
Obviously, all the page properties will contain different classes.
- request
- query_GET
- response_GET
- SampleResponse
For all the 4 page property, pega creates 4 new classes.
Now request, response and class structure are ready.
Data Transform

See how Pega created the rules for us 🙂
What are the configuration points in Connect-REST rule?
There are two main tabs.
Service tab
Resource properties

Resource path – You can see the resource path value ‘TestServicePackage’ is passed dynamically.
Authentication – A new authentication profile is created. You can open the data instance and check the basic credentials we provided at the wizard time.

Secure protocol configuration – You can specify the SSL/TLS version – Use default.

Security settings

Truststore – Stores the public SSL certificates of the server to connect.
Keystore – Stores the private keys to connect with Servers.
Really this is a vast topic. I will concentrate it on some other posts.
Connection

Response timeout – Remember this is in milliseconds. Once the timeout seconds get crossed, the connection fails with an error message.
Maintain session – Remember stateful sessions.
- If the service provider maintains stateful sessions, then we can check this checkbox and specify a connection ID say ‘Conn-1’.
- You can use the same connection ID in other connectors to share the same session data.
Error handling, processing options – Same as service-REST.
Methods tab
Exactly the same as Service-REST.
Request –

Response –

Wizard also creates all the required properties.
We have analyzed all the properties created by the wizard.
How to configure a Connect-REST manually?
We will try connecting with the same service we used in wizard.
Whenever you start manual creation, go with class creation first.
Step 1: Create the class structure.
We are not going to reuse all the 4 methods. We will create only for POST method.
Create a new main integration class.

Request – PolicyID – Since it is a single field, there is no need to create a class.
Response – Create a new class for response.

Step 2: Create a request & response parameters/properties.
Request – Creates a single value property. PolicyID
Response – Creates 3 properties.
a) Sample response

b) PolicyType – Single value property.
c) PhoneNumber – Single value property.
Step 3: Create a Connect-REST rule.
Service tab
Resource path – Provides the URL.
Resource parameters – We will keep it blank.

Authentication – We will use the same authentication, we created in wizard 🙂

Leave the remaining fields as such.
Methods tab
In the POST method, map the request body from clipboard – .PolicyID

Response

Things to remember while configuring REST integration:
Before creating a Connect-REST, check the following from the service provider.
- End point URL
- Request, response parameter
- HTTP method
- Authentication if any
As a best practice you use wizard to create REST integration. Within minutes, you can configure the REST Integration.
How to write a connector activity?
There are 4 steps involved in connector activity.
Create a new connector activity
Step 1: Create a new page.
Step 2: Set the request parameters.
For simple request, you can directly use property-set to set in the request page.
For complex request, you can use a Data transform. Rarely, if you use XML, then you can use xml stream in Property-set-xml.

Step 3: Use a Connect-REST method to invoke the connector.

Method name – You can specify any method GET/POST/PUT/DELETE.
Execution mode –
a) Run – Synchronous execution; in the same requestor.
Current processing depends on the response.
b) Run in parallel – Asynchronous execution; in the child requestor. You can use connect-wait method to later on in the activity to get results from the connector.
The current process depends on the response in the later stage.
c) Queue – You can specify a connect process requestor data instance to queue the request. ProcessConnectQueue agent process the request in the background.
The current process is independent of the response.
Step 4: You can use a data transform to set the response to the required properties. You can also use some parse rules to parse the complex response.
For testing purposes, use a show-page method as a last step.

Service activity is ready. Let’s test by invoking the service.
Go to actions button & run the service.

You can see that the sample response page contains the response values.
You can also see that the pyStatusMessage, pyStatusValue return GOOD.
We have successfully created a REST integration.
How Pega handles everything at the backend?
Just use the tracer and run the connector activity.

You will see, once the Connect-REST method begins, Pega Engine invokes an activity ‘Invoke’ in class Rule-Connect-REST.
Say it SOAP, FILE or any connectors Pega calls ‘Invoke’ activity in the respective class.
Just search a rule Invoke.

You can see the rule available in almost all the connector classes.
Let’s check, what this activity does.
The activity is full of java steps!!

You can see in the 5th step, it validates the request data we configured in the Connect-REST rule.
Let us modify the request in Connect-REST rule to some error criteria.
I changed it from clipboard to JSON.

Now try running the activity again.

It is full of errors starting from 5th step.
The error is ‘GetPolicyDetails.PolicyID was of mode String while com.pega.pegarules.data.internal.clipboard.ClipboardPropertyStrMinFeatureImpl.getPageValue() was expecting Page mode’.
Rememeber, whenever you use JSON mapping, specify a page mode property & set the request value on that page.
In the 7th step, it calls the processing activity.

Processing activity name is set in 4th step.
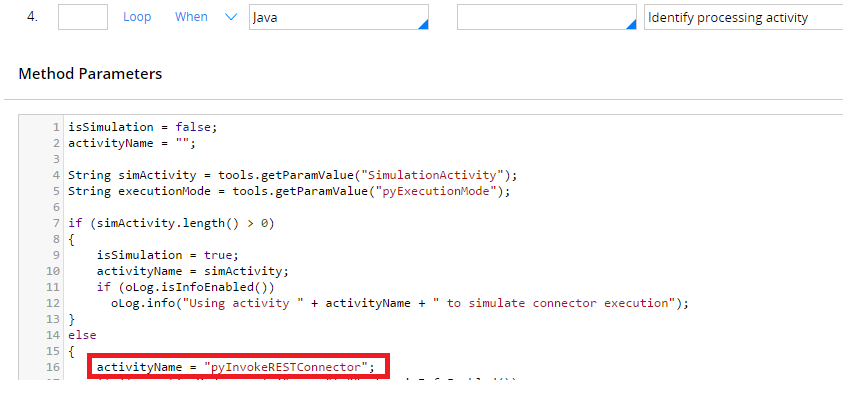
This is the main activity ‘pyRESTInvokeConnector’.

This is full of java code. You can see the step description and know what is happening in each step.
6th step executes the HTTP method and response, error all set in Invoke activity.
How to handle errors in Connect-REST?
1. Connect-Method transition

Note: You need to specify both, when if true & on exception to capture all the error conditions.
This is without error handling in transition step. All activities end abruptly throwing exception.

When you use transition, the activity step jumps to the exception handling step and the process resumes.

2. Error handling in data pages
We know connectors can be used in data pages as sources.

You can use an activity here to capture the exception in the data page and do any required action.
3. Connection Flow problem
This is not applicable when the transition is not handled in connector activity or when the connector is invoked from Data page.
We specify the connection flow problem in the Connect-REST service tab – ConnectionProblem

Connection Problem

You can see when resource is unavailable, it goes to IncompleteConnections workbasket and retries connection using an SLA – Retry connection.
If the exception is other than IncompleteConnections, then the spin off sub process is invoked.
FlowProblems

It goes to ProblemFlow workbasket.
Based on the business requirement, you can use your own customized flow in the Error handling section – Error handler flow.
How to debug Connect-REST?
1. Use Log-message method to log the Connection – Errors. In connect-REST transition, you can jump to Log-Message method.

Now run the activity, by providing invalid request.
Go to Designer Studio -> System -> Operations -> Logs -> Logfiles -> Pega Logs

You can see the error message captured in log file.
Logging level – We set the logging level based on the environment.
2. Tracer – Since connectors run in the requestor session, run the tracer and capture the exceptions.
3. Use Loggers – This is an interesting topic.
- You need to log all the steps involved in REST integration. You can use loggers to print those in log files.
- This is the logger class for Connect-REST.
Rule_Obj_Activity.pyInvokeRESTConnector.Rule_Connect_REST.Action
Go to Designer Studio -> System -> Operations -> Logs -> Log level settings

Change the current level to ‘Debug‘.
Now run the activity and invoke the Connect-REST.

You can see how each step in pyInvokeRESTConnector activity returns response.
You can download the log file and see the complete input output request parameters and all processing.
We are at the end!!

