Case Management – Understanding

In this article, we will start with some basics about Case Management.
Case Management is the primary power of Pega platform! Case defines a piece of work that can be executed with its own life cycle.
Take any organization. At any of their core business they may have their own business processes. Consider an Insurance company XYZ. Definitely Insurance claims is One of their core business processes right?
Let’s go deep into the Claims process.
Home Insurance Claims – Home Insurance policies can provide coverage and compensation to the losses or damages occur to the insured house. The customers can apply for the compensation by creating a Claim request with the Insurance Organization. The claims request can eventually be processed by the company.
Below is my own visualization of the claim process.

Let me explain the flow
1. It all starts with the Insured customer raising a claim request and the customer service representative (CSR) receives the request and collects all the the basic Information.
2. CSR then sends the request to the Investigation department, where the claim is checked for its validity. If it is a valid claim, the process continues else the process ends.
3. If the claim amount exceeds certain limit, then further claim investigations are needed. You may require onsite investigation and approval. If the claim amount is less than certain limit, then the extra investigation is not required.
4. Then the claim moves to the Claim approver, when he/she can approve the claim request.
5. Once the claim is approved, then it can move to payment department where the claim amount will be settled.
This is like a Generic complete claim process right?
What have we seen till now? – Claim life cycle from START to END.
I say this Claims business process is the ideal candidate for Case management.
If you look at the entire claims process, it has its own start and end, It goes through different statuses, different stakeholders are involved who need to take action on the request.
Let’s come to our Pega.
What is the Case Management in Pega?
Any complex business process or case lifecycle, just like ClaimsRequest can be broken down into different stages, processes and steps.
You can look at the below hierarchy relationship between Case, stages, processes and steps.

- A Case can go through one or more stages.
- Each of the Stage can have one or more processes.
- Each of the processes can have one or more steps.
Simple 😉
So Whenever you want to translate a business process and design to a Pega case, I would request you to draw the rough design in a paper. Do some paperwork 🙂 Draw your stages, processes, steps in a rough design, validate with your business and refine the processes.
Tip: Pega blueprint can exactly help you with the initial design. Instead of drawing out in a paper, you can design it using Pega Blueprint!
Without the blueprint, let’s see how we can replicate the claims process as a Pega case.
Creating a new case
You can also go to App Studio and design the case, the same way!
I will still use the dev studio.
Casetypes -> Add a new case type

Name – You can specify the Case name as ClaimsRequest.
Advanced Settings
Derives from (Directed) – You can specify the direct inheritance class. ( If you use any framework layer, the specify the framework work class)
Derives from (Pattern) – You can specify the Implementation work class.
I would recommend you to visit the blog article to understand more about the class Inheritance.
Ruleset and Ruleset version – Most of the time, you will be using the right Implementation ruleset.
Remote case type – This comes under federated case management.
What is the remote case type?
Federated case management (FCM) enables you to access cases from different applications. Say for example, an Insurance company have two Pega applications. Now using FCM, one application can access cases created from another application.
To enable this, you have to specify the case type as remote.
I don’t want to use it as a remote.
In the latest version, you also have an option to create the case using Constellation Architecture (even though my application is not constellation based). This is to support the co-existing feature to have constellation cases in Ui-Kit or Theme-Cosmos based applications.
After filling all the necessary details, click submit. You will be presented with the case designer.

What are the rules created at the back end?
It is interesting to look at the rules that were created at the backend.
Switch to Application – Development – Recent Actions, there you will see all the rules that were created a minute ago.

Some of the interesting rules are – A Work class, Case type rule, Workparty rule, Data pages and report definition, section, view and harness.
We will focus only on the Case designer and case type part.
Case designer – Is the low-code landing page where you can configure the case lifecycle in stages and steps.
Case type – Is the pega rule behind it. All the low-code configurations which you make in Case designer can update the case type rule automatically.
From the left panel, case type. Click on the Claims Request case type, that will open the Case designer.

You can also open the case type behind it by using the three dots and opening the case type rule.

Here is how the case type rule configuration looks like.

This rule instance will hold all the case configuration settings. When you add a new stage, steps or processes using Case designer, then the case type will get updated.
On a very high level, let’s understand the different configuration that comes with the Case design and case type.
First, let’s start with the case designer.
Configuration with the Case designer
There are 5 tabs
Workflow tab
This is where you can design the case lifecycle for the ClaimsRequest.
You can define – stages, processes and steps for your case.
I reserve this workflow tab configuration in a separate blog article 😊

Let’s move to the next tab
Data model tab

As a best practice, when you define a data model for a case type, I always recommend starting with identifying data objects first and then use embedded model on your case.
For example, let’s say we need to capture customer details within the claims request, first step is to create a Customer Data type.
Creating Data type is dedicatedly explained in a separate blog article.
For now, assume that the data type is already created for Customer as shown below.

Now I can create an embed property at the Work level and use the data object layer.
Go to ClaimsRequest case type and create an Add new field.
Create a new field name – Customer Details with Data type as Embedded Data that refers to the Customer Data object.

Click Submit.
Even when you want to create fields for the Claims Details like Claims Amount, Policy Details, never create the properties directly in the work details. Instead embed the field into a data layer and create a embedded property into the work layer.
So when you look at the pyWorkPage of your ClaimsRequest case, it should have only OOTB properties like pxCreateDateTime, pyID, pyStatusWork at the Top Work level and all the other application related details can be captured at the embedded level 😊
This is how Pega recommends capturing and using data within the Case level.
Just like other data model configurations, you can also control the field configurations.

It can also choose the input method as calculated, so Pega can create a Declare expression rule at the back-end for the field.
There is also an option to add validations, but it is not applicable when you don’t have stages defined for your case type.

Views tab
In Theme-Cosmos / UI-Kit applications – Views can be referred to Section rule in Pega.
In Constellation application, Views is altogether a separate rule.
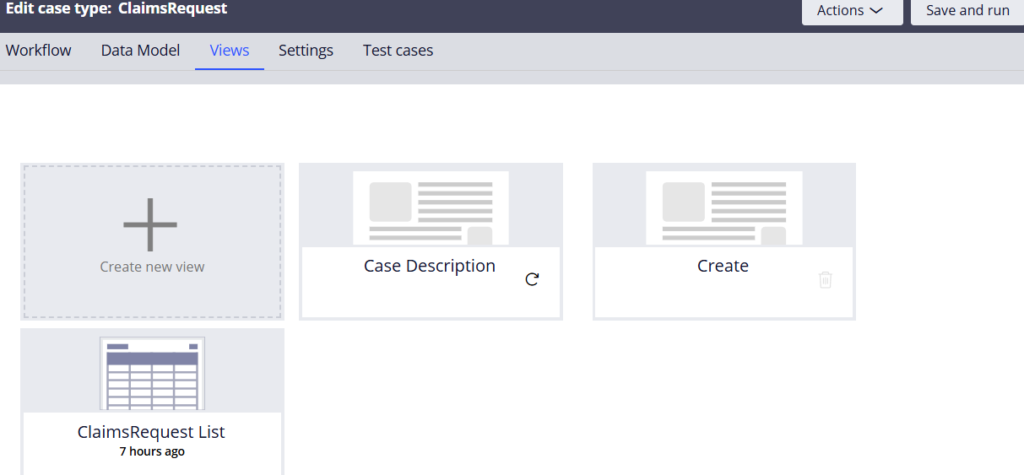
By default, you already see some views created automatically.
You can always create views from here or from Workflow design which we will see in a separate blog article.
But the configuration form is going to look the same 😊

On creating a view, you can verify a section rule created at the back-end.
Settings tab
This is the most important tab, where you have a lot of configurations for the case type.

I will quickly share some very important configurations which you will be using day-to-day development works.
1. General – As you can see from the picture, we can set the case initial urgency. This can be used in SLA for urgency calculation. You can set the Case ID prefix like C-, M-. You can also choose an Icon for the case and make it available to create from create menu.
2. Archival – You can configure the archival and purging for the case in a low-code way.
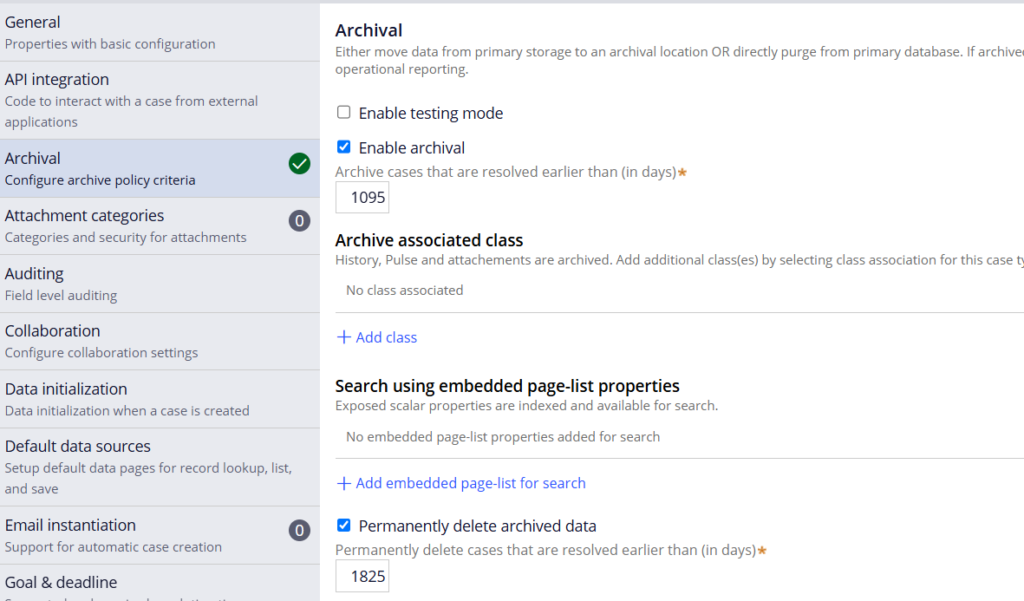
At the back-end DSS configurations will get updated and Pega have OOTB agents, jobs to handle or executing the archival 😊
3. Attachment Categories – You can add attachment categories with the case. These are existing instances already created in the system, so that when someone uploads a file to the case, they can easily tag it to existing available attachment categories.

A good example can be, for Claims we can create a attachment category called – Damage pictures and when you upload pictures for Claims request, you can tag those pictures under the attachment category.
4. Auditing – you can also control field level auditing using this configuration. We saw how Pega uses Declare trigger functionality to handle the auditing part in Declare trigger blog article.
5. Data Initialization – From very older versions, you might be aware of pyDefault data transform for the work objects that help with setting or initializing the data for the case.

You can control it in a low-code way from here. Pega can automatically update the pyDefault data transform using the fields initialized here 😊
6. Email instantiation – You can tag an email account, configure an email listener to automatically create a new case on incoming emails

7. Goal and deadline – We already saw about the case level SLA configuration in detail in the SLA blog article.
8. Locking – You can configure the locking strategy for the case. More details in a separate blog article.
9. Participant – We can add work parties to the case. We already discussed this in detail in a separate blog article.
10. Specialization – You can also create a specialized version of the case type based on a field

Let’s say you have a customer type and you want to do a special case processing when the customer type is Premium. Then you can use the case specialization. This is more like using rule circumstancing 😊
Please explore other uncommon case settings on your own!
Before ending this blog article, let’s also quickly explore the configurations in the case type rule.
Case type rule configurations
Most of the configurations of the case type are automatically handled when you update the case designer.
Open the case type rule.

There you see 5 main tabs.
Processes tab
Here you can specify the work party rule name (which is automatically created on new case type creation)
You can include a child case type, which will be automatically when you create a new child case type from the work flow tab.
Case-wide actions – You can configure different flow actions that can be available throughout the life cycle of the case

As you see from the above picture – Updating case, changing case stage – always available throughout the case life cycle whereas reopening is conditionally available when the case is resolved.
Case match – corresponds to duplicate search which we will discuss in a separate blo article.
Calculations tab

When you have child cases, this tab can come in handy.
Let’s say you want to calculate a field using the sum of property values from all child cases. In such a situation, you can use this configuration so that data from child cases can be propagated to the parent case.
(not used very often 😉)
Stages tab
Whatever configuration you do in the workflow tab of the case designer will automatically update the configurations in the stages tab of the case type.

Attachment categories tab

We already saw sometime before, we can add attachment categories in the case designer settings tab. All those will be automatically updated here.
Advanced tab
Here you have very few configurations, unlike the case designer configurations.

Remote type configuration, Locking strategy configurations, temporary case configurations. We are at the end of this blog article. Hope you understood the different configurations in the case designer and case type rule form.

