Approval flow in Pega – Usage and Understanding

In this blog article, we will look into the approval process flow which we can implement using the case designer.
This tutorial is demonstrated using Pega 8.7 personal edition.
Most of the business organizations work in a hierarchical role and most of the processes may require certain approvals.
From a very simple process like leave request to a complex process like claims request, you may have an approval flow at a certain stage.
Business scenario 1 – During the claims request life cycle, the claims manager should be able to verify the request and be able to approve or reject the case.
This looks like a simple or a single level approval process.
Business scenario 2 – When the claims request amount is less than $1000 then only claims manager approval is enough. But if the claims amount exceeds $1000 then we need approval from claims manager as well as from the claims department director.
This we call it as Cascading approval which can involve multilevel approval process.
Remember in cascading approval, approval request goes to a higher level (claims director) only when the lower level ( claims manager) approves it. This is not a parallel processing.

What are the pre-requisites for this tutorial?
1. Case type
Have a new case type in your application, say claims request.
With few stages (Submission, Approval, Settlement)

2. Add collection information view
Add a new process to the first stage (Submission) and collect the details
I will be using two simple fields – customer name and the claims amount.
Create a simple section to capture – customer name and claims amount.

3. Create and update Operators IDs.
Create 2 new personas/operator IDs
- Claims Manager
- Claims Director

Update the operator reporting hierarchy as follows.
The current operator, my operator (claims end-user) reports to Claims Manager and Claims manager operator reports to Claims Director. You can update these in the operator work form.

Okay, now my pre-requisites are ready. Let’s explore the out-of-the-box approval flow provided by pega.
Out-of-the-box approval flow
Step 1: open the Claims request case designer.
Step 2: In the approval stage, add a new step – Approve/Reject

Step 3: Configure the step.
The approval flow configuration has three tabs.

General, Flow and Goal & Deadline
General tab
You have two types of approval flow as we saw in the introduction
- Single level
- Cascading
Single level
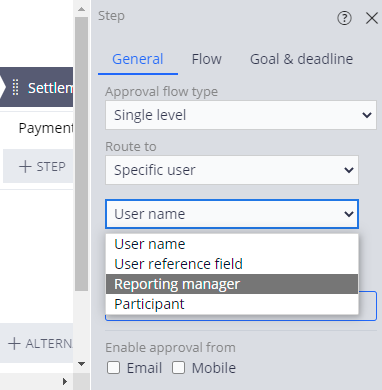
With the Single level, you can route the case to either worklist or workbasket assignment.
Route to single user corresponds to worklist assignment creation.
Note: Worklist is a user assignment and can be worked by a single user.

Username – You can mention any operator in the below field
User reference field –
You can choose either the create operator or resolved user to approve.

Reporting manager – self-explanatory
Partipants – You can choose any of the work party or the interested participant who can approve it.
Please visit my previous post on Workparties.
Route to work queue – You can also route it to the workqueue to create a new workbasket assignment.
You can mention the workqueue name in the field.

If you have a requirement that any one of the team members can approve or reject the case, then you can route the case to the team workbasket.
Route to – Use business logic
You have this option from Pega 8.5 version.

You can also use some business logic to conditionally route the case to either worklist or workbasket.
Click on the settings icon will open the business logic condition builder.

Based on when otherwise conditions you can route the case directly to the operator (worklist) or workqueue (workbasket). You can also use advanced conditions to route to the right operator based on availability, skill set and workload.
This will help in effective and appropriate customer treatment.
Cascading
Now let’s check the cascading approval type.

Approval based on – You get two options – Reporting structure and Authority matrix.
Reporting structure –
Approval is to be completed by the Reporting manager or workgroup manager.

Remember in the operator form we do configure the reporting manager and the workgroup name or the team name.

When you use reporting manger, then the case gets routed to the claims manager.
For work group manager, it will route to the team – Default’s manager. You can open the workgroup rule form to check its manager.
Note: Every workgroup should have a manager.

In real-time, you will have multiple teams with multiple managers.
Approval level.
One, All or Custom.

Approval level one is equal to having a single level approval we saw in the previous approval type.
All – It can go till the last hierarchical reporting manager!
Custom – You can use custom condition to cascade the approval level.
Click on Update custom levels
As we saw in the requirement, when claims amount to less than $1000, the route to one level only – Claims manager.
If Claims amount greater than 1000, then route to two levels – Claims manager and Claims Director.
we can use the when conditions to achieve the approval level.

This is for reporting structure, we have another option called Authority Matrix.
You can build an approvers page list by using a decision table and route it using the pagelist context.
You see decision table is not mandatory, because the pagelist can be initialized at any point during the case lifecycle. May be using a data transform also, you can populate the Page list.
As a short recap on different approvals
- Single level – You can route to indidual user or a team workbasket. You can also use business logics to determine the routing
- Cascading – You can cascade the approval to one or more levels using the reporting structure or authority matrix using pagelist.
Let’s look at the other configuration in the work step.
Click on Configure View button. Here you can define the view or section that will be present to the approver. By default we just capture the notes. This is customizable and you can add field to the view.

You can also enable the approval from email or mobile notification.

Flow tab
You can decide what to do on the approval and rejection scenario.
If approved, you can continue or change the stage and optionally set the status.

If Rejected, you can either Resolve the case, or continue the case or you can also change stage.
As a good case design, you can build an alternate stage and change to the stage on Rejected and set the status to Resolved-Rejected.

Goal & deadline tab
You can also choose to specifiy goal and deadline for the process to get complete.
You can choose to create or use SLA.

Technically you can create an SLA rule based on goal deadline and increase the urgency and appropriate actions at goal deadline time.
For more details on service level agreement, please visit my previous blog article.
For now we will make it as – never and continue.
Now interesting part – Let’s look at how Pega implemented the approval process.
Click and open the process/flow created by pega.

It created a flow in our work class which is in available state and can be customized if needed.
It has the subprocess shape, which has all the configuration for the approval flow.
Pega internally invokes the final flow rule – pxApproval
pxApproval flow in turn invokes, two other sub flows –
pxSingleApproval and pxCascadingApproval which are again final rules for the two approval types.

Both flows call the pyCascadingGretApproval flow which is in available state and can be customized easily.

This is the reusable flow.
This get invoked only once by the pxSingleApproval, where as in cascading approval, this gets called multiple times based on the cascading level.
You see in the below picture that for pxcascadingApproval, the flow loops back to call the approval step again,

Hope you are clear with the different types of approval and the configurations that need to be done.
In the next article, we will test the approval flows.


