Pega using Azure Key Vault as External Secret Store
In this blog article, we will explore the new feature of Pega Infinity ’25 – Storing and sourcing the secrets through an External Secret Store instance.
First of all, let’s understand the need or use case for the External Secret Store.
Let’s revisit the OAuth Client Credentials flow.
Say Pega as a client application needs to access the flight details resource using OAuth 2.0 Client Credentials grant type. Based on this requirement, Pega should be using an OAuth 2.0 Authentication profile in the Connect-REST and sending the Client ID and Client Secret in the Access token request to the Identity Provider (IdP) or the Authorisation Server.
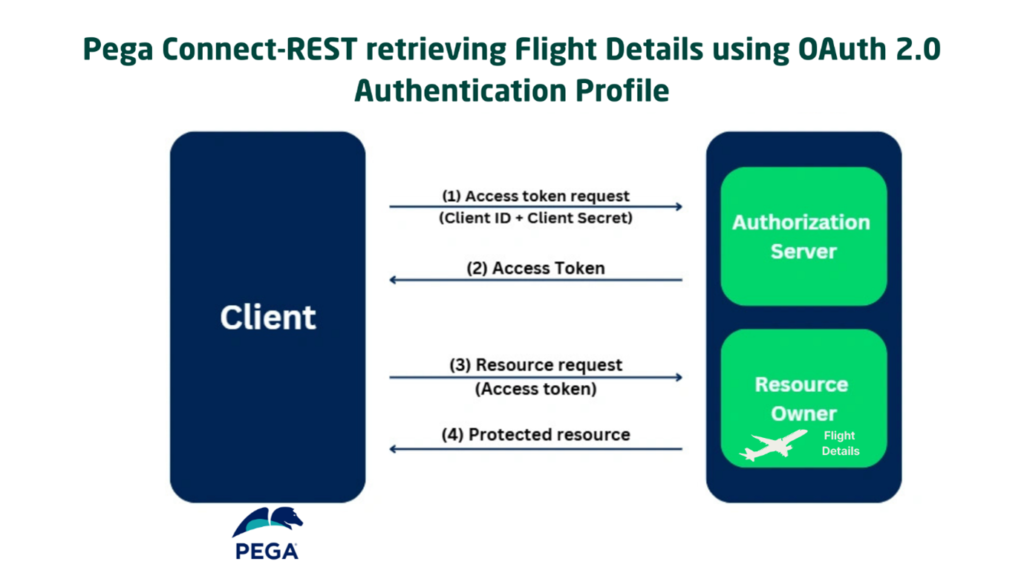
Here in the first step, we usually configure the Client ID and Secret directly in the Authentication Profile rule form.
Now let’s take one step back.
As per the coding/programming standards, secrets should never be stored in the codebase or configuration files. Instead it should be stored only in some secret management solutions.
Enjoying this content?
Access the author’s full video courses here at MyKnowAcademy.
Explore Courses →
There are a lot of Enterprise Secret Management solutions in the Market like Hashicorp Vault, Azure Key Vault, AWS Secret Manager, GCP Secret Manager etc. So, the Enterprise applications when it need to use some form of secrets in their application processing, need to store the secrets in these secret management solutions and retrieve those secrets at run-time.
For this tutorial, we will be using Azure Key Vault as the Secret Management solution.
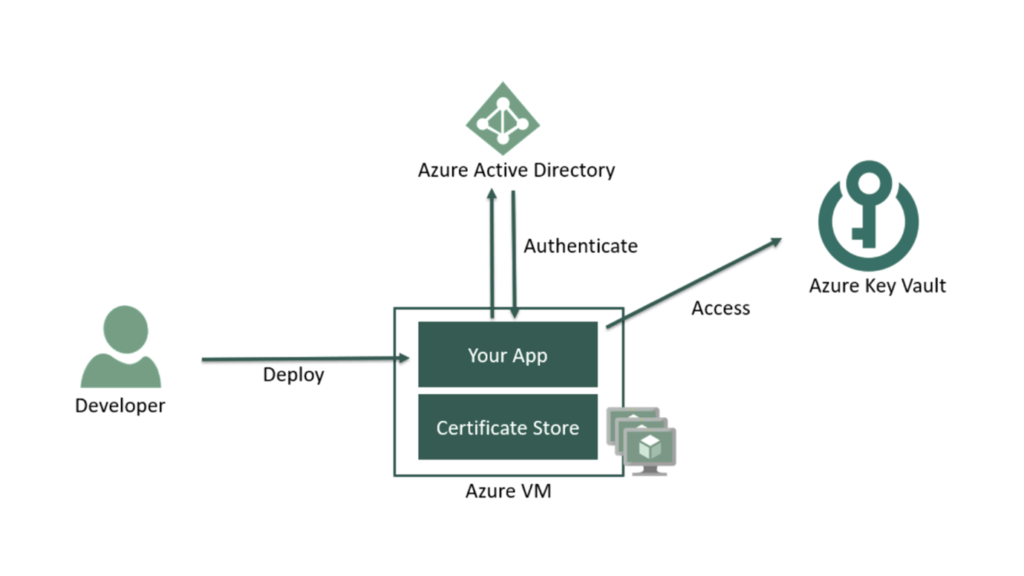
The below picture shows how ANY application can make use of Azure Key Vault.
It is also good to understand different places where we use secrets inside the Pega platform (let’s leave out the Operator / basic authentications for now).
- OAuth 2.0 Client Registrations, where we can register client applications and use Client ID & Client Secret.
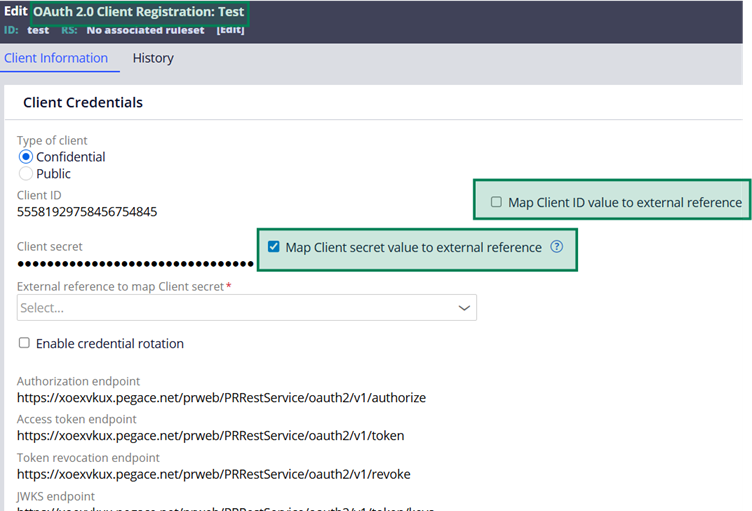
- Similarly on the other way, the OAuth 2.0 Authentication Profile can be configured with the Client Credentials for the external connections. ( The very first picture explains this)
- Connections to external services – Like database configurations, Kafka Server configurations passwords.
- Keystore instance – where the file and passwords are configured.
- Repository instance configurations.
In all these places, we may use some form of secrets like Client Secret, Passwords that are stored directly in the database. Technically, it will be stored within the rule instance, but at the end it is all saved into our Pega database.
If you look at this from a security standpoint, it is not a best practice to store these secrets in database; instead it should be stored and sourced from the right secret management solutions and… Pega is taking the right steps from Infinity ’25.
From Infinity ’25, we can use Identity Federation and External Secret Store instances to connect with the external secret solutions and source the secrets for these applications processing.
Important Note: As of Infinity ’25, Pega do support only Azure, AWS and GCP. Also only with AWS it is fully supported across different configurations, where as with Azure only the OAuth 2.0 Authentication profile is supported. Definitely a lot will be improved and supported in the coming versions. Supporting Document – https://docs.pega.com/bundle/platform/page/platform/security/identity-federation-and-external-secret-stores.html
The picture below gives you an idea of how Pega can make use of Azure Key Vault as an External Secret store.
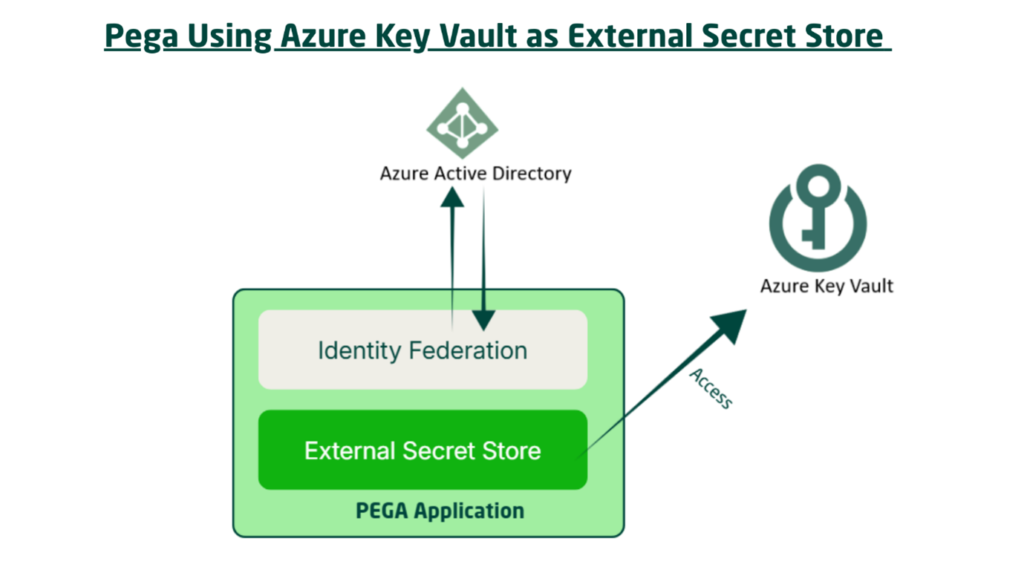
You see, there are two blocks – Identity Federation and External Secret Store. These are the two data configurations that were introduced in Infinity ’25 to support this external secret store sourcing.
Let’s get in detail about each of the Data Instances.
What is an Identity Federation data instance?
First, let’s talk briefly about the Federated Authentication. Federated is something more similar to Single Sign-on sometimes, both are used interchangeably. With Federated authentication, you allow applications to use multiple systems using a single digital Identity.
Let’s look at the same picture but in the Identity Provider (IdP) & Service Provider (SP) point of View in the context of retrieving secrets.
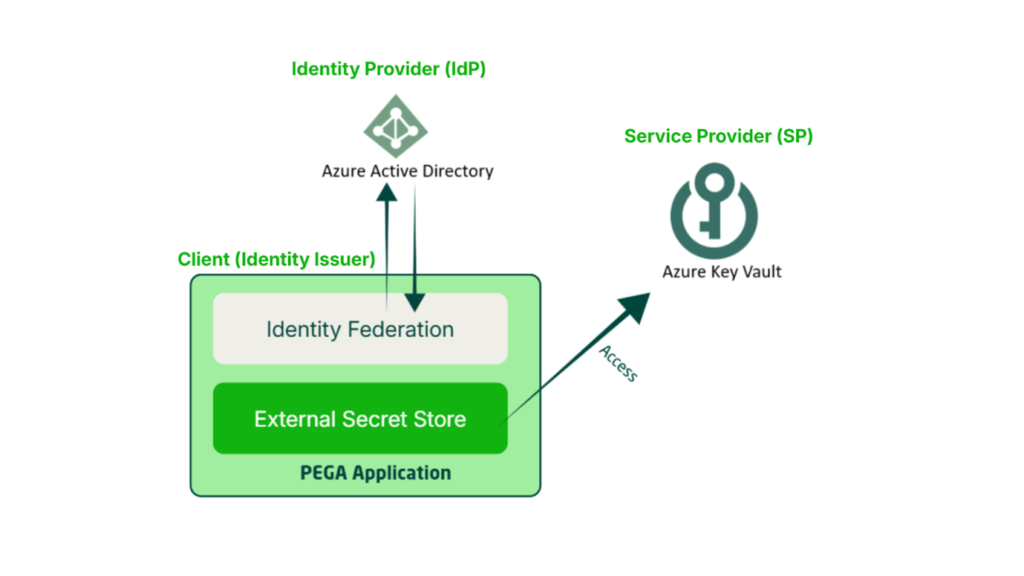
Service Provider – KeyVault – Ofcourse, we all agree that is the place where the secrets are stored.
Client (Identity Issuer) – here, either Pega oran external OIDC Compliant server can act as the Identity Issuer. Very important, this will not be Identity Provider. Do not confuse the terms!! Here, the Identity issuer issues the OIDC claims data like issuer, audience and subject to identify themselves against the IdP.
Identity Provider (IDP) – Azure Entra ID / Active Directory. Here Azure Entra ID Identifies the client via Federated Credentials.
Pega introduced this Identity Federation data instance to support the connection between the Client (Identity Issuer) and the Identity Provider(In our tutorial, Azure Entra ID).
What is an External Secret Store data instance?
- This data instance make use of Identity Federation instance which we saw before and identifies against the Cloud provider IdP. Then it can dynamically access and retrieve the secrets from the Cloud native secret management solutions.
- The External Secret Store instance can be referred to at multiple places like – Oauth 2.0 Client Registrations, OAuth 2.0 Authentication Profile, Keystore, repository etc.
It is now time to get our hands dirty 😊
What are the pre-requisites for this tutorial?
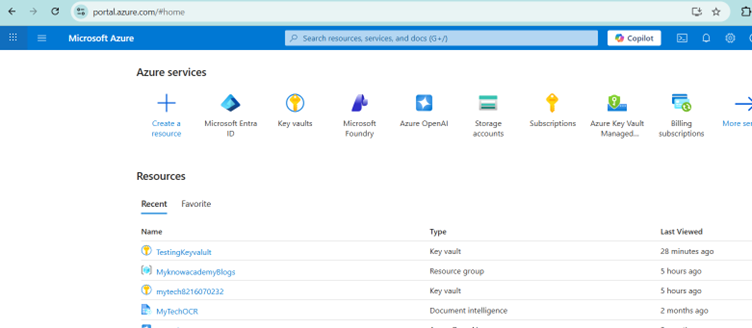
1. A Valid Azure Subscription – As we will be using the Key Vault and Azure Entra ID resources, we need a valid subscription.
I already got this covered
2. Toggle Switch On – Make sure the Identity Federation, External Secret Store data instances are visible by enabling the toggle.
Important note: As of Infinity ’25 version, the toggles related to External Secret Store configurations are disabled by default and so you may not see the data instances under security category. In this situation, you must enable the toggles.
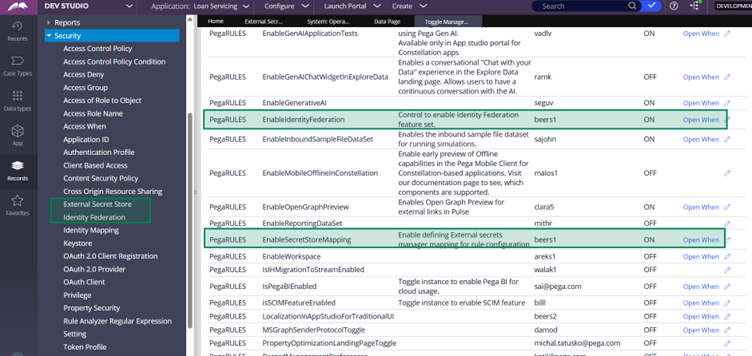
Once the toggles are on, you will see the data configurations under the Security Category.
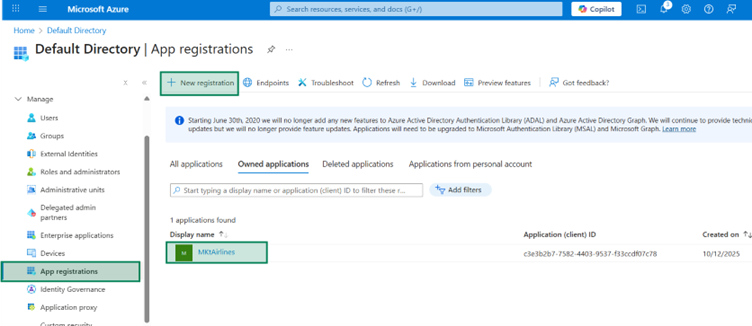
3. Necessary App Registrations under Azure Entra ID.
In this tutorial, we will be using Azure resources like Key Vault and Azure Entra ID will be our Identity Provider (IdP). So, to enable the Pega application access to resources, we need to have the right App registration created for the Pega application.
You can already create a new app registration in the Entra ID. I created the name MKTAirlines.
Now our pre-requisites for this tutorial are ready. Let’s go ahead with the implementation part.
What are the steps involved in implementing the External Secret Store?
Step 1: Set up Key Vault resource and Secrets
Step 1.1: Create a new Key Vault resource, if it doesn’t exist already.
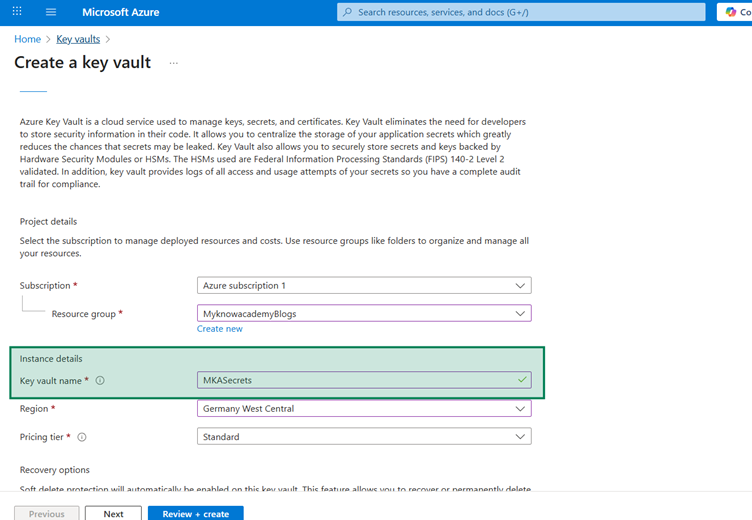
Click Create, which will create a new Key Vault resource. Also Important to understand by default, RBAC – Role Based Access Control policy will be enabled.
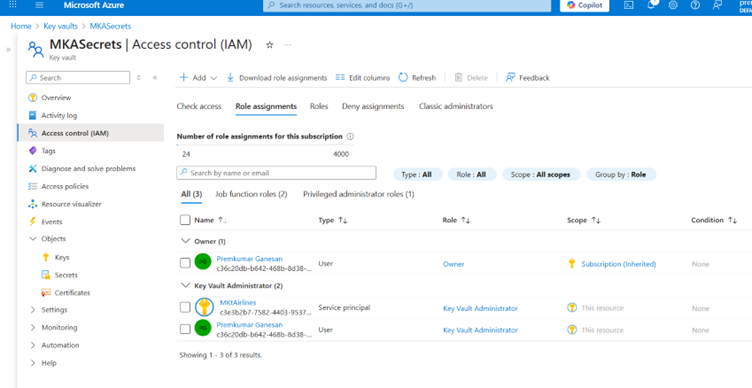
Step 1.2: Set up the right User Permissions in the Key Vault.
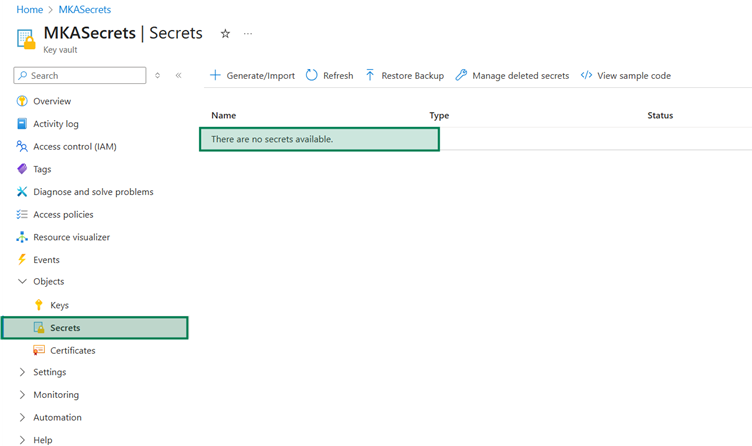
Once the new resource is deployed, you can quickly click on Secrets to see if you have the right authorization.
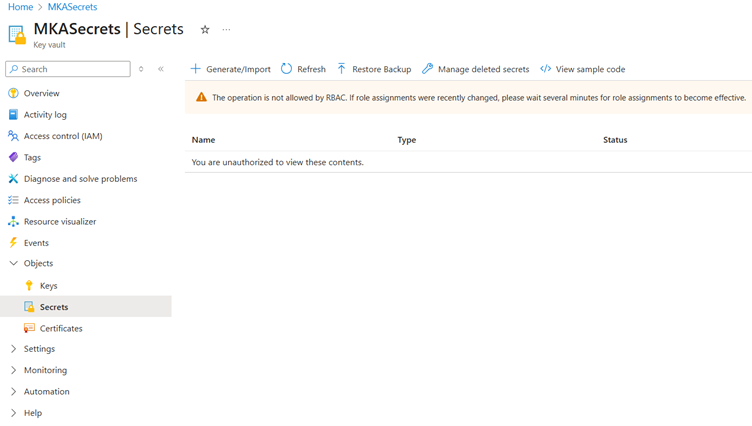
Most of the time, by default you may not have the authorization enabled.
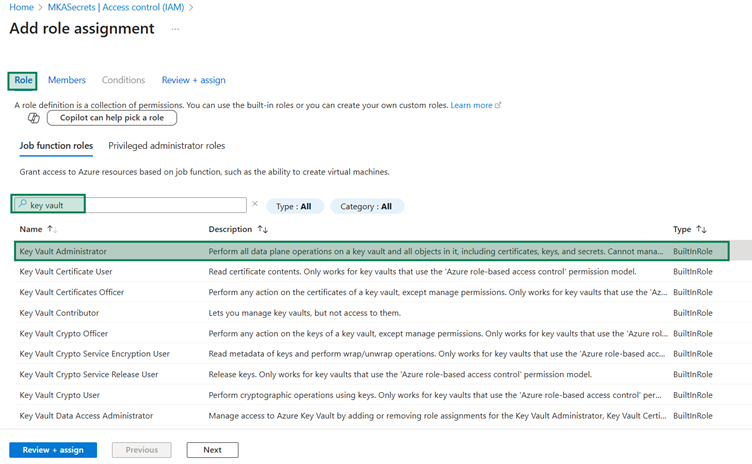
Just navigate to the Access control (IAM) and then try to add a new Role assignment.

Make sure you select your user details to be added as Key Vault administrator.
Important note: In a real-time enterprise situations, you cannot simply add roles or create resources. It may be managed by IAM Security team or other Cloud Infra team. Also the resource creation should be through IaC (Infrastructure as Code) and not directly from the Azure portal 😊
For now, let’s proceed manually.
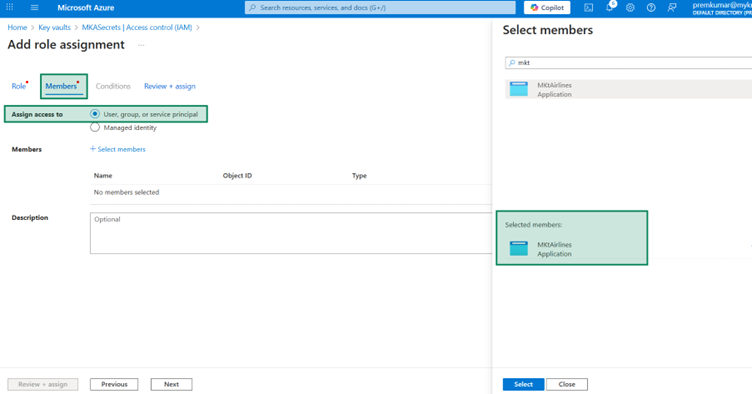
Go to Add role assignment –> Members tab -> Select members -> Add your user.

Once selected. You can come back to the first tab and add the role as well.
Key Vault Administrator.
Review + Assign and then complete it.
Now you should not see the unauthorized error 😊
Now we are ready to administer and create new secrets.
Step 1.3: Set up the right App Permissions in the Key Vault.
Repeat the same steps as step 1.2 , but this time, we will provide the permissions for the application.
And the same role as Key Vault administrators.
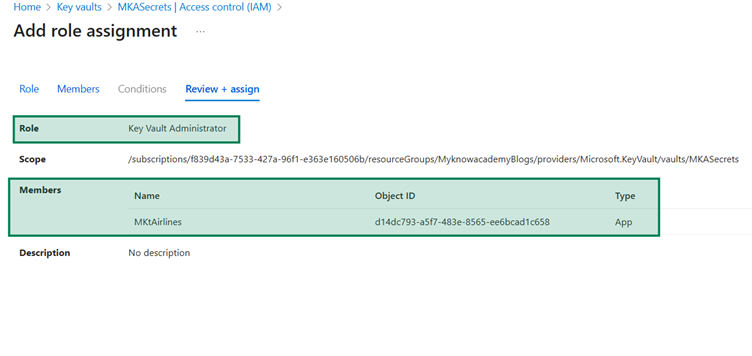
Complete the assignment.
Step 1.4: Create a new Secret.
For this tutorial, we will use only the Client Secret as the sole Key Vault secret. Let’s quickly create it.
Click Generate / Import
Here you can provide the secret name and value.
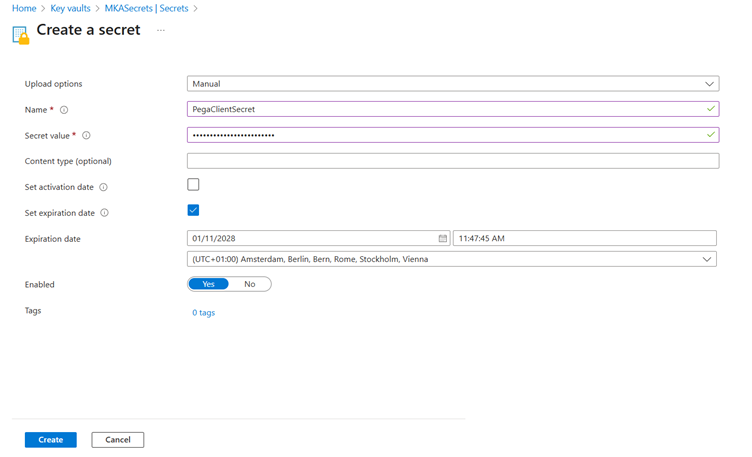
Create and complete it.
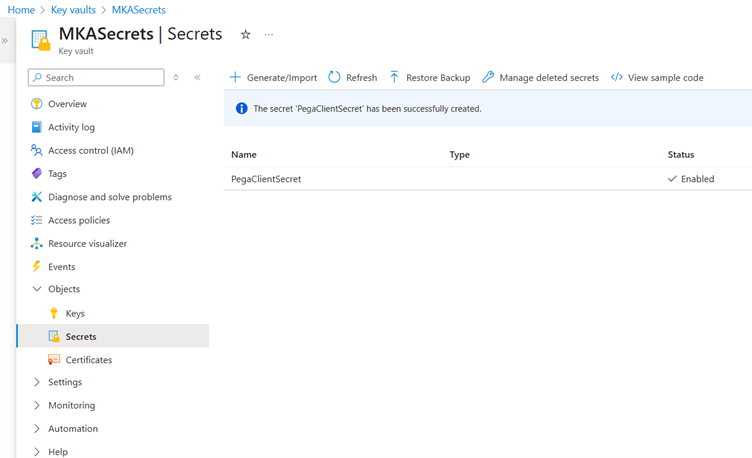
The first step is completed.
Step 2: Set up Identity Federation instance
Step 2.1: Create a new Identity Federation Instance.
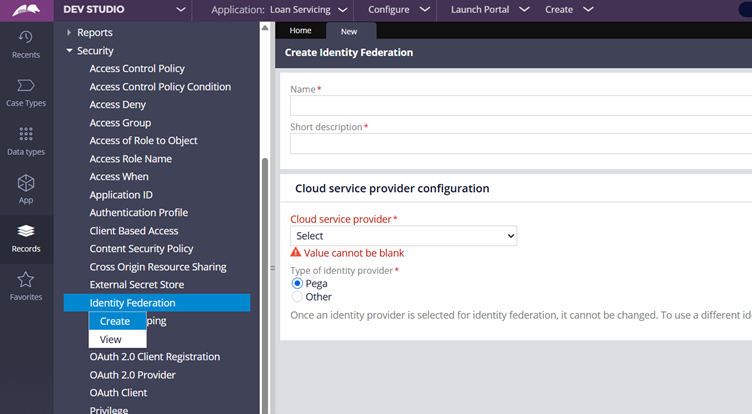
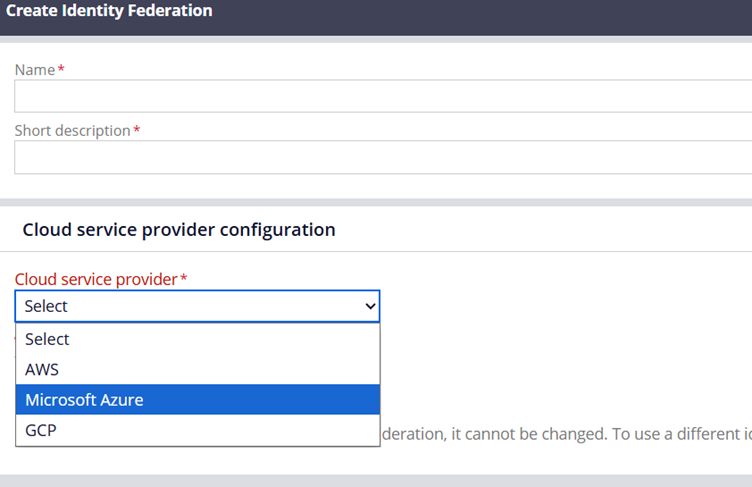
Cloud Service Provider Configuration
Cloud service provider – You can choose one of the available 3 options supported as of Infinity ’25 version.
We will use Microsoft Azure.
Type of Identity Provider – We have two options. Either Pega or Other.
When using Other, you need to use the server like Okta that supports the OIDC protocol.
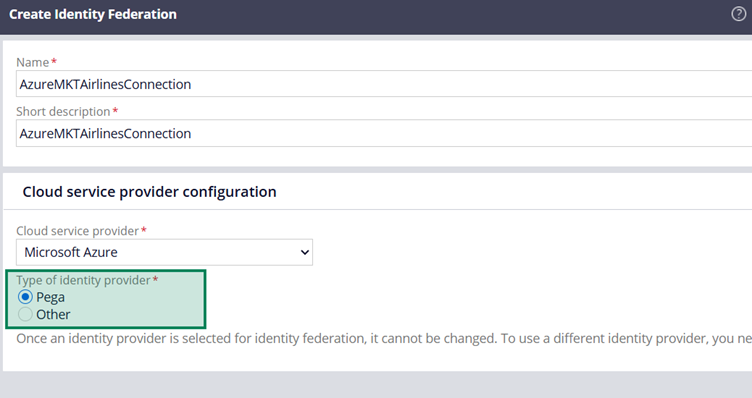
I have a remark on this label – Type of Identity Provider. Ideally this should be Identity Issuer, because in the connection flow, Microsoft Entra ID will be the Identity Provider (IdP). The label may confuse a little! We will use Pega as the option.
Click and create.
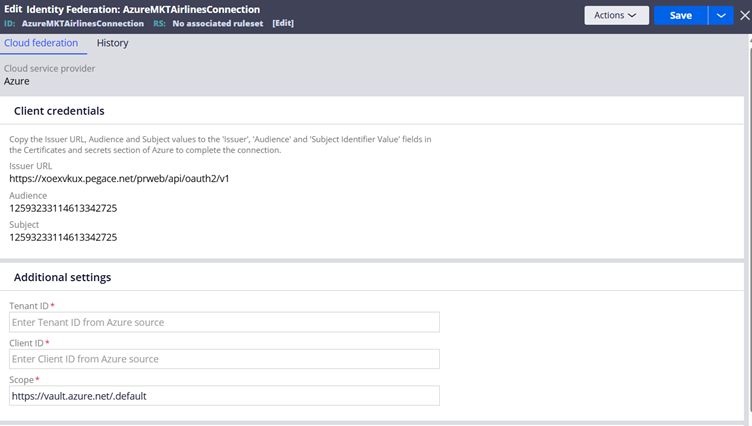
You get most of the Configurations already filled in the rule form.
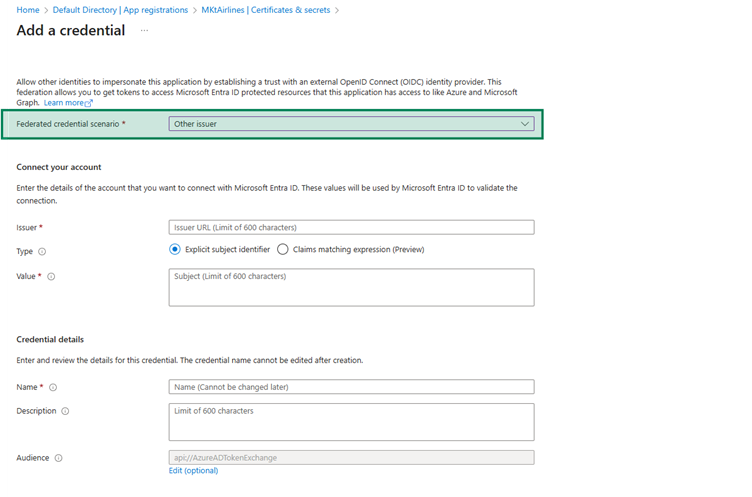
Step 2.2: Create Federated Credentials in Azure App Registrations.
Navigate to the Azure Portal -> Azure Entra ID -> MKTAirlines App Registration.
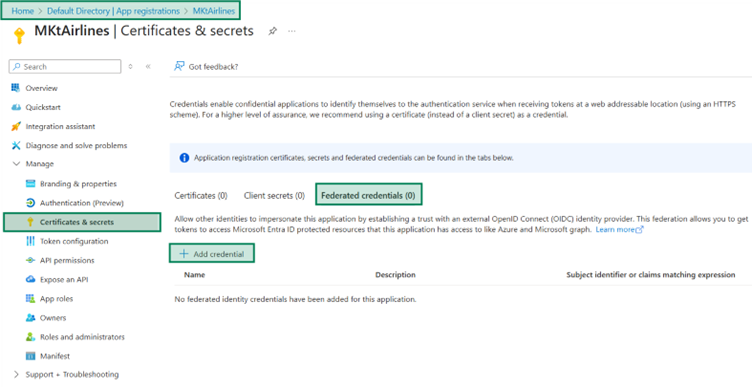
Under Certificates & Secrets, let’s start with Adding Credential
Federated Credential Scenario – Use the ‘Óther Issuer’
Step 2.3: Populate the details by copying the values from Pega Identity Federation Configuration.
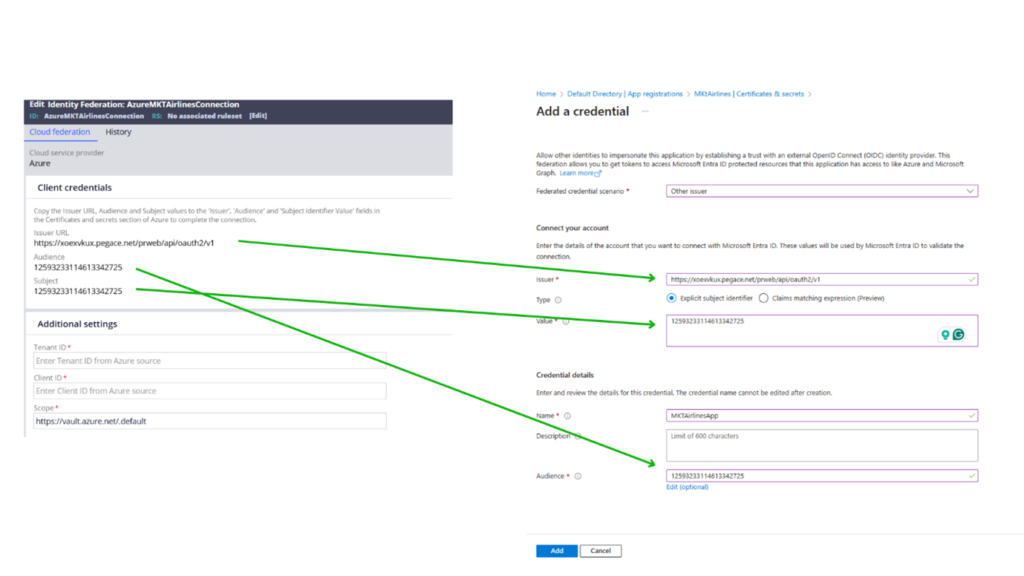
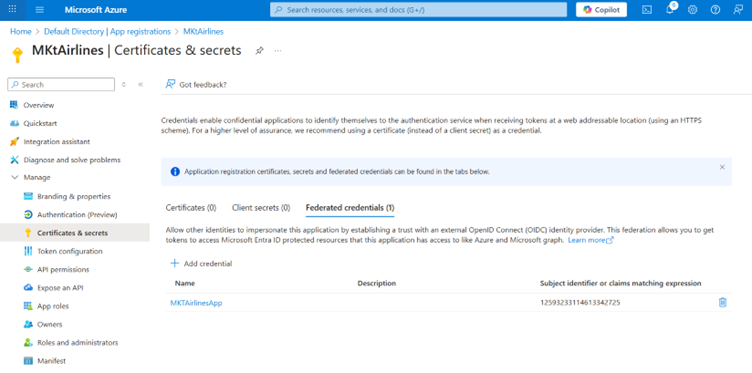
Click Add to create a new Federated Credentials.
Step 2.4: Copy the details from the other way around.
From the Azure portal Entra ID, copy the Client ID and tenant ID and fill those in the Identity Federation rule form.
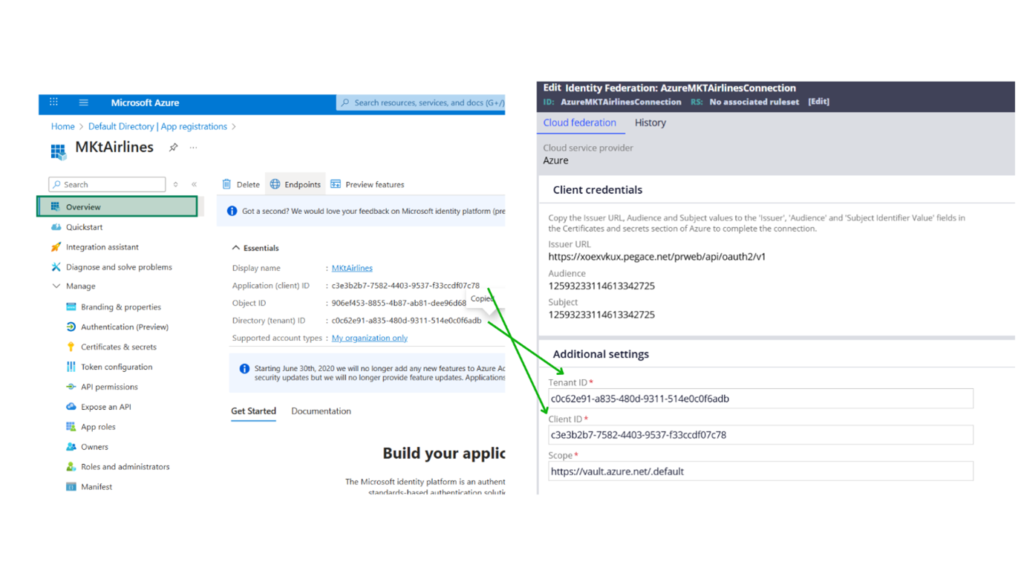
Scope – You can leave it as the default to provide all necessary permissions with the Azure Key Vault. You can also use like https://vault.azure.net/User.Read to allow only the read scope.
Step 2.5: Save and Test connect the Identity Federation instance.
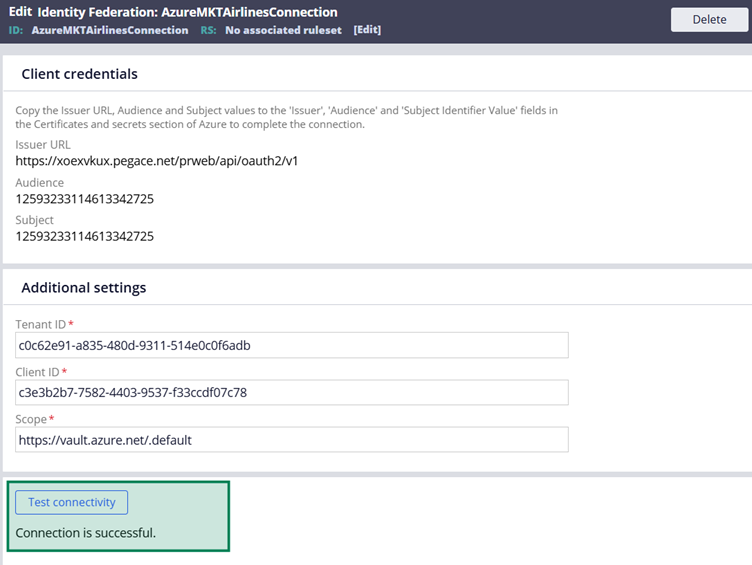
Step 3: Complete the External Secret Store Configuration.
Step 3.1: Create a new External Secret Store instance
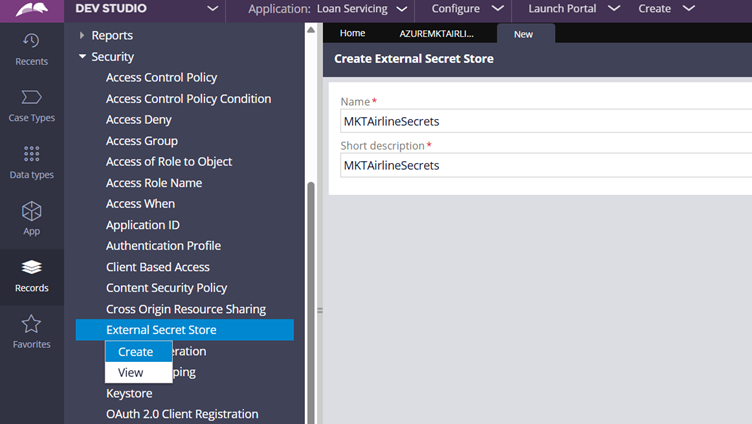
Tip: Make sure you name it in the right naming convention, so that it can hold multiple secrets and passwords in a single instance. Do not name it one on one with Each secret!
Create and Open
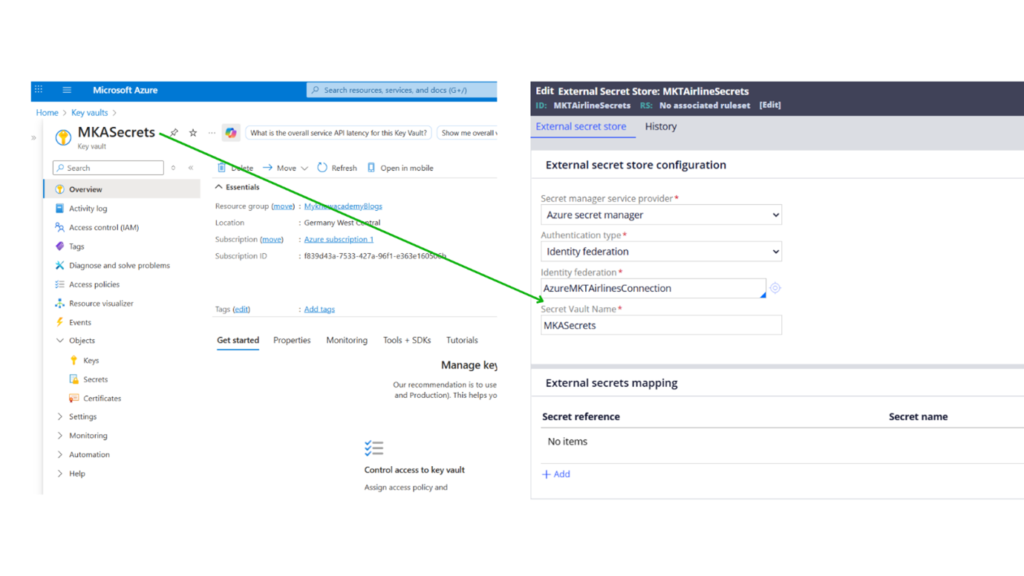
Step 3.2: Complete the External Secret Store Configurations.
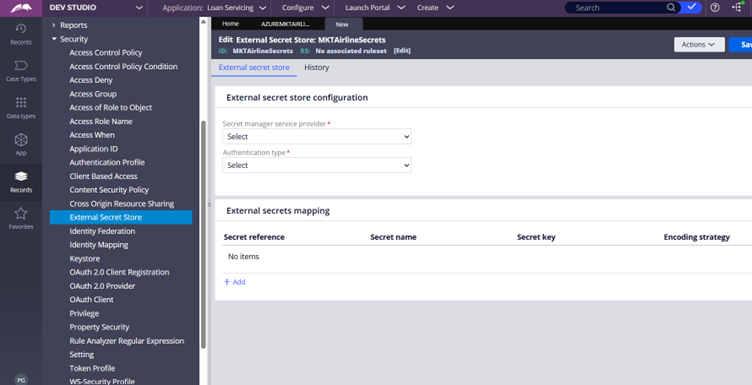
Secret Manager service provider – Azure Secret Manager
Authentication type – Identity Federation
Identity Federation – Specify the Identity Federation instance created in the previous steps.
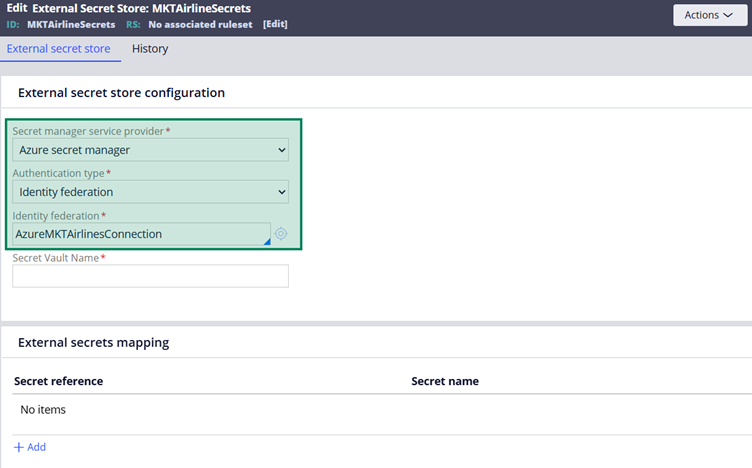
In the Secret Vault Name, specify the key vault resource name created in the Azure Key Vault.
Under the External Secrets mapping, you can map one-to-many secret mapping from Azure Key Vault to Pega Secret Reference.
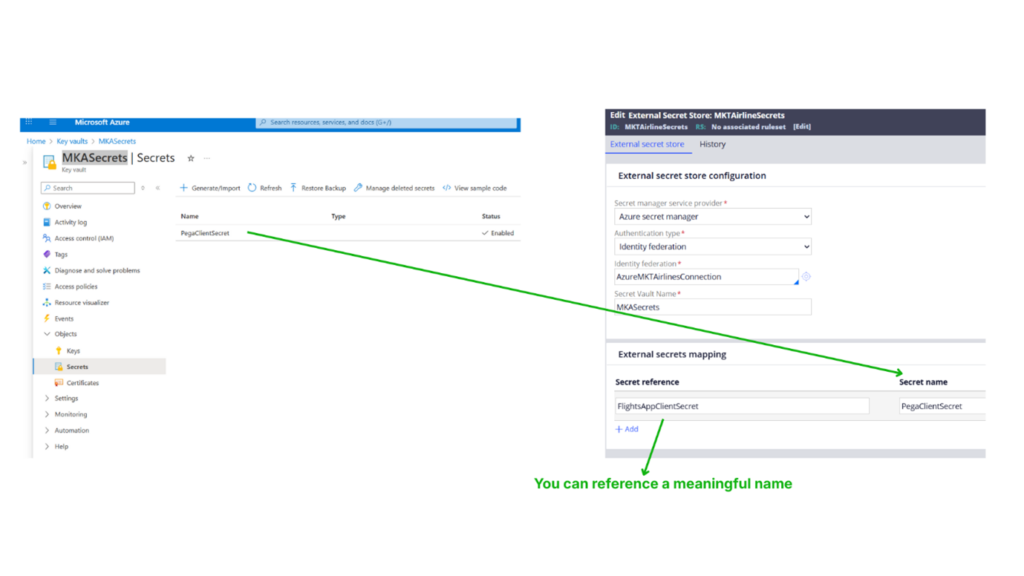
I am now referring to the Azure Key Vault stored secret in the name – FlightsAppClientSecret.
Step 3.3: Save the External Secret Store Instance
On Save, the instance should be successfully saved. If there is any error with permissions or other configuration issues, the rule may not be saved.
By this time, we have already completed all the necessary steps.
Step 4: Reference the Secrets at different places.
Before ending this article, we can quickly see how we can reference these external secrets.
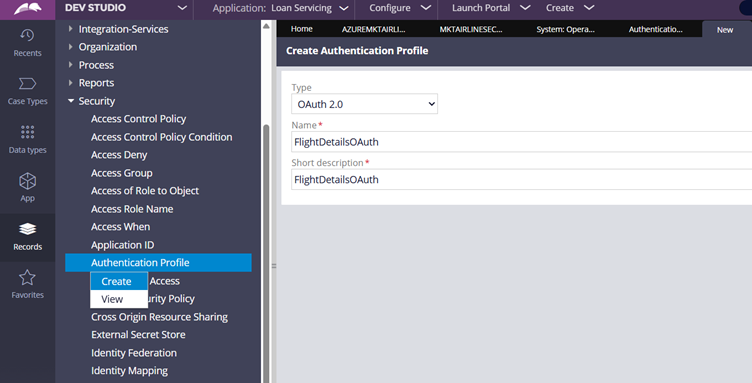
Note: As of Inifnity ’25.1.1, with Azure Key vault referencing external secrets is possible only in OAuth 2.0 Authentication Profile instance. Step 4.1: Create a new OAuth 2.0 Authentication Profile instance.
Step 4.1: Create a new OAuth 2.0 Authentication Profile instance.
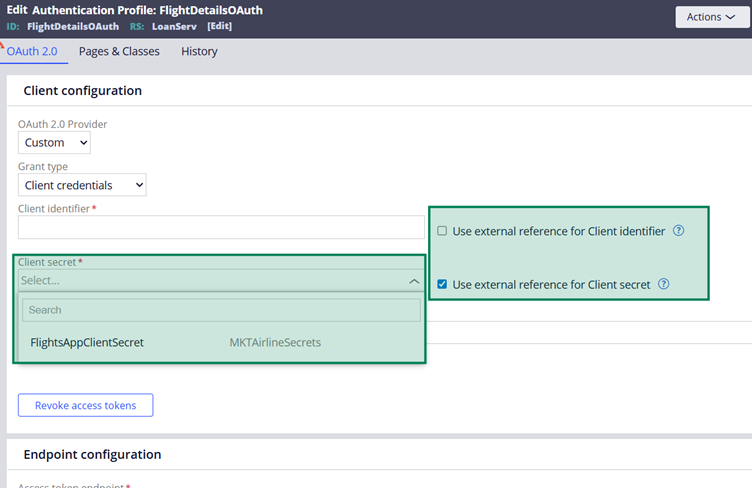
Step 4.2: In the Authentication Profile, you have low-code configurations to use an external reference for both Client ID and Client Secret.
When the option is enabled, Pega will list down all the secret references from the external secret store instances.
You can choose the right external secret.
So by this way, instead of saving the secrets and passwords in Pega rule form or inside the Pega database, we can store the secrets in secret management solutions.
Step 4.3: You can also quickly check the other rule forms, and how the external secrets can be referenced.
For example, in the OAuth 2.0 Client Registration form.
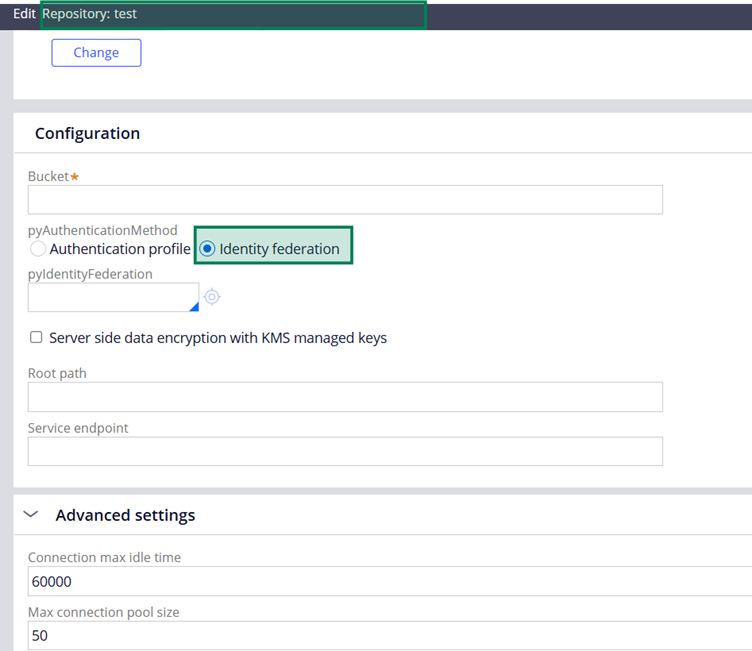
Repository rule configuration referencing the Identity Federation instance.
Let’s end this article by talking about the advantages of storing secrets in secret management solutions
- No hard-coding of secrets. We can have a centralised secret storage with fine-grained access control over the secrets.
- We can easily expire, rotate the keys in a decoupled way.
- We can have a full audit & compliance control. No more questions from Enterprise IAM or the security team.
Myknowpega Blog Articles are back, hope the style is not changed much!! Penning down this article after almost 4 years, more to come. See you in the next blog article 😊