Declare Expressions in Pega

In this blog article, we will see in detail about Pega declarative processing and one of the declarative rules – Declare expressions.
Most of the screenshots were used from Pega Infinity '24 version. Also reused a few screenshots from older versions to explain the core concepts.
First let’s start with some basic introduction about declarative processing.
Pega has an internal declarative engine, which is of course some abstracted Java engine libraries that uses DAG data structured to maintain the Declarative network.
In the below picture, you will understand about the DAG network – Directed Acyclic Graph network.

Difference between Cyclic and Acyclic Graphs
One major difference, Cyclic Graphs can have closed or cyclic loops where as Acyclic graphs have no cycles or closed loops. You can see the same in the left picture.
You can also see each node has a Direction and is always one way, because it is not cyclic.
These DAG structures can easily help with some dependent calculations
Example scenario 1 – Let’s say, you want to calculate the Age field automatically / declaratively using Date of Birth and Current Date values. It can have its DAG structure with the clear declarative network to automatically calculate.
Example scenario 2 – You see in the above picture right-side image. Calculating the line item cost using discount. I hope the picture can clearly explain the DAG structures 😊
In Pega, you have two ways of coding or writing your business logic.
Structural or procedural processing – When you can create activities, data transforms and other rules and make sure you manually invoke them at the right places.
Declarative processing – You can use a set of declarative rules, to automatically compute or fire some activity rules using the Declarative RAG network.
What are the different types of Declarative rules?
Pega platform includes six different types of declarative rules to support declarative processing.
1. Declare Expression – Mainly used to calculate the target properties, when the dependent properties change.
2. Declare Trigger – Automatically executes activities or flows when an instance is created, updated or deleted.
3. Declare Onchange – Automatically executes an action when the dependent property changes.
4. Declare Index – Automatically creates and maintains Indexes for embedded properties
5. Constraints – Automatically enforce conditions and validation when referred.
6. Data pages – Also declare pages, that can automatically load the data when referred.
These rules get executed declaratively or automatically and hence there is no need to call these rules manually. We can just configure the rules and no need to worry about where to refer the rules.
Declarative rules can be called business rules and can be delegated to business users.
In this article, we will concentrate only on Declare expressions 😊
Business Requirement: “Imagine in a form you have Date of Birth & Age field. When an user enters DOB field, we need to automatically compute Age value. This can be achieved by using a declare expression rule targeting Age property. We can use expression to find the difference in year between DOB and current date”.
What is a declare expression rule?
– Helps to compute a value based on expressions.
– Declare expression rule can get triggered automatically based on two methods – Forward chaining / backward chaining. We will discuss these methods shortly.
– Declare expression rules come under the decision category.
How to configure a Declare Expression rule?
First, we will go with a simple example of Age calculation using Data of birth.
Configuring a declare expression can be done in two places.
- Low-code configuration from Case/data designer data modelling.
- Manually creating the declare expression rule
Creating declare expression from data modelling
You can configure the field to be a calculated field (read-only), this will automatically create a declare expression rule at the back-end.

Similarly, when you configure view, you can also make the field a calculated field, which will in-turn create a new declare expression rule.

Manual creation of declare expression rules
Records -> Decision -> Declare Expression -> Create New.
Step 1: Create a new declare expression rule with the target property as “Age”.

You have an additional field called – Pagecontext.
Purpose of Page Context:
With this, you can set the context under which the declare expression can run. If the declare expression needs to fire in any top-level page or context-free (multiple contexts), then you can leave it empty.
In our scenario, we have all the customer details embedded within the CustomerDetails page property and so I can clearly define my context already as .CustomerDetails as shown in the picture
Step 2: Build the expression to calculate Age from Date of birth.
Pega provides some inbuilt functions to use.

You have different ways to calculate the Age field or any field.

Important note: The build expressions OOTB options vary, based on the data type of Target property. In our case, Age is an Integer and so you see a set of expression builder options 😊
Okay, now about the expression – Age can be simple = Current date (year) – Date of birth (year), with some rounding applied.
Let’s build an expression for it.
I choose some out-of-the-box functions to calculate the age field.

Creating function is out of scope of this article, I am keeping it short to straight away show you the function.
We can also configure conditions for the declare expression rule.

It means in a single declare expression on different conditions, you can calculate differently.
A good use case is to calculate the discount percentage based on the Total cost. If the total cost exceeds a certain limit, then we need to apply a certain discount percentage. In such requirements, we can use the IF conditions and then set the value accordingly!
In our use-case, we can say if Date Of Birth is empty, then we say Age = 0; else we use the function to calculate the age.
So by the end declare expression calculation will be like

Save the Declare expression rule.
Step 3: Now switch to user screens and check how effectively the declare expression is getting calculated.
Make sure the Age field (Declare expression target field is configured as read-only)
When you enter different values for the Date of Birth field, you should see the Age is calculated declaratively based on expression.

If you trace, then you should also see the Declare expression getting fired. Make sure in the tracer settings, declare expression is enabled.

Also make a note that it uses Forward chaining using the declarative network and also the age calculation was seamless. So for sure there are some JavaScript involved 😉
Forward chaining Vs Backward chaining
Before checking this, we need to be aware of two mechanisms involved in declare expressions:
- Forward chaining
- Backward chaining
What is forward chaining?
All the example scenarios we saw above belong to forward chaining.
Whenever input changes, target property gets calculated.
For example – Total price = Cost * Quantity, here the Input values are Cost and Quantity
for Age = Current date – Date of birth, the input value is data of birth.
Here, whenever Date of birth field value changes, Declare expression fires and Age gets calculated based on the expression in the declare expression rule.
Note: Property value updated by activity java step do not trigger forward chaining, while backward chaining works.
What is backward chaining?
It is exactly the opposite of forward chaining. The application performs calculation only when the target property is referred and then it tries to fetch and calculate from the input values. It uses goal seek pattern.
Let’s take an example of Discount calculation with a coupon code field.
When the coupon code is referred in the field as the target property and the Discount can be calculated based on the products.
I know it may be a bit confusing.. Look at the below picture

Also understand it is very rare now-a-days that we use backward chaining in the application processing.
Configuring Declare Expression rule:
There were some significant changes in the declare expression rules.
The most important change is how you configure Change Tracking.
In the older versions, you can explicitly configure the backward chaining and forward chaining using the Change Tracking tab, but in the later version, Pega automatically determines it.
First, open any of the Older OOTB declare expression rule. There you will find the change tracking tab.
Change Tracking tab changes in older Pega versions
Used to specify the tracking mechanism, additional properties it depend on and the context behavior.

Note: The below content is copy pasted from old myknowpega post to show how the configuration looked in the older versions.
Target Property data

1. Whenever inputs change – Forward chaining.
2. When used, if no value present – Backward chaining. If the target property we refer is null, then the declare expression fires to calculate the value. Once the target property is non null, then it never fires unless its value is null again.
3. When used, if property is missing – Backward chaining. If the target property we refer is not available in the clipboard, then the expression fires to calculate the value. Once the value is set in the clipboard, it never fires again.
4. Whenever used – Backward chaining. When the target property is referred, it re-computes the value again.
5. When applied by a Rule collection – Declare expression fires when it gets invoked by a collection rule.
Collection rule reference

Here the declare expression for Age property should be as “when applied by a rule collection”.
6. When invoked procedurally – Target property is computed only when invoked by collection rule. More or less it is the same as above. Maximum we don’t use 5 & 6.
Additional Dependencies

You can specify any additional properties to be tracked.
If not null changes to any property triggers the declare expression rule.
Note: This applies only for forward chaining – Whenever inputs change.
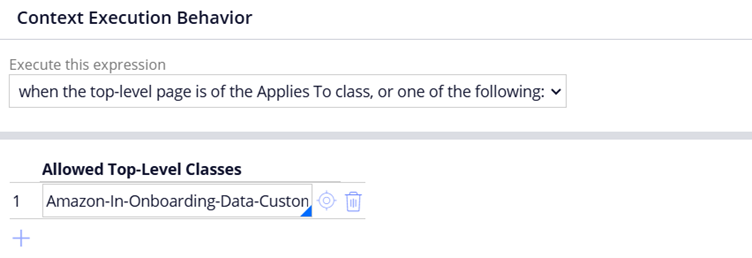
Context Execution Behaviour

a) Only when the top-level page is of the Applies To class
I will explain it with the above example. When the declare expression created applies to class as ‘Onboarding’ work class – Amazon-In-Onboarding-Work-OnboardingRequest, then declare expression fires only when we are in case workpage or case context.
This declare expression fires only when we are in case workpage.

Imagine we have the same properties quantity, discount & Total cost in a repeating grid data page which is different from the applies to class. Declare expression never fires.
b) When the top–level page is of the Applies To class or one of the following
The same as of above. But in addition to Applies to class, we can provide additional classes too. So, the declare expression fires in all those classes.

Here the declare expression fires when in Onboarding case context or in Customer data class.
c) Regardless of any page it contain
We make this declare expression context-free. It means it can fire on any page of any Applies to class.
This option can make the declare expression execute more often. Try to use it optimally.
Change Tracking tab changes in the latest Pega versions
You will find that the change tracking tab is totally missing in the new declare expression rules.

Then how does Pega know we are specifying forward chaining or backward chaining.
Most of the time, by default Pega considers the declare expression as forward chaining with input property values.
Other scenarios like when you use data page in a different context of function with empty input values, then ofcourse it will be treated as backward chaining and will fire only when the target property is referenced.
Also you always have the option of using the legacy expression calculation from the Actions button.

When you use the option, then you will get the Change tracking tab to control the declarative chaining 😊

One more important configuration to note is on Pages & Classes tab

When you use some page context, in our case we used CustomerDetails embedded page, then you can always use the Keyword pages like – Top and Parent to access the top level or case level property values from Onboarding case.
Okay, now one more important, How did this declare expression fired automatically?!!
Just like how we saw in the client-side validation blog article, Pega uses a JavaScript to do the expression calculation at the client side.

You can find this JavaScript text file rule – pzpega_ui_ExpressionEvaluator that is responsible to calculate the expressions in the browser side.
To load this Javascript in the browser, you need to do further configurations 😊
a) Configure the harness to include the expression calculation.
In my application, I use the pycreate OOTB harness. In the advanced tab, it is already enabled.

It means when the harness is loaded in the screen, the Javascript file will also be loaded in the browser.
b) But also remember to enable in the flow action rule form as well.

You already see by default these are always enabled in new flowactions or harnesses. So do not touch it and if you really need to disable it, only then do so 😊
Declarative network
You also view the declarative network in two places.
Configure -> Case Management -> Business rules -> declarative network
You will find all the declarative networks for your application.

In the property ruleform, you can find the network diagram on the target property.

Also, you see a checkbox, where you can specify any property to be calculated only procedurally and disable the declarative network calculation or target.
I will share also some content from legacy blog content on declare expressions. Please note the below content was created using Pega 7 version, with different class structure and with lower UI kit version 😊
Sample example using grid: (legacy blog post)
Requirement: We have a shopping cart repeating grid. Each row can represent a product. After each product is entered with quantity & cost, the total cost should be calculated automatically as
Total cost of each product = Quantity * Cost of each product.
Also the Subtotal for the purchase should be calculated automatically based on the total amount for each product.
Sub total = sum of each product total
How to implement this?
Step 1: Create properties.
– Create a Pagelist property ‘LineItem’ of Applies to class as Purchase request work class with context as “XYZ-Data-Customer”.
– Create individual properties Cost, Quantity, TotalCost under XYZ-Data-Customer class.

Step 2: Include a repeating grid in the section with source as ‘LineItem’ property and add the properties.
Add Subtotal property in a separate layout below the grid.

Step 3: We need to create 2 declare expressions:
- Total – for each product
- Subtotal
a) Go the TotalCost property from App explorer and create a new DE.

Set Page context as ‘LineItem()’

b) Configure the expression as Quantity * Cost

Now we need to create a DE for Subtotal property.
Follow the same step a).
c) Configure Subtotal = Sum of (LineItem().TotalCost)

Now both the declare expressions are ready.
Step 4: Test the same in user portal.
It works like a charm 🙂

How to use Property – Seek method?
This triggers the backward chining
Step 1 : Create a test activity with the below steps.

Goal property – Declare expression target property.
Missing Reference property – Will hold the missing property for computing the goal property.
Step 2: Create a declare expression with Target property data as “whenever used”.
Here we used the sample with backward chaining configuration.

We need to have both quantity and TotalCost in clipboard to compute discount.
Here, we don’t have any property in the clipboard.
Step 3: Run the activity.

Though both properties missing the cost property records the first missing property.
We can use HTML stream to throw popup for user to input the value.
Step 4: Try setting different values and analyze the result. We are at the end of this blog article 😊


