Agent & Agent Schedule in Pega
Note: Pega started recommending to use Job Schedulers and Queue processors instead of Agents from Pega 8.1 version. The reasons are – Better scalability, performance improvements and ease of use. If you are in > Pega 8.1 version, please consider the Job Schedulers and Queue Processors.
You can check on Jobs & Queue Processors using the link –
https://myknowtech.com/tag/background-processing
In this blog article, we will see in detail about Agent and Agent Schedule in Pega.
This article was created using Pega '24 version.
Most of the applications rely on processes that operate at the background without human intervention.
Imagine there is a requirement to send a status report to the reporting manager every day by 8 p.m.
You can code it like ‘providing a button and by clicking on that, we send an email containing the status report’. But if you do like this people can laugh at you.
Here comes the Internal background process to provide a solution for this type of requirement.
In Pega platform, ‘Agent’ rule serves as One of the Internal background processes. (+ Job Schedulers and Queue Processors from Pega 8.1 version)
Let’s briefly talk about different types of Agent background processing
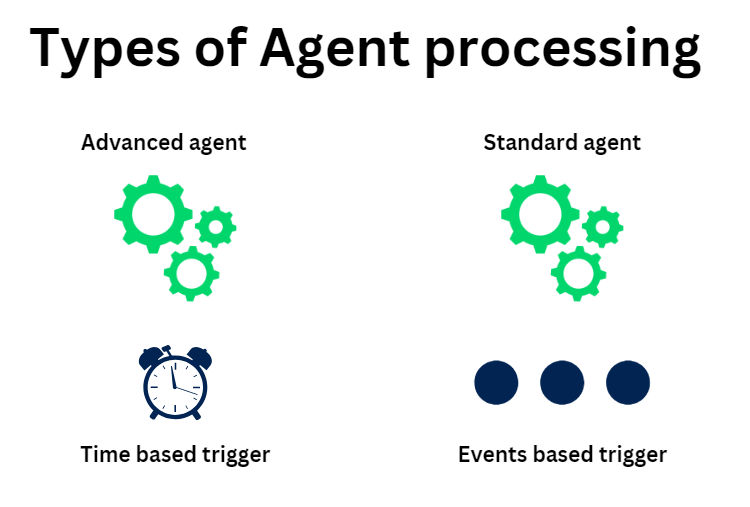
On a high level, agent processing is classified into two types based on the trigger.
a) Standard agent – Background processing based on an event trigger. Let’s consider a scenario of an aviation industry booking application. As soon as a new booking is made, the pega application needs to send out an email. Here the booking event is a trigger and that can invoke send email as the background processing activity or standard agent activity.
b) Advanced agent – Background processing based on time trigger. Just like a cronjob and the introduction scenario which we saw, where we need to send an email every day at 8.00 PM to the reporting manager. This can be achieved with the advanced agents.
We will start with some basic configurations before jumping into detail about these agent types.
I will also suggest as a mandatory to visit my previous article on requestor types where I talked in detail about batch processing and batch requestors.
https://myknowtech.com/blog/code-vault/requestor-types-in-pega
First, let’s start with Agent rule.
What is an Agent rule?
An agent rule can be a collection of internal background processes operating in the server on a periodic basis without any user/manual intervention.
Pega made a tight coupling between Agent rule and rulesets and so each ruleset can hold only one agent rule.
We will understand this in the next block when we start creating a new agent.
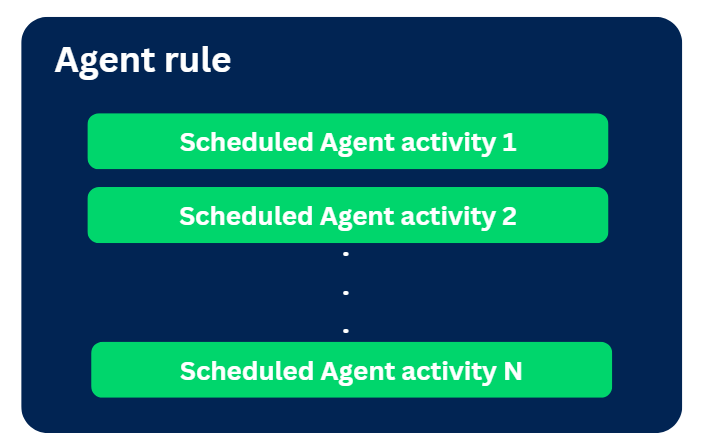
Each agent rule can contain one or more individual agent activities for different processes.
As you can see the below picture, technically one agent rule can include multiple agent activities or scheduled agents.
Agent rule comes under the SysAdmin category
How to configure an Agent rule?
Records -> SysAdmin -> Agents –> Create new
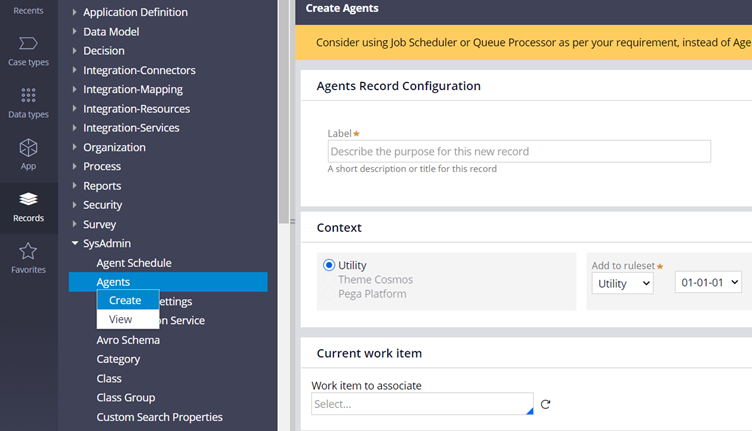
You can note two important things below
a) There is no class association with the agent rules.
b) You are asked to add only label and not the rule name/Identifier. This is because the ruleset name will apparently become the agent rule name.
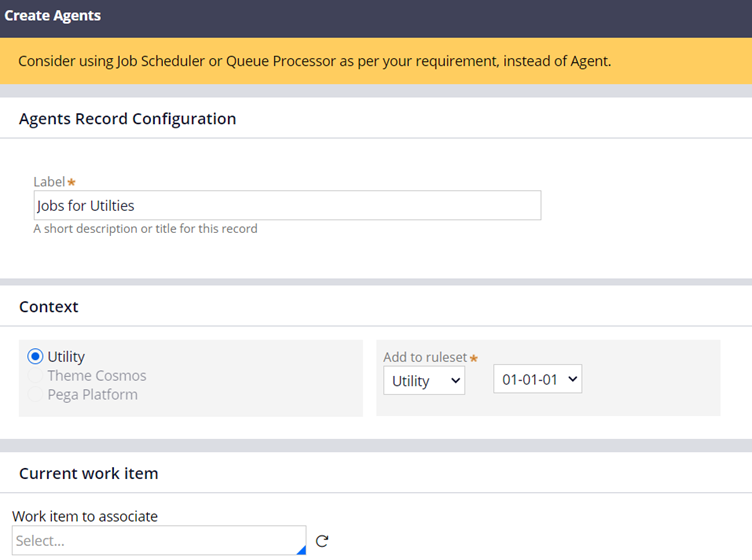
Click Create and Open
In the Agent rule form, we have three main tabs.
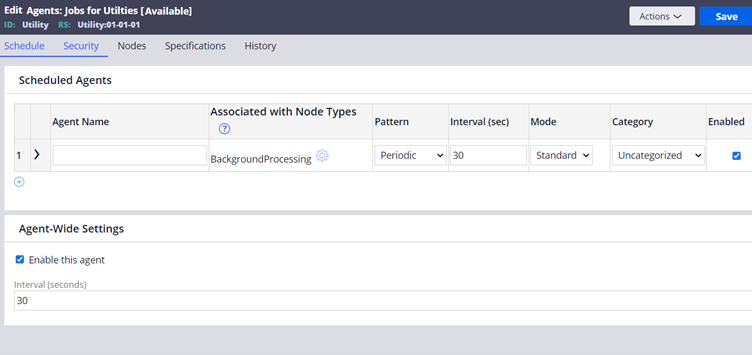
- Schedule
- Security
- Nodes
Schedule tab
Scheduled agents
In the scheduled agents, you can add ‘n’ number of Agent activities.
Agent Name – Provide the name of the agent (Appropriate description).
Associated with node types – You can associate this background processing with any specific node type. By default, Pega selected BackgroundProcessing node type which is the recommended configuration. You can always use the settings icon, to update the associated node type
Note: Never associate an agent with Web nodes where the end users login, as the background processing can potentially bring some performance issues.
Pattern – Periodic/Recurring/Startup.
a) Periodic scenario: Imagine you need to update a work item every one hour. In the interval field, you specify the seconds as 3600.
b) Recurring scenario: You need to send mail daily at 1 pm. Use Interval field advanced option, to set the time daily to 1 pm.
c) Startup: Only when the server starts ( not used often).
Mode – Standard / Advanced. This is how the agents are categorized. We will see more in detail shortly.
Category – Not a required field. Use it for recording purposes.
Enable – True/False. We can enable or disable the agent. You will also find a similar enable checkbox option as an Agent-wide settings. You can either control it globally or you can specifically enable or disable individual agent activities.
Class – Class of the Agent activity rule.
Activity Name – Agent activity name.
Params – Activity parameters.
Max Records – This shows how many records the agent should process before going to sleep. Usually applicable for standard agents.
Auto Queue Management – True/False. This is applicable only for standard agents and we will see more in detail in the standard agents section.
Agent wide settings
Enable this agent – True / False, which helps to manage all the agent activities as either enabled or disabled.
Interval – Default interval seconds. Used when if we don’t provide the Interval for Individual agent activity configurations.
Note: Pega creates Agent schedule data instances and these configurations can be updated in those agent schedule instances. More about this at the end of the lecture.
Security tab
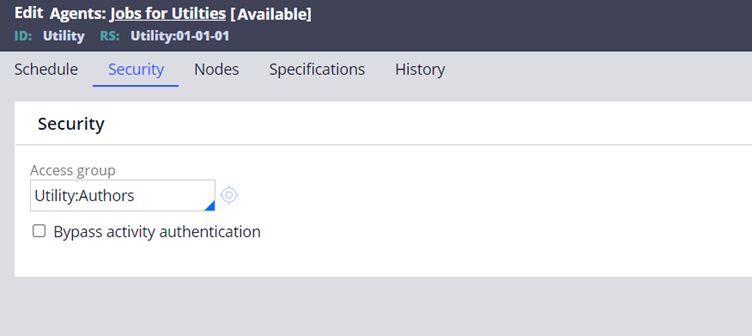
Access Group – Applicable only for Advanced agents. Used to identify the agent activity rule.
Access group -> Application -> Builds ruleset list -> Agent activity rule.
Please visit the request type article – Batch Requestor section. There you will understand clearly about the usage of this configuration.
https://myknowtech.com/blog/code-vault/requestor-types-in-pega
Bypass Authentication – True / False – Activities may be configured to use authentication (Activity security tab). You can bypass those authentication by selecting true.
Nodes Tab
This tab lists the nodes, where the agent schedules are created. We will discuss about Agent schedule later in this article.
The number of instances which you see here corresponds to number of servers/nodes the associated agent activities are associated with.
In my scenario, I am using community edition and so one cluster – one server model. So only one background processing node is running and is shown below.

How does a standard agent work?
The below picture shows a high-level overview on the Architecture behind Standard agent processing.
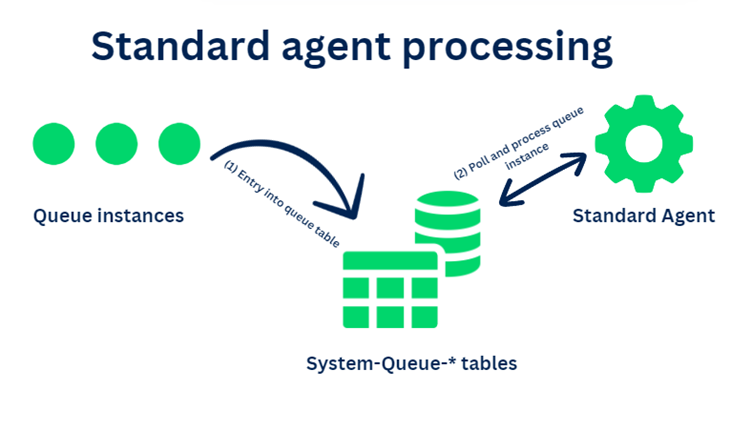
Participants involved
1. A System-Queue-* class that is pointed to a database table.
Note: You can find lot of system-queue-* default classes that are associated with OOTB System queue tables (pr_sys_queue_* tables)
2. A Standard agent configuration created on the applies-to class of the system-queue-*
3. A trigger that can create and queue the right system-queue-* instance (technically makes an entry into the System-Queue-* table)
High-level process steps
Step 1: Trigger creates an system-queue-* entry into database table (the agent table).
Step 2: Standard agent thread polls for the queue entry into the queue table
Step 3: Once queue instance is found, the standard agent uses configured activity to execute and process on the queue instance context
Step 4: Based on the process state, the queue instance will be updated as Processed, Broken-processes (error) or other statuses.
Let’s consider the below requirement
Requirement: Reminder notification on leave request approval.
The Leave request case is configured to get routed to manager queue for approval.
a) If the manager doesn’t approve the next day, a reminder email needs to be send to the manager.
b) Even after 3 days if the manager didn’t approve, then Auto-approve the request.
This requirement can be simply achieved using SLA on the assignment shape of manager queue. In the SLA you can configure Goal as 1 day with escalation activity as NotifyManager and then Deadline as 3 days with escalation as Resume flow with Approval connector.
As a developer when we configure this SLA, we don’t really mind how the OOTB SLA works at the backend to achieve our requirement. This is a Pega platform product feature right 😊
But I am going to take you to a trip and explain in detail how the background SLA process works.
The reason why I am explaining about SLA in a Agent lecture is ‘SLA architecture uses Standard agent background processing’ 😉
As I always say, When you want to learn something, always look for how Pega implemented the same in their Pega platform ‘PegaRULES’ application.
SLA processing
To know the basics of SLA, please visit my exclusive post on Service level agreement –
Trigger – Queue for Agent
Assume that we already configured the SLA rule in the approval assignment shape. Now when the Leave request case flow reaches the assignment shape, Assign-.AddAssign gets called OOTB.
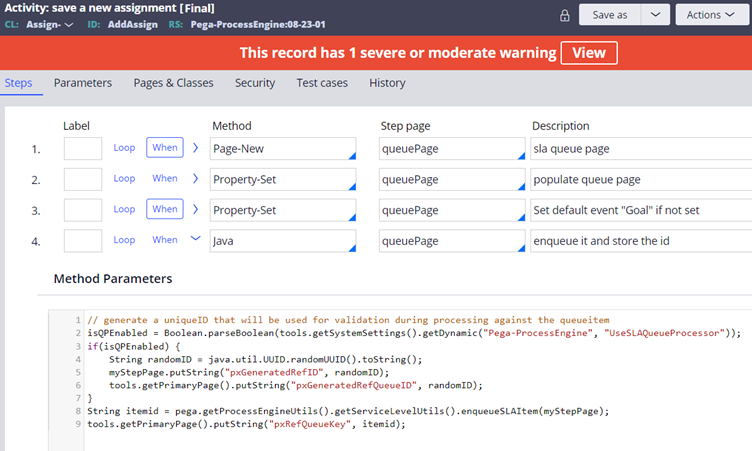
The activity on a high level creates a new QueuePage of class System-Queue-ServiceLevel and add the necessary details into the queue instances and saves the page. Technically making a queue instance commit into the pr_sys_queue_sla table as a row entry.
In the 4th step Java method, you can see SLA can be processed either using Queue Processor / standard agent using a DSS settings (although this is out of scope in our use case 😊)
In the 8th line of Java step, you can find a method enqueueSLAItem that uses Java engine code to defer save an SLA queue entry.
Note: This is not the only way to trigger or create a queue instance. The standard way is to use Queue-For-Agent method for the activity step. We will see about it very shortly.
Standard agent – ServiceLevelEvents
Agent rule/ OOTB ruleset – Pega-ProCom
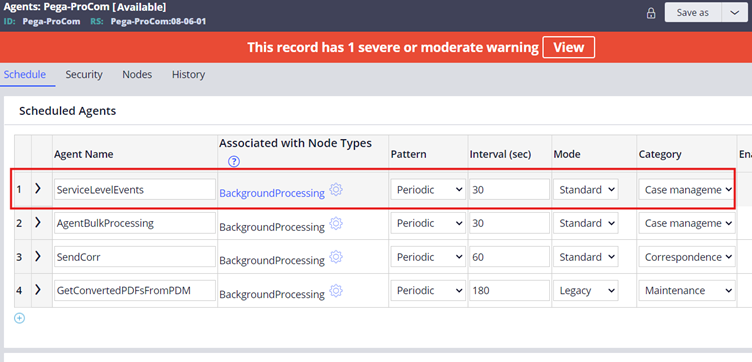
This standard agent polls for queue instance in the pr_sys_queue_sla table and then based on the MinimumDateTimeForProcessing value, it picks and process the queue instance.
Note: System-Queue-ServiceLevel.EstablishContext is responsible for Open & lock the assignment and Switching the access group. You can go through the OOTB agent activity for more details.
Standard agent OOTB takes care of lock and app context OOTB and doesn’t need Obj methods in the agent activity.
Now it’s time to look into detail about the contents of queue instance.
In the app explorer, input the class System-queue-servicelevel to find the SLA entries.
I already created an SLA queue entry for this demo purpose.

We will look into the key attributes saved within the queue instance that helps with Agent processing.
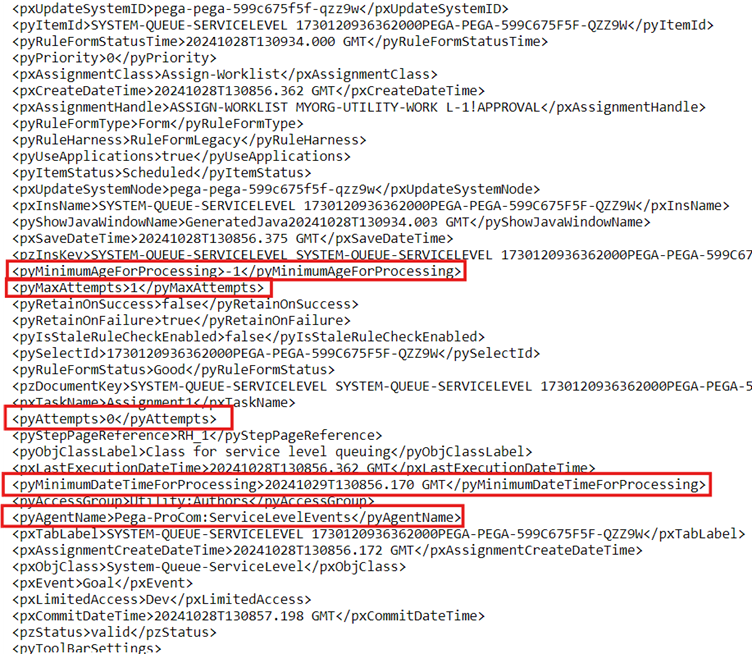
The key attributes are
1. pyAgentName – Stores the Standard agent name that needs to pick and process this instance
2. pyAttempts and pyMaxAttempts – There are always chances that the background processing can end up in error. A simple example can be lock error. In our above requirement, we saw that during deadline, the case needs to resume auto-approved, but what if the case is locked during that time. The standard agent processing may fail to update the case. In case of any transient errors, you may want to retry the processing in a certain time interval. You can always set the Maximum retry attempts limit value as pyMaxAttemps. pyAttemps show how many times the SLA agents attempted or tried.
3. pyMinimumDateTimeForProcess (DataTime), pyMinimumAgeForProcessing – DateTime attributes holds exactly at what time this queue instance needs to be picked and processed and play a key role for the standard agent picking. pyMinimumAgeforProcessing helps in setting the pyminimumdatetimeforprocessing and comes handy during retries where you can set some age in ms to delay the retry processing and also to avoid lock errors, in case you want to give some time to release the case lock before the lock can be obtained from the background processing Agent activity.
Now the question is can we control these attributes when creating queue instances?
Yes of course it is possible. Remember we briefly talked about the activity method Queue-For-Agent that helps to create a queue instance.
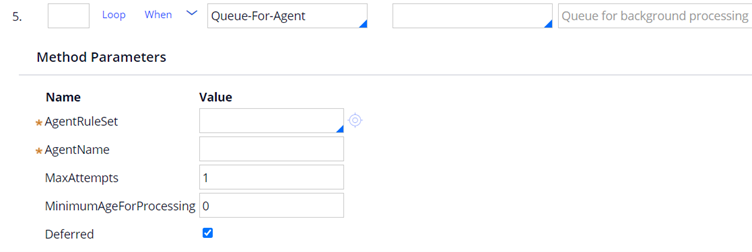
You can see that you can specify which agent to process, how many maximum retry attempt, what is the delay in ms before the queue item can be processed, also Defer the queue save, so that all commit can go in single transaction.
Note: You can also use an activity @baseclass.QueueForAgent to perform the same creating and queuing an entry to the standard agent.
What is Auto Queue Management (AQM)?
This is applicable only for standard agents.
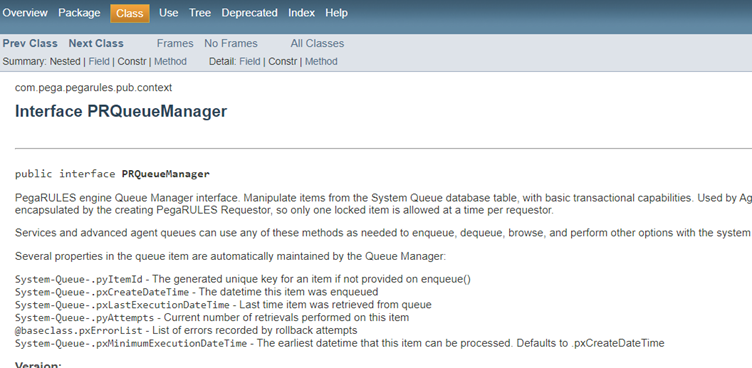
Pega engine code is responsible for managing the Standard agent processing. Pega uses an internal queue manager to take care of queueing, requeuing, retrying part.
Remember in the agent rule configuration, there is a checkbox that determines whether AQM is enabled or not?

Okay now let’s clear what is the significance of this configuration.
AQM configuration primary role is to enhance the error handling and retry capabilities.
Let’s consider a scenario, there is a queue instance created with Max attempts = 3.
How it behave when AQM is enabled and when AQM is disabled?
First let’s understand the common points. Irrespective of AQM enabled or disabled, Pega engine code will keep persisting the queue entry into the dedicated table and the standard agent will start processing the queue entry. When there is a failure attempt, the standard agent will always retry till the maximum attempt irrespective of AQM is enabled or disabled!!
Then what does this AQM matter?
When AQM is enabled, Retry may not be immediate. There can be a significant exponential delay on rescheduling the failed try. This is to prioritize tasks based on system load and queue size if the system experience high load.
But when AQM is disabled, the agent will just retry immediately on the next scheduled interval. There won’t be any intelligent or load-based adjustments to the retry mechanism.
By default, AQM will be enabled. Disable AQM only when necessary.
The main steps involved in creating a custom System-Queue-*
When you create your own system-queue-* class, make sure to directly inherit from System-Queue-DefaultEntry class, so that you can maximize
How does an Advanced agent work?
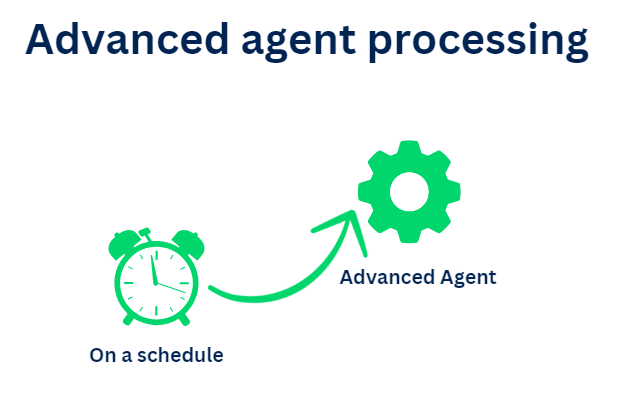
The advanced agent is like a cronjob. Based on a certain schedule (trigger) you can just execute any agent activity.
All the transaction items need to be carried out in agent activity. The transaction involves, obj-browse the items, locking the case if needed, updating the status on table or any other actions.
In simple words, you can build whatever you want in your agent activity and make it get executed in a periodic, recurring fixed interval.
What are the Key differences between a Standard agent and an advanced agent?
1. Standard agent uses the access group of the user who queues the entry, while the advanced agent uses the access group specified in Agent rule or requestor type.
2. Standard agent supports AQM, while advanced agent do not.
3. Standard agent wakes and runs only when there are queue entries with available lock, while the advanced agent runs even if there are no queue entries. This is because the advance agent is responsible for agent queue processing.
Issues you may face in advanced Agent:
Imagine the same scenario discussed at the start. You need to configure an agent to update a work item. Now you configured the agent as Advanced agent and made it available in 3 nodes. Here, Object contention occurs, since advanced agent activity should handle the locks. It is recommended to run the advanced agent in a single node.
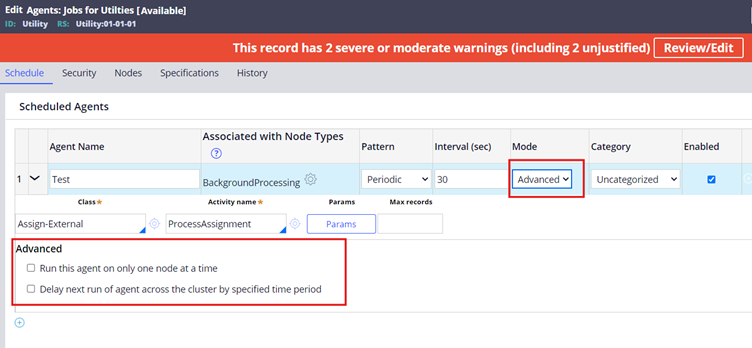
As you see in the above picture, you get those advanced configurations when you choose the Advanced mode.
You can run the agent only on one node at a time. You can also delay the next run of agent across the cluster by a specific time period, to be extra sure of object contention issues!
"Prefer using standard agent over advanced agent".
What is Agent Schedule or why is Agent Schedule?
We already know the difference between rule and data instance configuration in Pega.
Rules are always locked, whereas data instances can always be updated. Agent is a rule instance and hence it always comes under a locked version where as the agent schedule are the corresponding data instances.
For every agent rule, you may have one or more agent schedule instances. This is based on the number of associated node types.
For example – If the agent is configured to run only on background processing node type, then you will have only one agent schedule instance for the background processing. As you see in the below picture

You can click and open the Agent schedule instance.
You can also open the agent schedule instances from the Records Explorer.
Records -> SysAdmin -> Agent Schedule
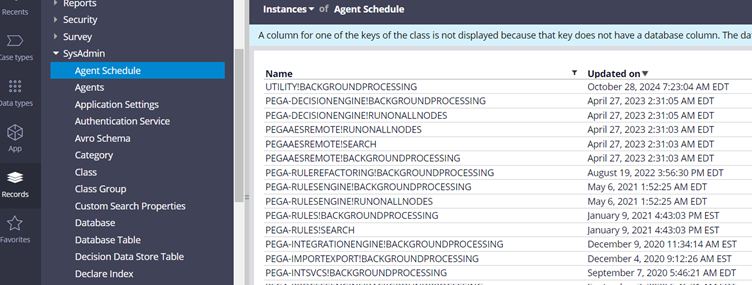
You can see the agent schedule data instance comes with very minimal configuration options.
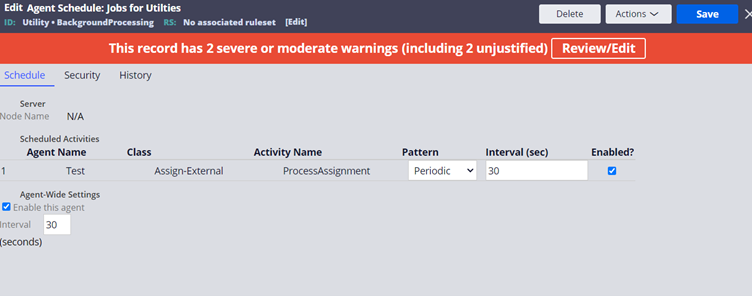
You can update three main configurations.
a) Interval – You can update the pattern and interval per agent. You can apply the default interval in seconds across agent-wide.
This can come in very handy when you want to update temporarily update production to reduce the interval to process a heavy load of agent processing in a shorter interval time.
b) Enabled – You can also either enable or disable the agents or you can enable or disable all the agents (agent-wide)
c) Security configurations – In the security tab, you can also update the access group and also enable or disable the bypass activity authentication configuration.
How to create an Agent schedule?
There is no need to create the agent schedule manually. There is an OOTB Master agent which monitors the Agent rules. If there are any new agent rules or if there is any update the Master agent generates the appropriate agent schedule instance. This is the relation between agent and agent schedule in Pega 🙂
If you want to revert all the changes, you can simply delete the agent schedule instances. The master agent will recreate the agent schedule instances based on the default configuration from the agent rule.
How to manage and debug an agent?
You can use the admin studio, to manage certain operations in the agent rule and can also trace and debug the agent rule.
Switch to admin studio -> Resources -> Agents / Agent Queues.
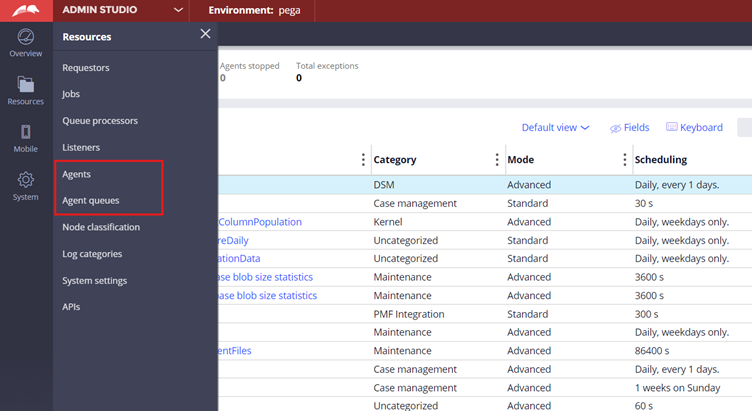
First, let’s check the Agent landing page.
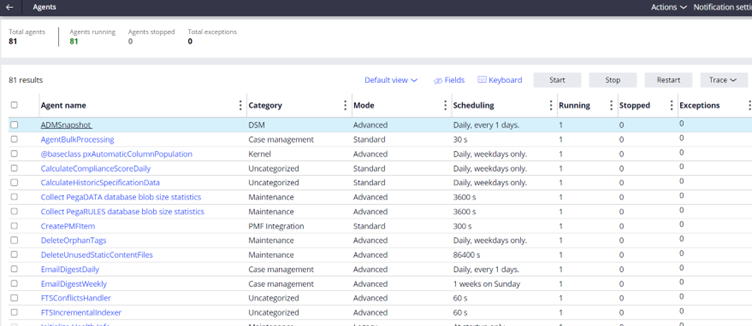
Here you can stop, start, restart or trace the agent rule. You can also find the status in the landing Page.
Agent Schedule is one of the main landing pages in the admin studio, where you can perform some error handling or retry mechanisms in the agent queues.
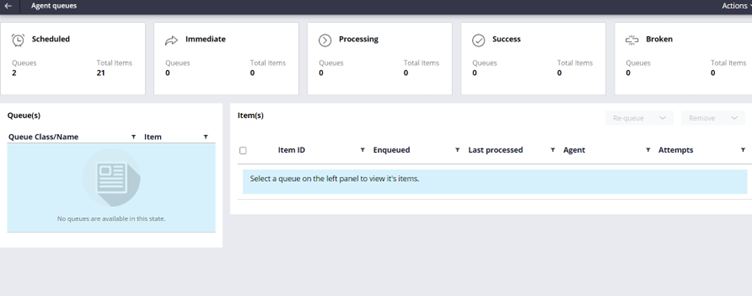
As you can see the agent queue instance normally goes across different statuses.
Scheduled, Immediate, Processing, Success and Broken.
Normally you will never find the Success status message as most of the queue instance gets deleted after successful processing. The queue instance will be retained only on failure.
Broken queue instance is the important tab for error-handling standard agents.
When there is a broken queue entry, you can simply click the instance and check the XML content. You should see the right error message to know why it went to broken process state.
You can also remove or re-queue the instance

Also sometimes, you will have the instance still in the scheduled state. For example, if you look the below picture, the time is cross, but still, the queue instance is in scheduled state.

You can just click and open the instance to find the important attributes.
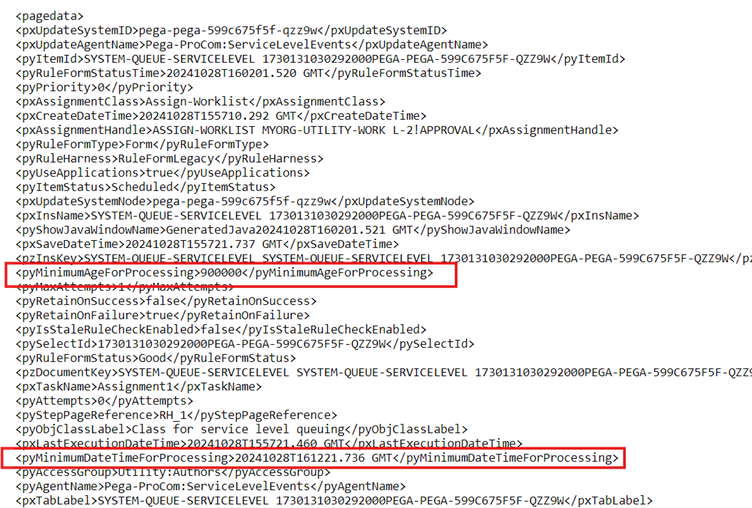
There you can see the even if the pyMinimumDateTimeForProcessing is crossed, the status is still scheduled because of the pyMinimumAgeForProcessing is for 15 minutes!
Hope you get the basics about agent and agent schedule in Pega

