

In this blog article, we will see how to create a custom notification and perform UI action using WebSocket Publish-Subscribe event processing.
It is recommended to go through the first two articles on the notification series before proceeding on this article.
https://myknowtech.com/tag/notification
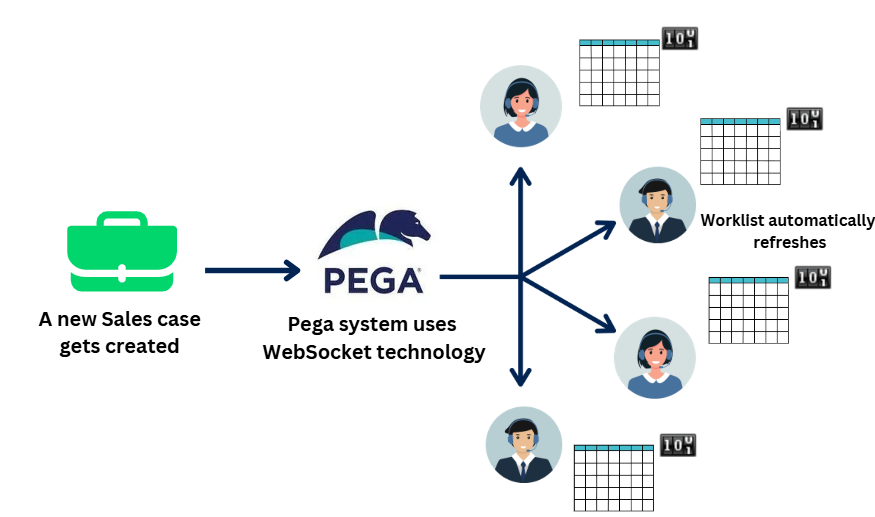
Business scenario: Whenever a work is assigned to Sales workbasket, the workbasket should automatically refresh in all the opened Sales managers portal. By automating this way, users don’t need to manually click the refresh button every time to get the updated workbasket items.
How to configure custom UI notifications in Pega?
There are four main steps
- Create a new custom User Interface Notification channel.
- Create a new Notify activity to publish notifications
- Configure the notification in the flow processing
- Configure Subscription WebSocket event listener using UI action set
1. Create a new User Interface Notification channel
Step 1: Configure -> User Interface -> Notification channels

Here you will see already existing UI notification channels.
Step 2: Create a new notification channel.

Channel name – specify a unique name.
Associated ruleset – specify application ruleset, that will help to promote this instance to higher environments
Class name – You can use the right class. I am using Work- to use it across all work layers. Use it wisely 🙂
Properties to publish – You can use a list of properties. The values set to these properties are send as event messages to the client machine. We will see it soon.
Here I am going to use an OOTB property rule – pyAssignmentOwner

2. Notify activity to publish notifications
Step 1: create a new activity type – Notify
RefreshAssignmentNotification

Step 2: Specify a parameter to the activity – OwnerName.

Tip: The idea to use the parameter is to reuse the same activity across multiple places in the application!
Step 3: Configure activity steps
Step 3.1: Add Page-New step – Notification.
Add the same page in Pages & Classes tab and define the class as Work-
Step 3.2: Add Property-set step.
Set the property pyAssignmentOwner value to the parameter OwnerName

Step 3.3: Add Publish-Notifications step
Pass the ChannelName as the channel name we created in the previous step.
Step 3.4: Add a Page-Remove step on Notifications Page. Save the activity rule. Your activity is ready now.

3. Configure notification in flow processing
As a pre-requisite, two instances are already created.
1. A new workqueue (Workbasket) – SalesWB

2. A new workstep assignment that gets routed to the workbasket – SalesWB

Let’s configure the notification in the flow processing.
Step 1: Open the process that includes the assignment shape.

Step 2: Configure notification in assignment shape
Use custom notification type.
Specify the newly created notify activity and specify the parameter value as SalesWB.

Save the flow rule.
First let’s do some manual action and check the Workbasket count.
Step 1: Open the case manager portal dashboard.

The count is 19.
Step 2: Create a new case routing to the SalesWB assignment.

Step 3: Check the work queue dashboard widget. It will not automatically refresh.
Do a manual refresh and check the count.

Okay, let’s do the final configuration to automatically refresh the workqueue widget in all the opened browser sessions.
4. Configure WebSocket Subscription event listeners
As we saw in the previous post on WebGadget channel, WebSocket technology is used for custom notification channel as well.
So, all we have to do is register an event listener to take the necessary action. Let’s do it
Step 1: Find the right UI place, where you can register your WebSocket event listeners
What is the right UI place here?
Ideally, event listeners can be registered on the load of a screen. In Pega terms, it can be on any section or layout, so that when that section or layout is loaded, event listeners get automatically registered in the browser.
Here I need to perform an action on the manager portal dashboard (refreshing the work queue widget). I am not going to register the event listener in the same layout as work queue widget, but keep it at a higher level, so that I can place all the event listeners at one place for the dashboard.
Here in this tutorial, I am going to use the section – pyUserDashboardContainer
Step 1: Include a new dynamic layout in the section pyUserDashboardContainer

Step 2: configure an action set for On Load – Subscribe and call back
In the Subscribe block – select the newly created channel name and use the Filter property.
Note: Use the filter property effectively. Filter property serves like a when condition. We can effectively make use filter conditions to customize the action for different applications/access groups or whatever 🙂 Think about it.
But for now, my only filter property is pyAssignmentOwner = SalesWB

In the Callback section, use refresh other section and target the pyWorkBasketsWidget section.
Save the section. Let’s test the changes
Step 1: Launch the manager portal from Incognito window. (It is like a new requestor session).
Step 2: Open the developer tools, check the DOM model for the newly added layout.

There you will find the data-subscription-id. Pega engine code uses this ID internally.Most of the other underlying code are hidden.
Step 3: On the networks tab, select WS filter.
Step 4: Refresh the portal to see the WebSocket network call.

Now the connection is open and tracable.
Step 5: Create a new case and check the message and initiator tab.

Switch to all networks and click the last interaction Initiator tab.

You will see a reload action happen.
Finally, you will see the count automatically refreshed.

Try opening multiple browser sessions and see the refresh happen seamlessly in all connected sessions.
Now a task for you guys.
How to automatically reduce the count when the case is processed from the work basket?
Tip: You can use the same notification activity.
So, what we did here is
a. Event is published – a new case is assigned to the workbasket SalesWB
b. Dashboard in subscriber’s portal is refreshed – Subscriber event listener is registered with the configuration and fires on incoming event. The action refreshes the work queue widget automatically in all browser sessions.
One last missing piece is pending in Notification, how to read incoming event messages from Pega?
We will see this in the next article.

