OAuth 2.0 – Part 1 – Understanding

This is the first blog article in the OAuth authentication series.
In this blog article, we will see more in detail about the basics of OAuth workflow and the different grant types supported by OAuth. This will be bit more theory article😉.
Finally, we will have some hands-on on in setting up X (formerly Twitter) developer application.
What is OAuth?
– OAuth is a specification for authorization.
– It is an open standard protocol that uses token-based authorization that grants the clients to access specific resource from a server.
– OAuth doesn’t share the password, instead uses tokens to provide the secured designated access.
You might have come across OAuth in day-to-day life. We will see an example. Open the Pinterest website.
Almost all of the websites, has this plugin in place now, to allow us to sign in with facebook or google accounts (which can always be trusted).

I am continuing with Facebook now. On clicking on continue with Facebook, you will get a popup to login one time, to identify yourself.

Make a note that, this window is from facebook asking to enter the password and not from Pinterest!!
One interesting thing to note is the URL. Copy the entire URL and paste it in the notepad.
You will see some importanant parameters like – client_ID, redirect URI, access scope – public profile, email, likes, friends, data of birth.

Client_ID – contains a unique ID for the client. Here client is the Pinterest.
So, every app that uses Facebook login, should be registered with Facebook as a client. So, the developers from Pinterest have already registered their app with Facebook and got a client ID for Pinterest. You can also see what are the Facebook resources, Pinterest can access into in the access scope field.
Now, enter your credentials. By entering your credentials, you are allowing the client application to access your resources.
Note: If you have already signed in the Facebook (specifically mobile apps), you will get an additional popup to allow the access.
What we saw before is, that we manually entered/allowed the client application to access the Facebook resource. Here at the backend, I am the one who entered the credentials and provided approval for access.
Now, you may get a question, is it always mandatory that some user should approve before accessing the resources?! The answer is No. There are other grant types that can skip this manual approval step.
We will see more in detail shortly down below.
First, let’s get started with the standard OAuth flow.

First thing to note is on the right-hand side, resource owner can be the same authorization server, which can be the same as resource server!
This is the standard picture for OAuth flow you can find it in the internet.
(1) The client requests the authorization from the resource owner. The authorization request can contain details that can identify the client (for-example, client ID)
(2) The client receives the authorization grant. There are different grant types defined in OAuth which is our next topic. Now assume like a code is generated for the grant type – Authorization code.
Note: step (1) and (2) can be skipped for specific grant types
(3) The clients send another request presenting the grant type to the authorization server.
(4) The authorization server validates the request and returns the client with the access token.
(5) Now with the token as an authentication parameter, the client sends the request to the resource server to access the protected resources ( for example, Facebook pictures)
(6) With the right authorization the resource server responds with the resources.
From the above picture, you see there are three calls going on in the OAuth protocol. This is the generic flow. As I mentioned before, there are different grant types that can skip some steps here.
What are the different grant types supported by OAuth2?
First of all, for Oauth to work, you need the access token. Without access token, no OAuth 😊
So whatever grant type you use, you will end up requesting an access token!
Currently with OAuth 2.0, there are 5 grant types available.
- Authorization code
- Implicit
- Client credentials
- Resource owner password credentials
- JWT Bearer
1. Authorization Code
Used for User Authorization
As we saw in the Facebook example at the start of the post, we saw a Facebook login screen. We know that Facebook is the resource owner and assume the Facebook login screen is provided by the Facebook authorization server. The credentials that I entered is not stored in the Client (Pinterest), but we are directly validating against the Facebook authorization server. At the back end, the server returns the code, followed by a token (in the next call) to access the resource.
It provides a security benefit that the resource owner credentials are never shared with the client.
Here the authorization server acts as an intermediator between the client and the resource owner. How?
The process flow can be of same as the standard OAuth flow diagram above.
This is mainly used when the client is an individual user.
Pega supports this Authorization code grant type.
Note: You need to perform additional steps (code, token) to access the resources.
2) Implicit –
Used for User Authorization
Pega does not support this grant type, so I will make it short 😉
This is mostly used in JavaScript browser applications. Here the authorization code step is skipped and the client is issued with an access token directly. Thus, the name is implicit. It improves responsiveness and efficiency but comes with a risk of security!
3) Client Credentials –
Used for server-to-server Authorization
This grant type is One of the often used grant types when the protected resources are under the control of the client.
Say for example, There is a waffle shop in Belgium, that need to display the number of likes for their Facebook page. Here the Facebook page belongs to the waffle shop right? Technically the resources (page likes) are under the control of the client (waffle shop). By the way, it is real and we tested it in a shop in Belgium 😉.
Here you don’t need to manually authorize your access. This is mainly used when the client is the application and not a user.
This is again a widely used OAuth grant type in Pega.
One additional piece of information is whenever you register any client with the resource, you will be provided with a client-ID and client-secret (this is not the same as login credentials). So, with these credentials, you can directly request the access token.
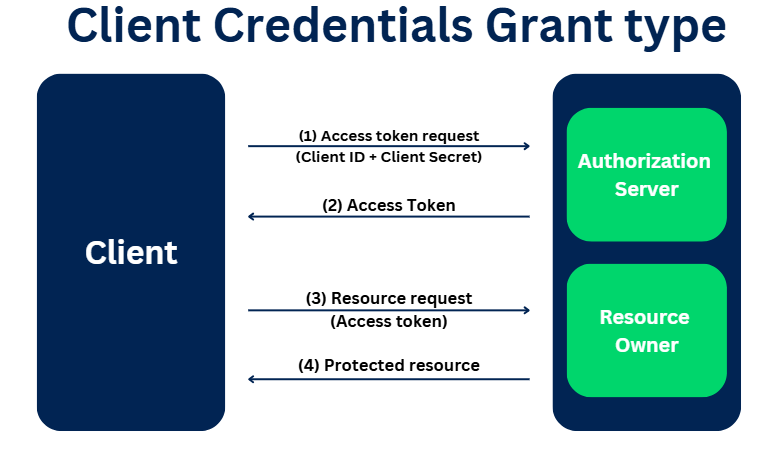
The flow for the client credentials varies a little from the standard OAuth flow.

(1) It starts with an access token request. It skips the authorization code step. The client credentials (ID and secret) is passed in the request)
(2) The authorization server validates the client ID and secret and sends the access token post successful validation
(3) & (4) With the access token, the client can access the resource.
4) Resource Owner Password Credentials –
Here the client application can use the resource owner password credentials directly to access the resources.
Used for server-to-server Authorization
I will give you an example – say there are two pega applications. So, from one pega application, I use the operator ID and password of the another pega application to access some of its resources, just like that we proxy using the operator credentials.
This should be used only when a high degree of trust is established between the client and the resource owner applications because the resource owner’s password is shared with the client
Pega supports this grant type in higher versions!

The Authorization flow is more or less the same except that in the access token, in addition to Client ID and Client Secret we also need to pass the username and password details. That is the only difference in the flow
5) JWT Bearer
The JWT Bearer Grant type enables clients to present a JWT (JSON Web Token) as a credential instead of a client secret or username/password
Used for server-to-server Authorization
Let’s check the Authorization flow of the JWT Bearer grant type

The authorization flow steps are as shown below.
(1) It starts with an access token request. The Client application should create a JWT token with the necessary claims included.
Note: Claims may be something new. You can just think of some attribute or details like Issuer, Subject and Audience
The JWT token should be signed by either Client’s Private key or shared key.
(2) The authorization server validates the JWT token. the Validation involves verifying the Claims, signature using Public key. Post successful validation, the authorization server sends the access token
(3) & (4) With the access token, the client can access the resource.
Theory over! Let’s do some practical stuff. My requirement is I need to access the Twitter timeline of any user.
The below demo was created years before using LinkedIn. You can just go through the tutorial to understand the OAuth 2.0 Concept.
I will start by registering a LinkedIn developer application.
How to register an OAuth client on LinkedIn?
Step 1: Launch the URL – https://developer.twitter.com/
And login with your credentials
Step 2: Click on the apps on the top right and then click Create an app.

Note: most probably you may not have a developer account. If then, please create a developer account first and then continue with creating a new app
Step 3: Enter the mandatory details

Do not care much, just fill out the form.
Note: You can always edit the value at a later point of time
Step 3: Click on Create App.

Step 4: Now on the new application landing page, you can see your client API key and client secret key on the keys and tokens tab.

We will use those details later! Now we have successfully set up an application. Let’s do some small smoke tests using Postman.
How to test the Twitter application setup?
You need to do a few additional steps (only for Twitter), so please go through the link once.
https://developer.twitter.com/en/docs/basics/authentication/oauth-2-0/application-only
Step 1: Get base64 encoded bearer token credentials
Step 1.1: URL encode the consumer key and consumer secret key.
Follow the link – https://www.urlencoder.org/

Mostly you will get the same value back as encoded.
Step 1.2: Concatenate the encoded consumer key and consumer secret key with a semicolon.
<url encoded consumer key>:<url encoded consumer secret key>
Step 1.3: encode the concatenated string to base64 format

You will get the result as a junk-encoded string that ends with ==
Step 2: Get the access token.
Launch Postman and provide the URL
Note: below I purposefully skipped the OAuth authorization feature available with Postman. So I need to do two API calls individually to access the resource
https://api.twitter.com/oauth2/token?grant_type=client_credentials
In the header field, provide the key value as Authorization and value as Basic <base64 encoded key>

Oh yes!! You see the access token in the response body.
Step 3: Access any protected resource using the access token.
I am going to check the Twitter timeline of King Kohli. His twitter handle is imVkohli. Make sure to pass the authorization with Bearer <Access token>
https://api.twitter.com/1.1/statuses/user_timeline.json?count=100&screen_name=imvkohli

We have successfully tested the client credentials OAuth grant type
I hope you got some basics about Oauth and its grant types, It is actually a very simple one right?!
All you need to do is follow the standard OAuth specifications already defined, that’s it 😊.
In the next blog article in this series, we will see how Pega can act as a OAuth client using client credentials and authorization code grant type.


