Case Locking Mechanism in Pega
In this blog article, we will see in detail about locking mechanism in Pega.
What is locking?
Let’s take a simple example. 2 clerks working in a bank tried to update the same bank account for two different transactions. They both retrieved the bank account at the same time and started applying the transactions. Clerk 1 applied transaction 1 details and Clerk 2 applied transaction 2 details on their saved copy. This may result in data loss. Since Clerk 2 entered the details in his saved copy, it overrides the transaction details entered by Clerk 1 as if transaction 1 never happened.

This data loss can be prevented by introducing Locking mechanism.
So when Clerk 1 needs to update the bank account, he can acquire lock on the case and starts updating the transaction details. Clerk 2 cannot work on the case, when it is locked by someone else. He has to wait until the lock is released by Clerk 1.
Releasing lock – Once clerk 1 completes updating the transaction details, he can release the lock. This will enable other users to work on the case.
Locking mechanism is not only specific to Pega. You can see many software support locking mechanism.
Note: Databases support different levels of locking. Locking can be on a database tables or table columns or table rows.
Now let’s come to our Pega. We know all the case details can be persisted to database tables.
Say, you have a sales case and you open the case and update the customer name. When you save the case, the customer name value gets persisted to database.

Here internally we acquired the database table (work table) row locking on the case and updated the customer details value.

Only database locking is enough to work in Pega?!….. No.
– We know how a Pega application saves the data. Data can be saved in memory ( clipboard) and can be persisted in the database at later point of time. So you need some additional locking mechanism.
– Locking mechanism in Pega is different from database locking mechanism.
We will deep dive.
How to implement Locking mechanism in Pega?
Configure locking in the class instance or class group
Some basics – Only concrete classes can have instances. Sales case belongs to a concrete class.
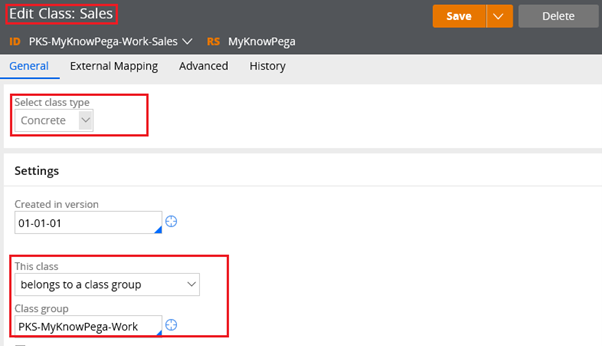
Classes can belong to a class group. We will see about classes and class groups in a separate blog article.
a) When a class belongs to a class group / is a class group – Configure locking in the class group rule instance.
b) When a class does not belong to a class group – Configure locking in the class rule instance. You get a new locking tab in the class instance :).

So what is there in the locking tab?

Lock definition – you can specify array of properties that can be used to form a lock key.
Why do we need a lock key?
This is similar to keys in a class instance. It helps in identifying unique class instance to lock.
It means say you got 2 sales cases – S-1 & S-2. Both cannot have same lock key. If they have same lock key, we may end up locking both the cases when we update a single case.
Note: In some complex requirement, two or more cases are related and cannot be updated parallel. In such cases, you can add your own complex lock properties.
If you leave blank, then the lock keys will be the same as class keys.
For work classes – we have ‘pyID’ as the default key. You can use the same as lock key to distinguish different cases.
Note: default the locking array will be blank.

pxLockHandle – property holds the lock key for this case instance.
pxLockHandle – pxObjClass + Lock key array ( if null , class key)
Locking
Allow locking – Mostly we select this option. If selected, user can save/delete the instance only when he holds a lock on the instance.
Note: when a class does not belong to a class group, you can configure the same in locking tab in the class instance rule.
What are the ways you can acquire lock in Pega?
Pega a new case is created/updated, Pega by default uses OOTB activities, functions to acquire lock and release lock on the case. You don’t need to really worry about the locking for a case.
But there may be situations where you may need to explicitly acquire lock on the case like Updating case using background jobs. In such situation you can use the below options to acquire the locks.
a) Using activity methods
Obj-Open, Obj-Open-By-Handle & Obj-Refresh and Lock

b) Use standard OOTB activities
Work-.WorkLock , Work-.AcquireWorkObject, Assign-.AcquireWorkObject used in requesting a lock on a work item
Note: Whenever you try to perform any action on a assignment, Pega tries to obtain the lock using standard activities.
What really happens when you acquire a lock?
Step 1: Create a test activity and use Obj-Open method.

Step 2: Trace open the rule. Check DB query.

Step 3: Run the activity. You will see an insert query on pr_sys_locks table.

Click on the SQL updates, you will get the query.

Let’s check the database table pr_sys_locks

You can see a corresponding entry in the database table.
So, whenever you obtain a lock, you can see an entry in the pr_sys_locks table.
You can also see all locks by clicking on the class on the left panel.

Note: for specific case related locks you can navigate Configure -> Case management -> tools -> Work admin -> All locks / My locks and check the locks.

Open the ‘System-Locks’ class rule form.

You can see pxLockHandle as the keys. It means System-Locks cannot have more than one instance with the same lock handle.
So when the other user (different requestor) tries to obtain a lock on the same case, insert query fails and throws error.
Also lock is exclusive to one Pega thread. When the same requestor tries to same object through different pega thread, then you will be presented with the release lock button.

What are the ways you can release lock in Pega?
a) Use activity methods
Normally locks are released, when you commit the changes to database. This can be controlled using activity methods
In the Obj-Open, Obj-Open-By-Handle methods, you can check ‘ReleaseOnCommit’ option to release the lock when the instance is committed.
Note: Always enable this option, when you open the case. In some rare situation, we uncheck this option.
Page-Unlock method can be used to release a lock on an object.
b) When the requestor logs out / system restart
Whenever the requestor logs out or the system restarts ( obviously it wipes out all requestors) locks are released.
c) Use standard OOTB activity
ReleaseLock to unlock a work item
d) Locks return to ‘Soft lock’ state, when the lock expires
This is controlled by locking timeout
What is locking timeout?
If the lock is not released – may be user didn’t log off/close the browser directly, and then the lock stays with the requestor ID.
So other users cannot work on the case. In order to avoid this, Pega provides a locking timeout.
After this locking timeout, the acquired lock will be treated as expired lock or soft lock.
How to configure locking timeout in Pega?
a) System-wide locking timeout
System Locking timeout can be configured in system data instance.
Navigate to Records -> SysAdmin -> System and open your current system name.

The lock timeout is default 30 minutes.
If the lock is not released after 30 minutes, then it goes to soft lock.
b) Case-wide locking timeout
You can have specific locking timeout for individual cases.
Case designer -> Settings -> locking

I updated the locking timeout to 5 minutes. Let’s test it.
Step 1: Create a new case and acquire the lock.
Step 2: Check the pr_sys_locks table.

pxExpireDateTime – holds the locking expiring time. You can see the time is set to only +5 minutes.
Let’s wait for some time and try to acquire the lock for S-2 from different user.

I acquired the lock and able to update the case. No locking error. Check in the database table.

What are the types of locking?
a) Default locking
Only one operator can work on a case at the same time. The other operator can work on the case only when the first operator completes updating the case.
b) Optimistic locking
This was introduced from Pega 7. Two or more operators can open and work on the case at the same time.
Say Operator 1 & operator 2 opened the case and started updating it. When Operator 1 commits the case, then Operator 2 gets a pop-up to refresh. On refresh, the data is retrieved fresh with operator 1 changes 🙂
We will test how optimistic locking works.
Step 1: Configure optimistic locking in Sales case.

Update: In the latest Pega version, you will find like the below configuration.

Step 2: login using operator 1 – Create a new case S-3. Login using operator 2 and open the same assignment. It means both operators are working on the case at the same time.

Step 3: Operator 1 submits the case first. When operator 2 submits he will get a conflict message with refresh button.

You can explore the activity ‘pzShowConflicts’ which is responsible to support optimistic locking functionality.

Locking strategy for sub cases
Locking strategy for a sub case is inherited from parent case ( default or optimistic)
You also have an option to control locking on the parent case when the child case is opened.

a) When it is checked – Parent case is not locked. Parent and child cases can be worked individually.
b) When it is not checked – Parent case is locked when you work on child case.
You can explore Work-.DetermineLockString activity which determines the pxLockhandle.
For Parent case – pxLockHandle – pzInsKey
For Child case – pxLockHandle – pxCoverInsKey.
So when you lock the child case, then both the parent case is locked
Parent case pxLockHandle = Child case pxLockHandle
Hope I covered all the basics about locking mechanism in Pega !!


