Validation rules in Pega

In this article, we explore the various validation rules in Pega and how they safeguard application data integrity.
Note: This technical guide is based on the Pega ’24 platform version.
Reliable data is the backbone of any application. Validation rules are essential for ensuring data quality and serve as a critical security layer for your system.
Imagine a standard employment portal: when completing a job application, you encounter various fields with specific requirements. For instance, an email field will flag an error—“Enter a valid email”—if the “@” symbol or domain suffix is missing. These real-time checks are powered by validation logic.
Similarly, Pega applications utilize diverse forms to capture user input. As developers, we must ensure this data is accurate and compliant before processing. Beyond user interfaces, validation is equally necessary when handling data from external systems or executing background tasks.
Core Types of Validation
- Server-Side Validation: Implemented via Java code, this requires a round trip to the server to verify data integrity.
- Client-Side Validation: Implemented via JavaScript, this occurs directly within the browser, providing instant feedback to the user.
Primary Validation Rules in Pega
Pega provides a robust toolkit for developers to maintain data quality:
- Validate Rule
- Edit Validate Rule
- Edit Input Rule (Data formatting)
- Constraints Rule
- Property Definition and Control Validation
- Custom JavaScript Validation
1. What is a Validate rule?
The Validate Rule is the most frequently utilized tool in a Pega developer’s kit. You can access the full list by navigating to Records > Process > Validate.
When designing a validation rule, prioritize these three elements:
- The property/field that needs validation
- The condition or logic used for validation (for example, not empty, valid phone number format, and so on)
- The error message to display when the validation fails
Enjoying this content?
Access the author’s full video courses here at MyKnowAcademy.
Explore Courses →
When you open any Validate rule, you will notice these three elements reflected in its configuration.
A few key points about Validate rules:
- When invoked, if a field fails validation, the rule adds an error message and prevents successful submission of the form (or blocks processing when used in backend validation).
- A single Validate rule can validate one or multiple properties.
- Validate rules are commonly referenced from Flow Actions and Activity rules.
How to create a new Validate rule?
You can create a Validate rule from Dev Studio or using low-code configuration in App Studio.
In Dev Studio, create one from: Records → Process → Validate → Create.
To configure validations in a low-code way, open Case Designer, select an assignment step, click Configure view, and use the Validation tab to define conditions.

Add a validation condition on the FirstName field and define the error message.

In this example, if First name is empty, the message “First name cannot be empty” is displayed. Click Submit and save the case type. Pega automatically creates the Validate rule in the background, which you can confirm from the Records Explorer.

Open the newly created Validate rule (for example, Create) to see the Dev Studio configuration and additional options.

What are the key configuration areas in a Validate rule?
There are two key tabs:
- Validate
- Input
Validate tab
Here, you can add validations for multiple properties. For each property, define one or more conditions and specify the message to display when the condition is met (based on your configuration).

You can validate single-value properties directly, and you can also reference page or page list properties. Use the Edit option to update conditions and messages.

This opens a pop-up to configure conditions, mark a field as required, enable/disable conditions, and add multiple conditions using AND/OR logic.


Pega also provides additional validation functions through the Select a function option.

When validations are configured through Case Designer, Pega may create supporting rules such as a When rule and a message rule.

You can also validate page list properties. For example, using the OOTB property pxStatusList:

When you add a page list property, Pega prompts you to reference another Validate rule based on the page list class context.

You can also call another Validate rule as an additional validation, either through the pop-up or directly from the Validate tab.

Input tab
The Input tab provides five input types, and the Validate tab layout changes based on the selected option.

1. None – Default selection.
2. Input property – Use this when validation logic depends on a specific property value.
Example: Configure different validations for Male and Female by setting the input property as Gender (a single-value local list property).

In the Validate tab, add separate blocks for different input values (for example, Gender = Male) using the + option.

3. Proposed work status
Apply different validations based on case status (for example, when status is Open).

4. Flow action name – Define different validations per flow action (commonly used in screen flows).
5. Stages – Define different validations per stage.
Where do we reference a Validate rule?
1. Flow Action (Validation tab) – Flow actions use Validate rules to validate fields before submission. When configured through Case Designer, Pega automatically references the correct rule in the corresponding flow action.

2. Activity using Obj-Validate – Commonly used when validating during case creation through background processing or services.

Quick test
Create a new case, leave First name empty, and submit the Create flow action. You should see the configured validation error.

This confirms that the Validate rule is working as expected.
2) What is an Edit Validate rule?
You can view Edit Validate rules from Records → Data Model → Edit Validate.

Edit Validate rules are written in Java and return true or false.

For valid input, the rule returns true. For invalid input, it returns false and provides an error message. While you can create custom Edit Validate rules, it is recommended to first check whether an OOTB rule already meets your need (and also use it as a reference for syntax).
When you define an email address field, Pega can automatically associate an OOTB Edit Validate rule.

Where do we reference an Edit Validate rule?
- Property rule (Advanced tab)
- Activity using Property-Validate, where you specify the property and provide the Edit Validate rule in the ValidateAs field.

- Validate rule, using the option to run Edit Validate conditions.

Quick test
Create a case and enter an invalid email address. When you tab out, the validation message appears.

In this example, the Edit Validate rule behaves like client-side validation.
Important note: Assigning an Edit Validate rule at the property level enforces validation everywhere the property is saved—UI, background processing, and activities.
3) What is an Edit Input rule?
You can view Edit Input rules from Records → Data Model → Edit Input.
An Edit Input rule is primarily a conversion rule (not a validation rule) and cannot be included inside validation rules. It helps convert data from one format to another and can indirectly support data quality. Like Edit Validate, it is written in Java, and in most cases you should rely on OOTB rules instead of creating custom ones.
Example: To always store input in uppercase, use an Edit Input rule that converts the value to uppercase.

Where do we reference an Edit Input rule?
Property rule (Advanced tab) can reference an Edit Input rule. Add it to the First name property, create a case, enter a value, and verify in the clipboard that it is stored in uppercase.

Differences between Edit Validate and Edit Input rules
a) Edit Input is a conversion rule type, whereas Edit Validate is a validation rule type.
b) Edit Input formats the data even if the original input is invalid.
c) If both are configured on a property, Edit Input runs first, followed by Edit Validate.
4) What is a Constraints rule?
You can view Constraints rules from Records → Decisions → Constraints.

Constraints is a declarative validation rule that uses forward chaining. This means the validation triggers whenever the property value is referenced or updated.
To create a new rule: Records → Decisions → Constraints → Create.
A Constraints rule has one main tab: Constraints.
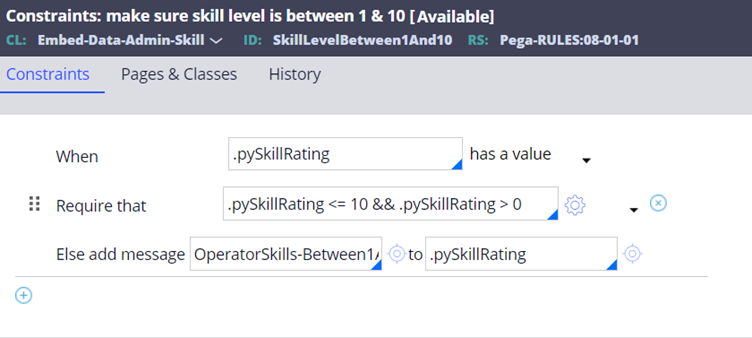
- When – A condition that must evaluate to true before the constraint is applied (useful for conditional validations).
- Require that – The validation function (select functions using the settings icon).
- Else add message – The message added when the “Require that” condition fails.
In the example shown, when pySkillRating has a value, it must be between 1 and 10. Otherwise, the configured message is added.
Because Constraints is declarative, there is no need to explicitly call the rule. The engine applies it wherever the property is referenced. To test it, use pySkillRating in a form, enter a value such as 100, and submit to see the validation message. Ensure Enable expression calculation is enabled in the flow action or harness form, as this feature is supported through AJAX.
These four are the validation rules available in Pega, but there are other ways through which you can also apply Validation for fields in a Pega application.
These four are the primary validation-related rule types covered in this article. However, you can also enforce validations through:
- Property definition and Control
- Custom JavaScript validation
We will cover these in the next blog article on server-side vs client-side validation.